DMR HD3
15
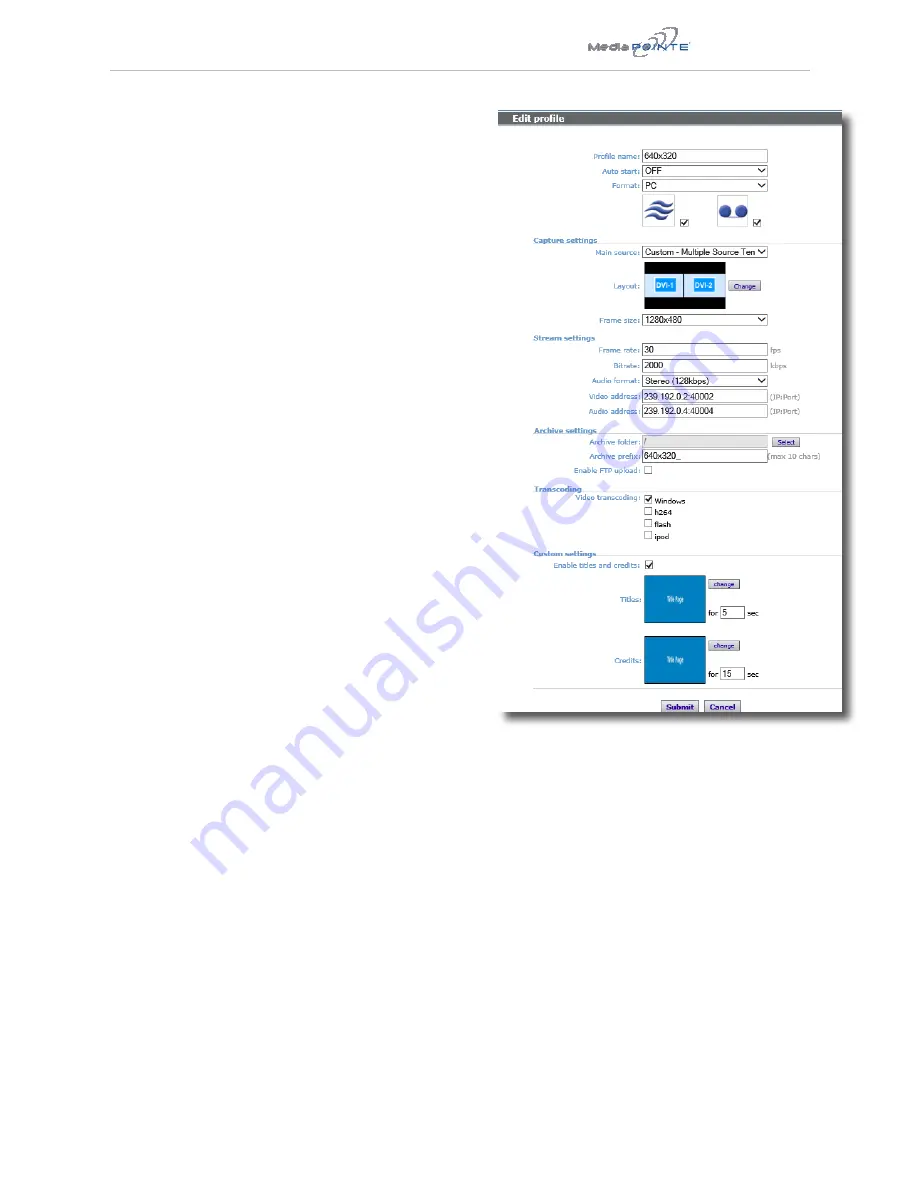
Modifying (Edit) a Profile
Modifying a profile is very similar to copying one. Use
the screen capture on the right as a guide to set pa-
rameters. Modify each section with the information you
want in that profile
as outlined in the steps below.
By
checking the Icons on the Edit profiles web page.
1.
Profile name
- The name of the profile you are
editing.
2. Auto start
- The drop down provides two choices:
OFF
and
ON
. Select
OFF
for standard control.
Select
ON
for standard control and automatic video
conference record with specified codec
3. Format
- he drop down provides six choices:
PC
,
iPod,WMV, DIVX
,
A
AC audio only
and
WMV audio
only. Selecting
PC
provides standard H.264 with
selectable frame sizes. Selecting
iPod
sets lower
resolution frame size. Selecting
AAC audio only
selects no video, audio only.
4. Main Source -
The
drop down provides three
choices:
DVI 1
,
DVI 2
and
Custom Multiple Source
Template
. Selecting
DVI 1
sets DVI 1 as input with
frame size selection. Selecting
DVI 2
sets DVI 2 as
input with frame size selection. Selecting
Custom
Multiple Source Template
brings up a separate
window that allows you to select from a variety of
available layouts.
5. Layout -
The Layout button allows you to choose
one of many screen layouts as shown on Page16.
6. Frame Size
(if allowed)
-
The
drop down provides
eight choices: VGA - 640 x 480; SVGA - 800 x 600;
XGA - 1024 x 768; 720p -1280 x 720; SXGA - 1280
x1024; SXGA+ - 1440 x 1080; UXGA -1600 x 1200;
1080p - 1920 x 1080. Choose desired frame size.
7. Frame rate
- Enter the selected frame rate with a
maximum of 30 fps.
8. Bitrate
- Enter the bitrate desired with a range
from 128 kbps to 5120 kbps
9. Audio format
- The
drop down provides four
choices:
Disabled
for no audio;
Stereo (128 kbps)
for
stereo source input;
Mono (64 kbs)
for 1 channel
mono source;
Mono (32 kbs)
for 1 channel mono
source at a lower bitrate.
10. Video Address
- Enter the bitrate desired with a
range from 128 kbps to 5120 kbps
11. Audio Address
- Enter the bitrate desired with a
range from 128 kbps to 5120 kbps
12. Archive folder
- The location where the files are
saved on the local machine.
13.
Archive prefix
- The beginning of the file name
saved. A maximum of ten characters is allowed
with no spaces or special characters (only
underscore and dash are allowed.)
14. Enable FTP upload
- Check if you want to send the
files to an FTP server after recording. If you check
this another menu will appear.
FTP Server:
Enter address of the FTP
server
FTP user name:
Enter registered user of
the FTP server
FTP user password:
Enter Password of the FTP
server user
FTP upload directory:
Enter the path to where
the file(s) will be stored on the FTP server
Delete:
Check this box if you want to delete
local media after upload.
13
12
14
15
1
2
3
7
6
8
10
9
5
4
11
17
16
Streaming and/or Recording

