DMR HD3
3
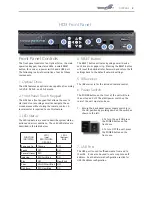
Front Panel Controls
The front panel consists of an Optical Drive, the main
operation Keypad, two status LEDs, a small RESET
button, IR receiver, a power switch and a USB port.
The following is a brief description of each of these
components.
1. Optical Drive
The HD3 features an optical drive capable of recording
to DVD-R, DVD+R, and CD-R media.
2. Front Panel Touch Keypad
The HD3 has a front keypad that allows the user to
start and stop recording as well as navigate the on
screen menus without using the remote control. A
local monitor is required to use this feature.
3. LED Status
The LED indicators are used to describe system states,
actions and error conditions. The valid LED states are
described in the table below.
FUNCTION
INDICATED
LED 1
(top)
RED/YELLOW/
ORANGE
LED 2
(bottom)
BLUE
Powering On
Orange
OFF
Ready
OFF
ON
Record/Stream RED
ON
Indexing
RED Fast Blink
ON
Play
OFF
Slow Blink
Error
YELLOW Fast Blink OFF
Disk Burn
RED Slow Blink
ON
HD3 Front Panel
4. RESET Button
The RESET button activates by using a small device
such as a pin or paper clip. Pressing the RESET button
will reset the Administrator Password and return the IP
settings back to the default network settings.
5. IR Receiver
The IR Receiver is for the included remote control.
6. Power Switch
The POWER button on the front of the unit will turn
the unit on and off. The MAIN power switch on the
rear of the unit must also be on.
1. Ensure the back panel power supply switch is in
the ON position by pressing down on the switch as
shown to the left.
2. To turn the unit ON press
the POWER button on the
front once.
3. To turn OFF the unit, press
the POWER button on the
front once.
7. USB Port
The USB port is used to offload media from and to
the HD3. It can also be used to set or capture an IP
address. See the Network Configuration section for
USB IP address configuration.
1
2
3
4
5
6
7


