


14
Follow-Up fitting
(go to Fine Tuning) should be chosen
for the Vibrogram measurement.
Press
OK
to confirm the selection.
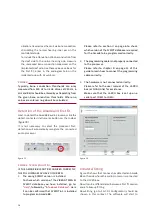
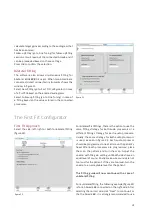
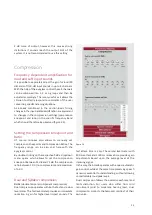
Starting the Vibrogram measurement
The necessary calibration settings are stored in the
processor via selecting
“Fitting”
, followed by
”Test
Settings…”.
The following window (figure 11) will
appear. Click on
Vibrogram Settings
. The Amadé is
programmed and the Vibrogram table (figure 12) is
activated.
CAUTION:
Do NOT close the
Test settings
window.
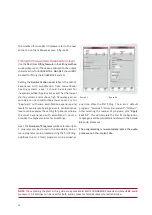
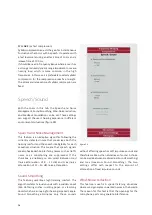
Select the Vibrogram tab from the 6 tabs in Fine Tuning.
The Vibrogram table will appear (figure 12). The
Vibrogram process is similar to an audiogram.
In order to prevent external sounds from being picked
up by the microphones, mute the Amadé. Refer to figure
42 on page 34 on how to mute the Amadé.
THE PRE-PROGRAMMED AMADÉ IS NOW GIVEN TO THE
PATIENT AND PLACED OVER THE IMPLANT.
figure 11
figure 12
Begin taking measurements at 1kHz, 30dB above the
bone conduction threshold. Click on the corresponding
symbol to activate the tone and start the measurement.
The tone will remain active until either another test tone
is activated or the measurement is complete. The active
tone will be displayed on the top and bottom of the
Vibrogram screen (figure 12).
NOTE:
Test tones can be adjusted from 500Hz to
6000Hz in frequency and from 15dB to 105dB in volume.
REMARK:
If the patient is having difficulty finding satisfying
fitting levels, consider collecting the uncomfortable
loudness levels (UCL) during the Vibrogram process
so there is a full range of responses.
Summary of Contents for SYMFIT 6.1
Page 1: ...1 Business Unit Vibrant Fitting Guide SYMFIT 6 1...
Page 2: ......
Page 4: ......
Page 39: ......


