background image

11 


2.3  TV Connections 

This digital TV receiver has two video connectors for use by a TV. 


HDMI 


Composite video 

Use an HDMI connector to connect the receiver to a TV for the best picture quality. If 
the TV has no available HDMI connector, use the composite video connector. 


2.4  HDMI connection 


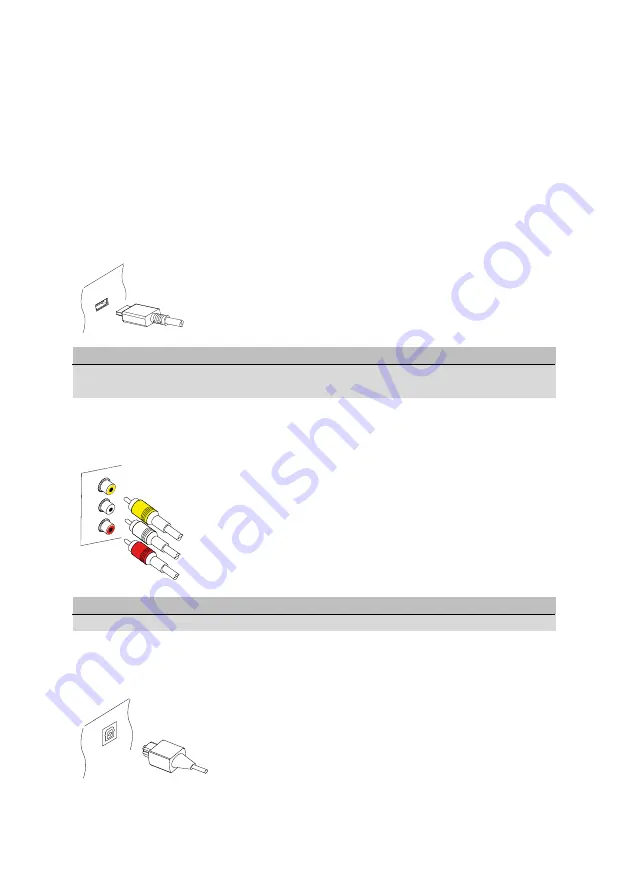
Connect  the  receiver’s  HDMI  output  connector  to  the  TV’s 
HDMI input connector using an HDMI cable. 
 

Note 
Some  HDMI  cables  and  TVs  may  not  be  compatible  with  the  receiver  due  to 
differing HDMI specifications. 


2.5  Composite Connection 


The composite video connector shares the audio connectors 
with  the  component  video  connectors.  A  typical  composite 
cable has three connectors. 
The  yellow  connector  is  for  the  video  connection.  Connect 
the  receiver’s composite  video  and audio  output  connectors 
to the TV’s composite video and audio input connectors using 
a composite cable, so that the connectors of the same colour 
connect to each other. 

Note 
Composite video connectors cannot carry HD video. 


2.6  AV  Receiver  Connection 


Use an AV receiver for better audio quality. Connect the 
receiver’s  SPDIF  connector  to  the  AV  receiver’s  digital 
audio input connector using an optical audio cable 

Summary of Contents for CR2010CX

Page 1: ...CR 2010CX User Manual...

Page 2: ......

Page 3: ...1 2 5 Composite Connection 11 2 6 AV Receiver Connection 11 2 7 Network Connection 12 3 Cable Search 12 4 Watching TV 13 4 1 Service List 13 4 2 Service List Manager 15 4 3 TV Program Guide 17 4 4 Con...

Page 4: ...Settings 27 7 1 Cable Search 27 7 2 System Recovery 27 7 3 Recording Option 27 7 4 Parental Control 27 7 5 System Setting 28 7 6 Time Setting 28 7 7 Language Setting 28 7 8 A V Audio and Video Output...

Page 5: ...nly a single TV program but also every episode of a series using the program guide See the 5 1 RecordingTV Programs Users can pause and resume a live program See the 5 2 Time Shifting This receiver ca...

Page 6: ...6...

Page 7: ...e device See Playing Media Files 9 MENU Display menu See The menu Screen In addition use this button to return to the higher menu level 10 EXIT Return to the previous screen or close the current list...

Page 8: ...emote control to turn on the receiver When turning on the receiver for the first time the initial setup process automatically starts Follow the on screen instructions to finish the process At each ste...

Page 9: ...e receiver in a cabinet make sure to leave a space of at least 10 centimetres around the receiver for cooling Do not place the receiver in direct sunlight and close to heat emitting devices that can i...

Page 10: ...10 Connect the cable to CABLE IN...

Page 11: ...ifications 2 5 Composite Connection The composite video connector shares the audio connectors with the component video connectors A typical composite cable has three connectors The yellow connector is...

Page 12: ...it is to pick up To scan for all available channels set Search Mode to Auto Choose Search Type and determine which types of channels to scan for All Service Scan for all availableTV and radio channel...

Page 13: ...ore information about the current program press the INFO button again When a channel number other than the current channel is displayed pressing the OK button switches to the channel Pressing the FAV...

Page 14: ...14...

Page 15: ...annels that are not in the chosen category HD service grouping With this option enabled HD channels are grouped at the top of the channel list 4 2 Service List Manager Press the OK button to open the...

Page 16: ...16...

Page 17: ...d Move Groups Place the focus on a favorite group press the FAV button and then move it to a new location Delete Group Place the focus on a favorite group and press the BLUE button and then confirm to...

Page 18: ...uled event Select a program entry that is scheduled to watch or record Search for programs Press the YELLOW button Choose Search event name and enter search criteria It is also possible to search by p...

Page 19: ...he same frequency Press the PiP button and a window appears at a corner of the screen displaying another channel Pressing the PiP button again displays the two pictures side by side at the same size T...

Page 20: ...onto a removable hard drive or flash drive However flash drives are not recommended for recording Connect a removable hard drive to one of the receiver sUSB port For details on how to manage removable...

Page 21: ...lendar Select a date to view its recording events Edit a recording event Place the focus on an event entry press the OK button Delete a recording event Place the focus on an event entry press the RED...

Page 22: ...n TimeShift start With this set to Auto the receiver begins time shift recording whenever changing channels With this set to Manual pressing the PAUSE button begins time shift recording With this set...

Page 23: ...23...

Page 24: ...Choose Current Device select a storage device and then choose Storage Check If any faults are found they are automatically repaired 6 2 Managing Files Press the PLAY LIST button to access the removab...

Page 25: ...specific point Press the PLAY button to display the progress bar and then enter a number This action can be configured to perform differently See RecordingOption Play fast forward or backward Press th...

Page 26: ...her or not to repeat slideshows Title Determine whether or not to display file names Downscale Determine whether or not to display a reduced size Set Installation toYes to finish 6 5 Playing Music Sel...

Page 27: ...ervice Clear all service data System restore to stored position Restore the receiver using the stored settings and channels Store system data Back up all settings and channels Delete stored position C...

Page 28: ...eceiver for the specified period the receiver automatically turns off PowerOff Mode Determine Hibernation or Standby mode Info Box Display Time Specify how long to display the program information dial...

Page 29: ...use TV Aspect Ratio Determine which aspect ratio to use by default Display Resolution Determine which resolution to use by default Technically 1080p is better than 1080i but the difference is only sl...

Page 30: ...s enabled on the router If DHCP is not available specify the network details including IP address and gateway 8 Hybrid Functions Press the MENU button to open the Icon screen It require an internet co...

Page 31: ...31...

Page 32: ...eyboard Refresh a webpage Press the MENU button and select the refresh icon Halt a webpage from downloading Press the MENU button and select the stop icon Move between the series of webpages that have...

Page 33: ...PAUSE button and press the PLAY button to resume Skip backward or forward Press the BACKWARD button or the FORWARD button 8 3 Free TV FreeTV allows users to view videos from a variety of video sharing...

Page 34: ...rd must be inserted to access this menu Subscription Status You can check the authorized viewing rights of your smartcard EventStatus Check the event information of your smartcard Token Status Check t...

Page 35: ...from other types of wastes and recycle it responsibly to promote the sustainable reuse of material resources Household users should contact either the retailer where they purchased this product or th...

Page 36: ...This product is under continuous development Due to changes or improvements some descriptions and illustrations in this guide may differ slightly from the actual product...

Page 37: ......

Page 38: ...Digital Cable Set Top Box CR 2010CX...

Reviews: