background image

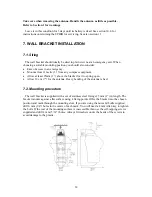
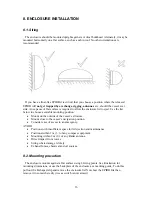
   Offer the back plate into the chosen position and mark through the mounting holes. The 

uts 


rews 

8.3. Mounting instruction plate 

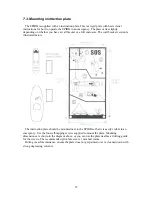
 The EPIRB is supplied with a rigid plate giving visual instructions on how to operate the 

8.4. Marking HRU expiry 

 If you are installing a float-free EPIRB you 

must

 now mark the HRU expiry date. The HRU 


enclosure is supplied with a set of 25 mm (1“) stainless steel fixings. If you are using the n
and bolts, drill 6 mm (1/4“) holes where you have marked. You will need a 4 mm Allen key to
tighten the bolts. If the rear of the mounting surface is inaccessible, use the self-tapping 
screws supplied (a 4 mm pilot hole is required). Always fit washers under heads of the sc
to avoid damaging the plastic. 


EPIRB in an emergency. Mount this next to your EPIRB as explained in section 7.3. 


has a 2 year in-service life which starts as soon as it gets exposure to a marine environment. 
Hence the 2 years starts at installation and it is left to the customer to mark this date during 
installation. A date 2 years into the future should be marked on marked on the HRU body an
copied onto the label on the side of the enclosure. The HRU is marked by cutting out the 
corresponding dates on its label. The enclosure should be marked using the alpha-numeric
stickers provided, then covering them with the clear sticky label provided (but see 8.5 first)
The preferred date format is month and year, for example: JUN 2003. 


17

Summary of Contents for 406 EPIRB

Page 1: ...1 ...

Page 2: ...2 ...

Page 3: ...the EPIRB 13 6 3 Dealing with a transmitting EPIRB 13 7 WALL BRACKET INSTALLATION 14 7 1 Siting 14 7 2 Mounting procedure 14 7 3 Mounting instruction plate 15 8 ENCLOSURE INSTALLATION 16 8 1 Siting 16 8 2 Mounting procedure 16 8 3 Mounting instruction plate 17 8 4 Marking HRU expiry 17 8 5 Marking vessel name 18 9 REGISTRATION 18 9 1 Overview 18 9 2 How to register 19 9 3 Warranty form 19 9 4 Radi...

Page 4: ... strobe 2 PURPOSE An Emergency Position Indicating Radio Beacon EPIRB is used to alert search and rescue services in the event of an emergency It does this by transmitting a coded message on the 406 MHz distress frequency This message is relayed via satellite and earth station to the nearest rescue co ordination centre The satellite system is run by COSPAS SARSAT and is described in the Appendix U...

Page 5: ...PIRB READY button Press this key once to de activate the EPIRB Hold it down to run the built in self test which checks basic operation ON button Press this key to activate the EPIRB manually The key is protected by a sliding door which is fitted with a tamper seal Sea switch The two screw heads below the keys are sea switch contacts Submerge these in water to automatically activate the EPIRB Lanya...

Page 6: ...ates the automatic release sequence 1 As the vessel sinks the enclosure fills with water The HRU contains a blade which is released due to water pressure acting on a diaphragm Before it reaches a depth of 4 metres the HRU will operate and cut the plastic rod releasing the coil spring 2 The spring pushes the EPIRB and the enclosure lid outwards As the lid pivots off it disengages from the screw hea...

Page 7: ...tress transmissions for 50 seconds This gives you a chance to turn it off if you activated it accidentaily When the lamp starts to flash the 50 seconds delay has passed and distress transmissions have started 4 2 READY button This button de activates the EPIRB and also tests the EPIRB Ready Pressing and releasing this button quickly will de activate the EPIRB and return it to its ready state When ...

Page 8: ...tivated the strobe flashes 23 times per minute with a pause during the time when the EPIRB is transmitting The strobe is also used to indicate the result of a self test see section 10 1 4 4 2 Red lamp The red lamp is used to indicate transmissions by the EPIRB When activated it flashes alternately with the strobe to indicate a good transmission on 121 5 MHz Every 50 seconds it illuminates for 2 se...

Page 9: ...this should always be done Release the EPIRB from its mounting bracket as described in section 5 3 or 5 4 and carry if to one of the liferafts Once the liferaft is in the water uncoil the lanyard and tie it to the liferaft then throw the EPIRB overboard so that is floats next to the liferaft The EPIRB will operate because its sea switch will activate 5 3 Releasing EPIRB from a wall bracket If you ...

Page 10: ...its enclosure 5 5 Manual activation If the vessel is not sinking but there is imminent danger then remove the EPIRB from its nce to bracket and activate it manually as shown below Note that once activated it will flash immediately but it will not transmit a distress call for 50 seconds This gives you a cha turn it off if ou activated it in error 10 ...

Page 11: ... is still flashing then it must have b manually Slide th Press and release READY button If EPIRB is still flashing then it has a fault 5 7 Battery condition If your EPIRB has been activated for a cumulative period in excess of 2 hours then its ill y 5 8 Re fitting EPIRB 5 8 1 Refitting into wall bracket The EPIRB is now in its ready state but its sea switch is still armed and will activate if it R...

Page 12: ...aped metal prongs Antenna rests either to left or right of release pin Check EPIRB is fully engaged in metal prongs and resting on foam pad Refit cover by first locating release pin through hole in cover Locate cover onto backplate then snap down over locating lug Refit R clip through hole in end of release pin 12 ...

Page 13: ...emove the EPIRB from any water and dry its sea switch contacts Wait about 8 seconds for the sea switch to de activate If the EPIRB is still flashing then it must have been turned on manually Slide the switch cover fully to the right Press and release the READY button The EPIRB should now stop flashing Refit the EPIRB correctly into its mounting bracket or enclosure Modern EPIRBs have sea switches ...

Page 14: ...nt Allow at least 25mm 1 above the bracket for it to spring open Allow 18 cm 7 for the antenna Heavy bending of the antenna is bad 7 2 Mounting procedure The wall bracket is supplied with a set of stainless steel fixings 25 mm 1 in length The bracket mounts against a flat surface using 4 fixing points Offer the bracket into the chosen position and mark through the mounting slots If you are using t...

Page 15: ...ket version is illustrated below The instruction plate should be mounted next to the EPIRB so that it is easily visible in an emergency Use the four self tapping screws supplied to mount the plate Mounting dimensions are shown in the diagram above or you can use the plate itself as a drilling guide for the screws The recommended pilot hole size is 3 mm maximum During vessel maintenance ensure the ...

Page 16: ...ed by overhangs rigging antennas etc should the vessel ever sink An expanse of flat surface is required to allow the enclosure lid to eject Use the list below to choose a suitable mounting position Mount on the outside of the vessel s stru Mount close to the vessel s navigation position Consider ease of access in an emergency AVOID Po Positions within 1 m 3 of any compass equipment Mounting within...

Page 17: ...supplied a 4 mm pilot hole is required Always fit washers under heads of the sc to avoid damaging the plastic EPIRB in an emergency Mount this next to your EPIRB as explained in section 7 3 has a 2 year in service life which starts as soon as it gets exposure to a marine environment Hence the 2 years starts at installation and it is left to the customer to mark this date during installation A date...

Page 18: ...life In the USA failure to register leads to monetary forfeit In the UK you are legally required to register your EPIRB IMPORTANT The United States registration system has changed Refer to Page 30 for information 9 REGISTRATION 9 1 Overview Every EPIRB is pre programmed with a unique identity before it reaches the customer This is done by the manufacturer or in some cases the distributor The ident...

Page 19: ...d MD 20746 4304 Falmouth TR11 4WZ Tel 888 212 7283 Fax 301 568 8649 Tel 01326 211569 Fax 01326 319264 9 3 Warranty form Please complete the warranty form supplied and fax or mail it to McMurdo Failure to do this may delay any future warranty claim 9 4 Radio licence An EPIRB is a radio transmitter and must therefore be added to your radio licence If you have been allocated a radio callsign then you...

Page 20: ...ard immediately If the beacon is to enter service immediately complete the registration card and fax the information to the NA The original card must still be mailed to the NA for hard copy reference and filing If the current owner is transferring the beacon to a new owner the current owner is required to inform the NA by letter fax or telephone of the name and address of the new owner The subsequ...

Page 21: ...n enclosure Check the HRU is within its expiry date category 1 only Confirm the cover can be manually removed with ease Ensure the EPIRB base is correctly fitted into the D shaped prongs If EPIRB or its mounting needs cleaning then this should be done using warm soapy water and a damp not wet cloth Do not use strong detergents or solvents Do not paint the EPIRB or its mounting Do not clean with de...

Page 22: ...nd check that the washer is fully engaged Slide EPIRB into D shaped foot on lever arm switches outermost Refit cover by engaging hole over rod and then snapping into place Refit R clip through top of rod On side of cover remove old HRU expiry date and mark new date 10 3 Battery replacement The EPIRB uses a 9V Lithium battery pack McMurdo type 82 140 Typically this will have expiry date has been re...

Page 23: ...battery pack contains 3 2 5 lithium and a nominal weight of 85 gm Transport the EPIRB in compliance with applic material For furth 10 6 GMDSS inspections If your vessel is subject to GMDSS regulations then you can expect to get regular visits ored 11 FULLY DISABLING AN EPIRB In the unlikely event that your EPIRB refuses to turn off then it may have a fault ple ed in section 6 2 apping the EPIRB in...

Page 24: ...remove the 2 hidden rear sc Do not as yet remove the sea contact screws Lift the lens dome off Remove and retain the grey gasket Avoid touching the circuit board and the glass strobe tube 3 cm 1 agent Hold the hexagon shaped pillars and remove the sea screws Use a cross headed screwdriver to remove the front screw Grip the white plastic coil former and lift the circuit board up Using fingers unplu...

Page 25: ...thium sulphur dioxide Operating life 48 hours minimum Shelf life 5 years typical in service Environment Operating temperature 40 C to 55 C class 1 Storage temperature 50 C to 70 C Automatic release depth 4 metres max 13 feet Physical Weight 740 grams 1 6 lb Height of body 21 cm 8 2 inches Length of antenna 18 cm 7 inches Approvals Satellite system Cospas Sarsat T 001 T 007 Europe ETS 300 066 Marin...

Page 26: ...rface of the Earth on average a satellite comes into view every 45 minutes LEOSAR satellite path and scan footprint Distress transmissions from EPIRBs are picked up by the satellites and retransmitted to ground receiving stations which then pass the message to the appropriate rescue organisation Typically the delay from activation of an EPIRB to the message being received by the rescue services is...

Page 27: ... However you register the beacon you will be sent a sticker which must be attached to the beacon Emergency Contact It is VITAL that the Emergency Contact information is accurate particularly regarding the telephone number as this will be used to validate an alert Only if the beacon registration and approximate location details can be confirmed will USCG United States Coast Guard launch an immediat...

Page 28: ...r to be valid claims must be made under the above warrantly in writing as soon as practicable after discovery of the defect or failure and within the warranty periods referred to above Proof of purchace will be required The claim should be sent together with the product in question to the address set out below or to an Approved Service Agent Following a valid warranty claim McMurdo Limited shall b...

Reviews: