background image

- 8 -

8.

With body (#10) out of outer shroud (#6), remove
retaining ring (#19) from cap (#13) and then slide
upper shroud cover off (#7).

9.

Loosen hose camps (#1) from air hose (#18) and
then remove air hose from elbows (#2).

10. Using a metal rod placed through holes in the Tamper

body (#10) unscrew cap (#13).

11. Separate valve upper (#11), lower (#12), o-ring (#16),

and valve disc (#9) from cap (#13) (Note: Inspect
components for wear and replace if necessary).

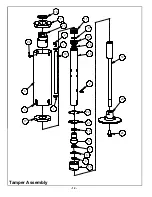
Tamper Assembly

Refer to Tamper Assembly, page 12.

1.

Place new o-ring (#16) on to lower valve (#12).

2.

Assemble upper valve (#12) lower valve (#13), and
valve disc (#9), then insert into cap (#13). (Note:
Make sure valve disc (#9) stays seated).

3.

Using medium-strength thread locking compound,
along with a metal rod placed through holes in
Tamper body (#10), screw cap (#13) over valve
assembly onto body (#10).

4.

Install air hose (#18) onto hose elbow (#2) and
secure using hose camps (#1).

5.

Using retaining ring (#19) secure upper shroud cover
(#7) to Tamper cap (#13). 

6.

Slide outer shroud cover (#6) up from bottom and
connect to upper shroud cover (#7). Secure with four
screws (#20).

7.

Feed lower shroud (#17) into shroud cover (#6) and
secure with four screws (#20).

8.

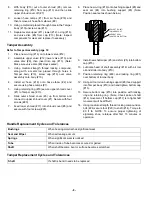
Place new o-ring (#16) onto bushing support (#8) and
seal set (#4) into bushing support (#8) (Note:
Position seal set as shown below).

9.

Install new shaft wiper (#3) and shim (#5) into bottom
cap (#15).

10. Lubricate head of shaft assembly (#14) with air tool

oil and slide into body (#10)

11. Position retaining ring (#22) and locking ring (#21)

over bottom of tamper body.

12. Using air tool oil on bushing support (#8) feed support

into Tamper body (#10) and hand tighten bottom cap
(#15).

13. Secure bottom cap (#15) into position with locking

ring and retaining ring. (Note: Check ease of shaft
(#14) movement. If bottom cap (#17) is to tight shaft
movement will be difficult).

14. Using medium-strength thread locking compound on

bolt (#24) secure foot (#23) to shaft (#14). Torque to
80 ft lb. NOTE: To ensure proper tightening of
ergotamp shoe, retorque after first 15 minutes or
operation.

Handle Replacement Cycles and Tolerances

Tamper Replacement Cycles and Tolerances

6($/6(732,17

72:$5'6)227

/$5*(676($/

/2&$7('21%27720

Bushings

When bearing material has significant wear

Seal and Wiper

When air leakage occurs

Springs

When significant wear is noticed

Tube

When inside of tube becomes scoured or galled

Shaft

When shaft become bent or surface becomes scratched

Shaft

If shaft is bent it needs to be replaced

Summary of Contents for ERGO-TAMP

Page 1: ...bsite www mbw com MBW UK Ltd Units 2 3 CochraneStreet Bolton BL3 6BN England UK Phone 44 0 01204 387784 Fax 44 0 01204 387797 E mail saleseurope mbw com Website www mbweurope com L20993 07 19 G MBW In...

Page 2: ...ing Ergo Tamp 4 Storage 5 MAINTENANCE 6 Maintenance Schedule 6 Ergo Tamp Oil 6 Suppressor Grease 6 SERVICE 7 General 7 Handle and Tamper Separation 7 Handle Disassembly 7 Handle Assembly 7 Tamper Disa...

Page 3: ...CALIFORNIA PROPOSITION 65 WARNING Engine exhaust and some of its constituents are known in the state of California to cause cancer birth defects and other reproductive harm WARNING...

Page 4: ...pecified steel tipped safety shoes HEAD PROTECTION Wear OSHA specified safety helmets OPERATOR Keep children and bystanders off and away from the equipment DUST PROTECTION Machining crushing or handli...

Page 5: ...nt can expose you to chemicals including engine exhaust phthalates and lead which are known to the state of California to cause cancer and birth defects or other reproductive harm Avoid breathing engi...

Page 6: ...tor type and compaction conditions 786C 786CS Operating Weight 39 3 lbs 17 8kg 38 1 lbs 17 2 kg Length 74 188 cm 60 152cm Foot Diameter 6 15 2 cm 6 15 2 cm Maximum Pressure 140 psi 965 KPa 140 psi 965...

Page 7: ...ting REMEMBER It is the owner s responsibility to communicate information on the safe use and proper operation of this unit to the operators Review ALL of the Safety Precautions listed on page 1 of th...

Page 8: ...Vibration Suppressor The MBW Ergo Tamp is a spring loaded device Efficiency of isolation will depend on many factors including air pressure pole tamper type and operator input When operating try to fi...

Page 9: ...er will damage the internal surfaces A suitable oiler can be purchased through MBW Part 12248 In event the tamper will be stored pour several drops of oil into the line to prevent corrosion Suppressor...

Page 10: ...in assembly heat might be need to help loosen bushings 11 Slide valve body assembly 4 off of outer tube 5 12 Using a 10 32 bolt pull the spool 7 out of the valve body 4 then separate the o ring 10 an...

Page 11: ...r 6 and secure with four screws 20 8 Place new o ring 16 onto bushing support 8 and seal set 4 into bushing support 8 Note Position seal set as shown below 9 Install new shaft wiper 3 and shim 5 into...

Page 12: ...maintenance and rebuilding and to carry an adequate parts stock in all areas of the country Their sales engineers are available for professional consultation If you cannot locate an MBW distributor in...

Page 13: ...10 Handle Assembly...

Page 14: ...1 1 11 20915 BELLOWS ORANGE 2 2 12 20917 CAP 1 0 21297 CAP SHORT 0 1 13 20919 TRIGGER COVER 1 1 14 20921 BUSHING UPPER 1 1 15 20935 TRIGGER PAINTED 1 1 16 20936 HOSE HYDRAULIC 1 2 X 29 1 0 21300 HOSE...

Page 15: ...12 Tamper Assembly...
Page 16: ...13 20927 CAP 1 14 21301 SHAFT ASSEMBLY 1 15 20930 CAP BOTTOM 1 16 20931 O RING 1 8 X 1 1 2 OD 2 17 20934 SHROUD LOWER 1 18 20958 AIR HOSE 3 8 12 19 20959 RETAINING RING EXT 2 25 1 20 21009 PLASTIC SC...

Page 17: ...for the return of merchandise under warranty must be obtained from MBW or MBW UK Limited 7 MBW reserves the right to inspect and render final decision on each warranty case 8 MBW reserves the right t...

Reviews:

Related manuals for ERGO-TAMP