background image

7-1

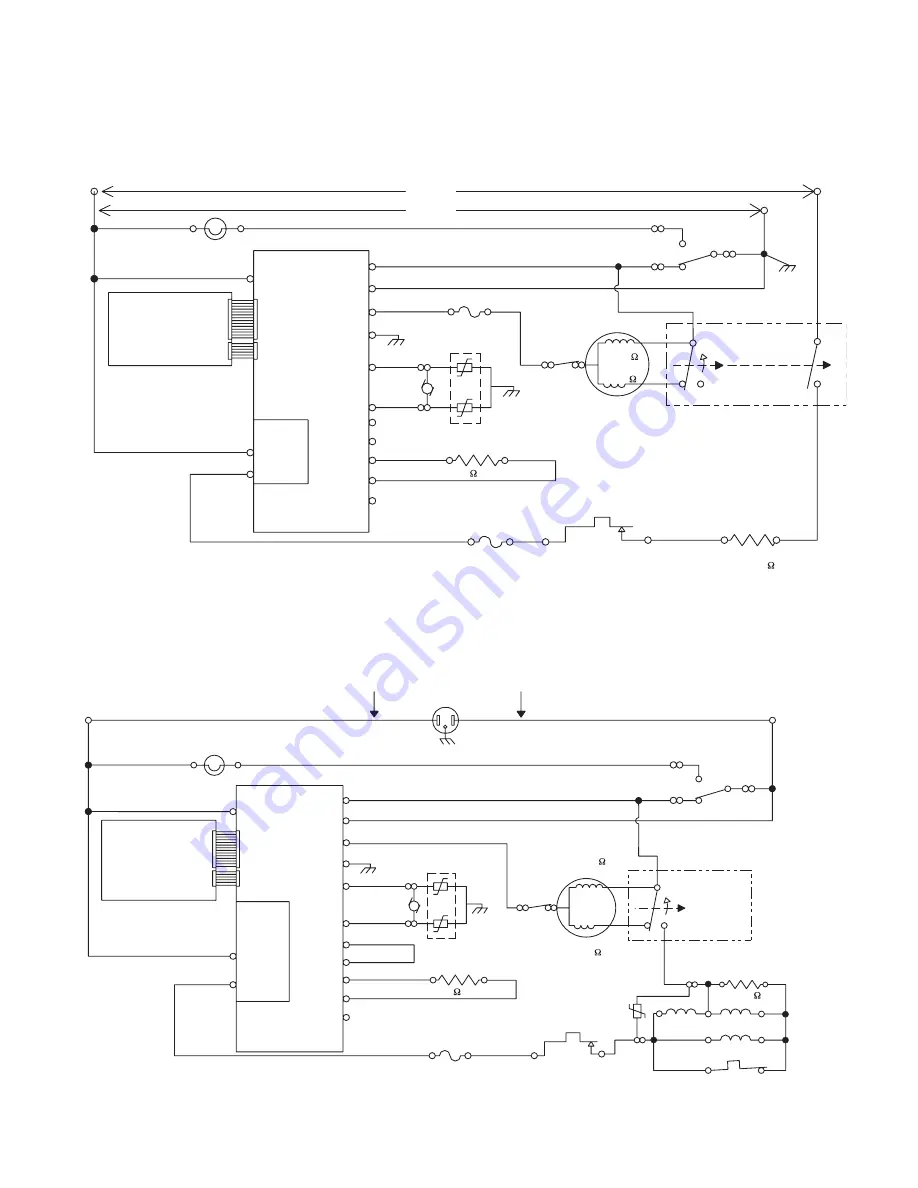
WIRING DIAGRAMS

ELECTRIC DRYER 

GAS DRYER 

120 VOLTS

240 VOLTS

L1 LINE BK

R

LINE L2

W

NEUTRAL

2M

1M

DOOR

SWITCH

R/W

NC

DRIVE MOTOR

1/3 H.P.

4M

MAIN

START

5M

6M

THERMISTOR

BK

DL

HEATER

R

BK

CONTROL

THERMAL CUT-OFF

(TCO) 352

°

F (178

°

C)

NEUTRAL
TERMINAL
LINKED TO
CABINET

CENTRIFUGAL SWITCH

THERMAL FUSE

196

°

F (91

°

C)

HIGH LIMIT

THERMOSTAT
295

°

F (146

°

C)

DOOR

DRUM LAMP

MOIST RTN

MOIST.

TEMP.

SENSOR

NC

3M

NO

COM

G

BU

BK

R

BR

LT BU

LT BU

BELT

SWITCH

W

MODEL RTN

L1

USER INTERFACE

(ACTIVE OVERLAY or
ALTERNATE TECHNOLOGY)

MOTOR

HEATER RTN

V

10k

± 3%

P3

P4

P1-3

P2-1

P2-2

P2-5

P2-4

P1-4

P1-5

HEATER

RELAY

NEUTRAL

P1-2 NEUTRAL

MODEL

P2-3

N.O.

(0.250 TERMINAL)

COM

(0.250 TERMINAL)

N.C.

TEMP RTN

P2-6

P2-7

G

SENSOR

MOVS

G/Y

P1-1

Y/R

BK

R/W

BK

W

7.8 - 11.8

BU

W

2.4 - 3.8

2.4 - 3.6

ELECTRONIC

FS2

FS1

VALVE NO. 1

IG

IGR

IGNITOR

50 - 500

HOLD

ASSIST

MAIN

22,000 BTU/HR

VALVE NO. 2

4

1

3

2

5

FLAME SENSOR

4M

5M

6M

DL

NC

3M

3V

1V

HS1

91

°

C (196

°

F)

96

°

C (205

°

F)

HS2

TF1

TF2

TEMP.

L1

HEATER RTN

V

10k

±3%

P3

P4

P1-3

P2-5

P2-4

P1-4

P1-5

HEATER

RELAY

P1-2

P2-3

N.O.

(0.250 TERMINAL)

COM

(0.250 TERMINAL)

N.C.

P2-6

P2-7

P2-1

P2-2

VALVE MOV

P1-1

BK

L1 LINE

BK

ELECTRONIC

CONTROL

DOOR

DRUM LAMP

MOIST.

NEUTRAL

MOTOR

PLUG

5 -15P

GND

USER INTERFACE

(ACTIVE OVERLAY OR

ALTERNATE TECHNOLOGY)

MODEL

MOIST. RTN

TEMP. RTN

MODEL RTN

120 VOLTS U.S.

LINE L2

R

W - NEUTRAL

DOOR SWITCH

START

THERMISTOR

CENTRIFUGAL

SWITCH

THERMAL FUSE

HIGH LIMIT THERMOSTAT

SENSOR

W

NEUTRAL

BELT SWITCH

W

SENSOR MOVS

GND

MAIN

DRIVE MOTOR - 1/3 H.P.

NC

NO

COM

2.4 - 3.6

2.4 - 3.8 

BU

BU

W

LT BU

BR

BK

BK

G/Y

Y/R

BK

R/W

BK

BU

R

R

115 VOLTS CANADA

LT BU

Summary of Contents for Epic MED/GD9600S

Page 1: ...TECHNICAL EDUCATION JOB AID 8178601 ML 2 FRONT LOADING GAS AND ELECTRIC DRYERS MODELS MED GD 9700S MED GD 9600S Epic ...

Page 2: ...provided with the dryer The Wiring Diagrams used in this Job Aid are typical and should be used for training purposes only Always use the Wiring Diagram supplied with the product when servicing the unit GOALS AND OBJECTIVES The goal of this Job Aid is to provide detailed information that will enable the In Home Service Professional to properly diagnose malfunctions and repair the Maytag Epic Front...

Page 3: ...imit Thermostat Thermal Cutoff Electric Dryers Only 4 10 Removing The Belt Drum Rollers 4 12 Removing The Drum Light Socket 4 15 Removing The Moisture Sensor 4 17 Removing The Burner Assembly Flame Sensor And High Limit Thermostat Gas Dryers Only 4 18 COMPONENT TESTING 5 1 Heater 5 1 Drive Motor 5 2 Thermal Fuse 5 3 Thermistor 5 4 Thermal Cutoff Electric Dryers Only 5 5 Door Switch 5 6 Gas Burner ...

Page 4: ... iv NOTES ...

Page 5: ...hurt you and others All safety messages will follow the safety alert symbol and either the word DANGER or WARNING These words mean All safety messages will tell you what the potential hazard is tell you how to reduce the chance of injury and tell you what can happen if the instructions are not followed You can be killed or seriously injured if you don t immediately follow instructions You can be k...

Page 6: ...CT D Dryer SERIES 5 LEAP 6 Oasis 7 24 Front Load 8 Mid Line Front Load 9 Full Size Front Load PRICE POINT LEVEL 1 9 TRADE PARTNER ID 00 Branded YEAR OF INTRODUCTION S 2006 T 2007 COLOR CODE B Black Q White ENGINEERING CHANGE SERIAL NUMBER M T 26 13227 DIVISION Marion OH YEAR OF PRODUCTION T 2006 WEEK OF PRODUCTION 26 26th Week PRODUCT SEQUENCE NUMBER ...

Page 7: ...3 MODEL SERIAL NUMBER LABEL AND TECH SHEET LOCATIONS The Model Serial Number label and Tech Sheet locations are shown below Tech Sheet Location Behind Lower Access Panel Model Serial Number Label Location ...

Page 8: ...1 4 SPECIFICATIONS 12345 14367389 1436738 9 9 3 1 3 2 4 7 0 3 12 3 4 92 4 5 56 2 3 12 3 4 92 4 5 56 2 3 ...

Page 9: ...ts or repair labor costs when the major appliance is used in a country other than the country in which it was purchased 1 9 869 3741 49 893 4 67762 93 489 9 6 91241 473 3 93 CUSTOMER S SOLE AND EXCLUSIVE REMEDY UNDER THIS LIMITED WARRANTY SHALL BE PRODUCT REPAIR AS PROVIDED HEREIN IMPLIED WARRANTIES INCLUDING WARRANTIES OF MERCHANTABILITY OR FITNESS FOR A PARTICULAR PURPOSE ARE LIMITED TO ONE YEAR...

Page 10: ...e option of purchasing a pedestal separately for this dryer Y ou may select a 15 5 39 4 cm pedestal This pedestal will add to the total height of the dryer for a total height of approximately 53 5 135 9 cm For a garage installation you will need to place the pedestal at least 3 5 8 9 cm above the floor 7 8 62 4 4 6 T o order call the dealer from whom you purchased your dryer or refer to the Assist...

Page 11: ...e dryer must not be installed or stored in an area where it will be exposed to water and or weather Check code requirements Some codes limit or do not permit installation of the dryer in garages closets mobile homes or sleeping quarters Contact your local building inspector 7 54 45627 3 94 4739 The location must be large enough to allow the dryer door to open fully 9 6 97 627 Most installations re...

Page 12: ... 4 83 962 8 96 946 For cabinet installation with a door minimum ventilation openings in the top of the cabinet are required Required spacing For side or bottom venting 0 0 cm spacing is allowed 12345526727896 9468 396 8 4 8 232 2784 8 34 2 896 946 8 9 8 3 278 2 8 6787 2 88 The dimensions shown are for the recommended spacing Required spacing Required spacing 12 3456784697 7 6 7 7 4 657 6 2 6 75 79...

Page 13: ...white wire within the dryer If the dryer is installed with a 4 wire electrical supply connection the neutral ground conductor must be removed from the external ground connector green screw and secured under the neutral terminal center or white wire of the terminal block When the neutral ground conductor is secured under the neutral terminal center or white wire of the terminal block the dryer cabi...

Page 14: ... plugged into an appropriate outlet that is properly installed and grounded in accordance with all local codes and ordinances 11For a permanently connected dryer This dryer must be connected to a grounded metal permanent wiring system or an equipment grounding conductor must be run with the circuit conductors and connected to the equipment grounding terminal or lead on the dryer 9 Improper connect...

Page 15: ...cord is inside the strain relief The strain relief should have a tight fit with the dryer cabinet and be in a horizontal position Do not further tighten strain relief screws at this point 1234546 9 9 9 8 69 4 9 87 2 9 8 69 6 98 9 2 9 6 9 9 9 989 6 8 9 6 2 9 6 9 6 8 9 69 9 69 9 6 9 69 69 8 8 9 2 9 99 9 9 6 9 9 69 6 99 9 6 2 9 6 9 3 87 9 6 9 3 69 8 8 2 59 987 6 69 88 989 6 8 9 6 2 8 9 6 9 86 9 6 9 9...

Page 16: ...23456789 68 49 7 93657 7895 7 86 A 4 wire connection is required for mobile homes and where local codes do not permit the use of 3 wire connections Remove center silver colored terminal block screw 7 Remove neutral ground wire from external ground conductor screw Connect neutral ground wire and the neutral wire white or center wire of power supply cord under center silver colored terminal block sc...

Page 17: ...f wires into a hook shape When connecting to the terminal block place the hooked end of the wire under the screw of the terminal block hook facing right squeeze hooked end together and tighten screw as shown 2 Remove center silver colored terminal block screw 2 Remove neutral ground wire from external ground conductor screw Connect neutral ground wire and place the hooked end hook facing right of ...

Page 18: ...er wires to outer terminal block screws Tighten screws 32 Tighten strain relief screws 42 Insert tab of terminal block cover into slot of dryer rear panel Secure cover with hold down screw 52 Y ou have completed your electrical connection Now go to Venting Requirements 123456789 68 49 7 4568 73456 789 9 9 98 9 9 9 9 92 Direct wire cable must have 5 ft 1 52 m of extra length so dryer can be moved i...

Page 19: ...have completed your electrical connection Now go to Venting Requirements 123456789 4 9 566 3456 89 9 9 2 12 Remove center silver colored terminal block screw 32 Remove neutral ground wire from external ground conductor screw Connect neutral ground wire and the neutral wire white or center wire of power supply cord cable under center silver colored terminal block screw Tighten screw 42 Connect the ...

Page 20: ...ces For more information see the Assistance or Service section of this manual 5 For best drying performance rigid metal vents are recommended Rigid metal vent is recommended to avoid crushing and kinking Flexible metal vents are acceptable only if accessible for cleaning Flexible metal vent must be fully extended and supported when the dryer is in its final location Remove excess flexible metal ve...

Page 21: ...tom If you prefer you may contact your local dealer to have the dryer converted 276 4376 4 732237 4 2 6 263 34 6 Venting systems come in many varieties Select the type best for your installation Two close clearance installations are shown Refer to the manufacturer s instructions 1 23 45675 83 9 3 43 9 1 93 3 1 7 1 51 7 71 7 1 7 3 7 1 7 1 7 7 561 1 7 17 3 9 1 7 123453647869 9 7 97 6725 467 9 7 9 7 ...

Page 22: ...ten the life of the dryer Reduce performance resulting in longer drying times and increased energy usage The Vent system chart provides venting requirements that will help to achieve the best drying performance 2738 3258 43 12345 Side and bottom exhaust installations have a 90º turn inside the dryer T o determine maximum exhaust length add one 90º turn to the chart 7 3 273 325 Install exhaust hood...

Page 23: ...ck that there are no kinks in the flexible gas line 32 Once the exhaust vent connection is made remove the corner posts and cardboard 2326 25996 Y ou can change your door swing from a right side opening to a left side opening if desired 2 932 2 996 52 Open the dryer door Remove the 4 screws that hold the door hinge on the front panel of the dryer Loosen but do not remove the screw with the top key...

Page 24: ...ge holes 52 Insert a screw in the second opening from the top of the hinge opening and partially tighten Hang the door by placing the top hinge keyhole over the second screw head and tighten the screw By putting this screw in first the door will hang in place while you insert and tighten the remaining 4 screws 2 Close the door and check that it latches securely 8262 456788763 4 62 Check that all p...

Page 25: ... dial to select either an Automatic or Manual Cycle then press the CONTROL ON button The preset settings and drying time for the cycle chosen will be displayed 2 Point the dial to an Automatic Cycle Select DRYNESS LEVEL to adjust how dry you want the load to be The time displayed is an estimated length of the cycle based on the Dryness Level selected As the cycle runs the control senses the drynes...

Page 26: ...TO START button until dryer starts Drying will continue from where the cycle was interrupted if you close the door and press Start within 5 minutes If the cycle is interrupted for more than 5 minutes the dryer will shut off Select new cycle settings before restarting the dryer 362 3 3 This feature allows you to lock your settings to avoid unintended use of the dryer Y ou can also use the Control L...

Page 27: ...d or when the door is opened 2 3 3 324 The Extra Care feature light illuminates when this option is selected This indicator stays on with the Cycle Complete light 2 6 The Control Locked light illuminates when this option is enabled 7 32 78925 Other indicator lights on the control panel show Cycle T emperature and Cycle End Signal settings selected The time display will indicate the estimated or ac...

Page 28: ...cles will retain the Extra Care feature setting For example if you select the Extra Care feature in the Normal cycle the Extra Care feature will be on the next time you select the Normal cycle 12345 If you do not select the Extra Care feature the dryer stops after the cool down period 5 632 T emperature settings are used with the Manual Cycles Press TEMP until the desired temperature setting illum...

Page 29: ...items on top of the rack Leave space between the items so air can reach all the surfaces 123457 Do not allow items to hang over the edge of the rack Close the door Select a Manual cycle and choose a temperature or Air Only see following chart Items containing foam rubber or plastic must be dried on a clothesline or by using the Air Only temperature setting Y ou must select a time by pressing the M...

Page 30: ...COMPONENT ACCESS Electronic Control Board Drum Light User Interface Drum Roller 1 of 4 Drive Motor Thermal Fuse Thermistor Belt Drum Thermal Cutoff Electric Only High Limit Thermostat NOT SHOWN Door Switch Moisture Sensor Belt Switch Mounted On Drive Motor Bracket Heater Or Gas Burner Coil Assembly Gas Regulator Ignitor High Limit Thermostat Gas Burner Assembly Flame Sensor Burner Funnel ...

Page 31: ...racket catches when you rein stall the top cover Slide Top Cover Back Cover Flange Tab Under Bracket Catch Screws Electrical Shock Hazard Disconnect power before servicing Replace all parts and panels before operating Failure to do so can result in death or electrical shock 1 Unplug dryer or disconnect power 2 Turn off gas supply to dryer 3 Pull the dryer away from the wall far enough to access th...

Page 32: ...move the electronic control board from the bracket Squeeze Ends Of Supports To Remove Board 9 Removethe1 4inchhex headscrewfrom the electronic control board 8 Remove the following connectors and wires from the electronic control board 5 wire connector at P1 Red and black wires at relay K1 7 wire connector at P2 Ribbon cables at P3 and P4 ...

Page 33: ...board connectors P3 and P4 6 Remove the two screws from the console bracket P3 P4 Press In On Clips To Release Cables Electronic Control Board Lift Console Bracket From Flange On Both Sides 8 Lift the console straight up until the brack ets are free of the left and right side panel flanges and remove the console Viewed From Back Of Console Side Panel Flange 7 Open the door and pull out on the bott...

Page 34: ...Use your thumb or a screwdriver Console Subpanel Catch 1 of 6 9 Place the console assembly on a padded work surface with the bracket side facing up as shown in step 10 10 Remove the four hex head screws from the console bracket and remove the bracket Console Bracket Screws Console Bracket Touchpad Subassembly ...

Page 35: ... lay it on a padded surface Screwdriver Removal Brown Wire N C White Wire COM Blue Wire N O Door Switch Wire Holder 5 Push the wire holder out of the chassis hole 6 Press a screwdriver blade against the locking arms on each side of the door switch from behind the cutout and push the switch and wiring harness out Electrical Shock Hazard Disconnect power before servicing Replace all parts and panels...

Page 36: ...ove the two hex head screws from the bottom flange of the toe panel Pull the panel out at the bottom pull down and remove the panel Lint Filter Screen Lint Duct Screws Toe Panel Toe Panel Screws Continued on the next page Electrical Shock Hazard Disconnect power before servicing Replace all parts and panels before operating Failure to do so can result in death or electrical shock Thermal Fuse 2 Sc...

Page 37: ... remove it Push To Left Remove Belt From Idler Pulley Blower Wheel 1 2 inch Drive Refer to the photos at the top of the right column for the next two steps c Reach around to the back of the drive motor and attach a 7 16 inch open end wrench over the flat of the motor shaft andaratchetwitha1 2inchdriveonthe blower wheel hub d Turntheblowerwheelclockwise shown by the REMOVE arrow that is em bossed o...

Page 38: ...h a Remove the 3 8 inch hex shoulder washer screw from the idler pulley as sembly and remove the assembly h Remove the two hex washer head mounting screws from the drive motor then lift the right side of the motor slightly pull the two tabs on the left side out of the chassis slots and remove the drive motor Top Locking Tab Idler Pulley Assembly 3 8 inch Hex Shoulder Washer Screw Belt Switch c Dis...

Page 39: ... wires from the termi nal block see photo in step 5 b Remove the hex head screw from the heater housing and slide the heater out of the duct High Limit Thermostat Thermal Cutoff Heater Area 3 Remove the hex head screw from the heater shield and remove the shield Heater Shield Screw Heater Housing Screw Toe Panel Screws Toe Panel Electrical Shock Hazard Disconnect power before servicing Replace all...

Page 40: ...r the thermal cutoff a Disconnect the wires from the high limit thermostat or the thermal cutoff b Remove the two hex head screws High Limit Thermostat Red White Black Wires Heater Terminal Block Red Red White Wires Thermal Cutoff Red Black Wires ...

Page 41: ... the idler wheel arm to the left then remove the tension and remove the belt from the idler pulley 10 Removethetwobottomfrontpanelscrews Push To Left Remove Belt From Idler Pulley 7 Disconnect the 3 wire moisture sensor con nector from the main harness connector Top Front Panel Screws Bottom Front Panel Screws 8 Disconnect the 3 wire door switch con nector from the electronic control board connect...

Page 42: ...l so that the drum sits on the com ponents inside the cabinet and slide the front panel and rollers away from the drum c Lift the drum and remove it from the unit b Slide the belt off the drum Belt REASSEMBLY NOTE Use the following illus tration as a guide when installing a new belt Continued on the next page Drive Motor Pulley Drum Idler Pulley Keyhole Slot ...

Page 43: ...g Partially Removed b Slide the roller off the roller support NOTE There are two rollers on the front panel and two on the rear panel as shown below Front Rollers Rear Rollers Rear Panel inside Front Panel inside DRUM INSTALLATION NOTE Be sure to position the drum with the clip toward the rear when you reinstall it Front Install Drum Position Clip Towards Rear ...

Page 44: ...rew Bulb Continued on the next page 5 Remove the bulb from the drum light socket 6 Remove the screw from the drum light holder and pull it forward so you can access the wires Electrical Shock Hazard Disconnect power before servicing Replace all parts and panels before operating Failure to do so can result in death or electrical shock 7 Disconnect the wire connectors from the light socket terminals...

Page 45: ...4 16 Squeeze Arms 8 Squeeze the locking arms and remove the socket from the drum light holder ...

Page 46: ...e screws from the outlet grille Outlet Grille Screws Lint Filter Screw Screw Screw Outlet Grille 6 Pull the moisture sensor away from the dryer and disconnect the black and yel low red wires from the moisture sensor strips Yellow Red Wire Black Wire Moisture Sensor Electrical Shock Hazard Disconnect power before servicing Replace all parts and panels before operating Failure to do so can result in...

Page 47: ... panel out at the bottom pull down and remove the panel Toe Panel Toe Panel Screws 4 To remove the burner assembly a Remove the two hex head screws from the burner support bracket and pull the bracket away from the burner assembly Burner Assembly Burner Support Screws Electrical Shock Hazard Disconnect power before servicing Replace all parts and panels before operating Failure to do so can result...

Page 48: ...Disconnect the gas line from the burner manifold at the right rear corner of the dryer d Loosen the burner manifold clamp at the inside back of the dryer e Remove the two hex head screws from the burner mounting bracket and pull the burner assembly out of the unit Manifold Clamp Screw Bracket Screws f To remove the ignitor from the burner assembly loosen the 5 16 inch hex head screw and remove the...

Page 49: ...u can access the flame sensor Venturi Screws b Remove the hex head screw from the flame sensor and remove the sensor from the venturi Flame Sensor Screw 6 To remove the high limit thermostat a Remove the venturi see step 5 b Disconnect the two wire connectors from the high limit thermostat c Remove the two hex head screws from the high limit thermostat and remove the thermostat High Limit Thermost...

Page 50: ...ls or wires not pressed into connectors far enough Resistance checks must be made with power cord unplugged from outlet and with wiringharnessorconnectorsdisconnected HEATER Refer to page 4 10 for the procedure for ser vicing the heater 1 Unplug dryer or disconnect power 2 Disconnect one of the wire connectors from the heater terminal block 3 Set the ohmmeter to the R X 1 scale 4 Touch the ohmmete...

Page 51: ...er test lead to the blue motor wire connector and the other test lead to connector pin 3 violet wire The meter should indicate between 2 4 and 3 8 Ω start winding 7 If either resistance is much larger than 4 Ω replace the motor If the resistances at the motor are correct check for a failed belt switch If the belt switch is okay check for an open circuit between the motor and the elec tronic contro...

Page 52: ...r to the valve is turned off A centrifugal switch on the motor also opens the heater circuit Once the thermal fuse has opened it will not reset and must be replaced Check for a failed thermistor Blower Housing Thermal Fuse 91 C 196 F 1 Unplug dryer or disconnect power 2 Turn off gas supply to dryer 3 Disconnect the wires from the thermal fuse 4 Set the ohmmeter to the R X 1 scale 5 Touch the ohmme...

Page 53: ...move the exhaust vent and start the dryer 7 Select the desired temperature cycle to be tested and select 20 minutes of Timed Dry heat using the or pushbuttons 8 Hold a glass bulb thermometer capable of reading from 32 C to 82 C 90 F to 180 F in the center of the exhaust outlet Mea sure the exhaust temperatures with the heater on and off The correct exhaust tem peratures for the various settings ar...

Page 54: ... 3 Set the ohmmeter to the R X 1 scale 4 Touch the ohmmeter test leads to the ther mal cutoff terminals The meter should in dicate continuity 0 Ω If the meter indi cates an open circuit infinite replace both the thermal cutoff and the high limit ther mostat In addition check for a failed heater element or a blocked or improper exhaust system Thermal Cutoff High Limit Thermostat Heater Terminals El...

Page 55: ...ustration below for the following tests 6 Touch the black ohmmeter test lead to the white wire pin in the connector and leave it there for the remaining tests 7 Touch the red ohmmeter test lead to the brown wire pin in the connector The meter should indicate an open circuit infinite 8 Touch the red ohmmeter test lead to the blue wire pin in the connector The meter should indicate a closed circuit ...

Page 56: ...s Pins 1 2 1300 to 1400 Ω Pins 1 3 500 to 600 Ω Pins 4 5 1200 to 1300 Ω Electrical Shock Hazard Disconnect power before servicing Replace all parts and panels before operating Failure to do so can result in death or electrical shock 1 2 3 4 5 BURNER IGNITOR Refer to page 4 18 for the procedure for ser vicing the gas burner assembly 1 Unplug dryer or disconnect power 2 Turn off gas supply to dryer ...

Page 57: ...nect power before servicing Replace all parts and panels before operating Failure to do so can result in death or electrical shock HIGH LIMIT THERMOSTAT Refer to pages 4 10 or 4 18 for the procedure for servicing the high limit thermostat 1 Unplug dryer or disconnect power 2 Turn off gas supply to dryer 3 Disconnect the wire connectors from the high limit thermostat terminals 4 Set the ohmmeter to...

Page 58: ... staticbag observeabove instructions DIAGNOSTIC GUIDE Before servicing check the following Make sure there is power at the wall outlet Hasahouseholdfuseblownorcircuitbreaker tripped Time delay fuse Is dryer vent properly installed and clear of lint or obstructions All tests checks should be made with a VOM or DVM having a sensitivity of 20 000 ohms per volt DC or greater Checkallconnectionsbeforer...

Page 59: ...me by pressing the and buttons If either button fails to change the time something is faulty with one of those buttons and it is not possible to enter the diagnostic mode Remove the console electronics and housing If no in dicators come on after pressing the Manual Cycle buttons go to TEST 1 Supply Con nections on page 6 4 Indication 2 E1 or E2 flashes on the display Action Proceed to TEST 3a Ther...

Page 60: ...oor firmly should cause a beep tone and the display to go blank or indicate 88 Diagnostic Console switches and indica tors Pressing each button or turning the cycle se lector to each cycle should cause a beep tone and control one or more LEDs Pressing the Hold To Start button will also control the motor and heater while the 2 digit display will indi cate a software project identification number St...

Page 61: ...No response when Control On button is pressed 1 Supply connection See TEST 1 2 Check harness connections 3 Console electronics and housing See TEST 5 WILL NOT START CYCLE WHEN START BUTTON IS PRESSED 1 If number display flashes check to be sure the door is completely shut and press and hold down HOLD TO START for about 1 second 2 See TEST 2 3 See TEST 6 WILL NOT SHUT OFF WHEN EXPECTED 1 Check OFF ...

Page 62: ...y and the me chanical connections of the wire are secure replace the main wire har ness f If the dryer still does not operate re place the electronic control board c With an ohmmeter check for continuity between the neutral N terminal of the plug and P1 2 white wire on the elec tronic control board If there is continuity go to step d If there is no continuity disconnect the white wire of the harne...

Page 63: ...nic control board and measure the resistance across P1 3 and P1 4 If resistance across P1 3 and P1 4 is in the range of 1 to 6 ohms replace the electronic control board Otherwise go to step 3 3 Check the wiring and components in the path between these measurement points refertotheWiringDiagramsinSection7 4 Electric Dryers Only Check the thermal fuse see TEST 3b on page 6 9 5 Check the belt switch ...

Page 64: ...components making up the heating circuit The following items are part of this system Harness connection Heater relay Thermal fuse gas dryer only Thermal cutoff electric dryer only High limit thermostat Gas burner assembly gas dryer only Heat element assembly electric dryer only Centrifugal switch Thermistor Electronic control board Console electronics housing Gas supply gas dryer only Dryer does n...

Page 65: ...ither shorted or open Unplug dryer or disconnect power Check the wire connections at the elec tronic control board and thermistor If the wire connections are good re move the two wires from the thermistor and replace the thermistor Plug in dryer or reconnect power 4 Electric Dryers Only a Connect the ohmmeter test probes to the red wires at the thermal cutoff and the heater If the resistance is ap...

Page 66: ...ce across termi nals Readingsshouldmatchthoseshown in the chart below If the readings are not as listed replace the gas valve coil IMPORTANT Be sure all harness wires are looped back through the strain relief after checking or replacing coils 5 If the exhaust temperature is not within specified limits use the following table andchecktheresistanceofthethermistor NOTE Allthermistorresistancemeasure ...

Page 67: ...ndicates an open cir cuit replace the failed thermal cutoff and high limit thermostat In addition check for failed heat element or blocked or improper exhaust system TEST 4 MOISTURE SENSOR TEST NOTE This test is performed when an auto matic cycle stops too soon or runs much longer than expected The test is started with the dryer completely assembled The dryer will shut down automatically after 2 1...

Page 68: ... electronic control board See Checking The Button Functions on page 6 12 8 Measure the resistance across the pins of the mating connector If a small resistance is measured replace this harness 9 Measure the resistance across each of the outermost contacts and the center pin ground If a resistance less than infinity is mea sured replace the wire harness and moisture sensor 10 If moisture sensor dia...

Page 69: ...e you can use the diode test function on the digital meter If using an analog meter the resis tance reading should go from infinity open circuit to less than 40 kΩ If not reverse the polarity of the meter con nection and measure the resistance again If the reading is less than 40 kΩ the circuit is okay and you should con tinue the remainder of the resistance checks with the connections reversed fr...

Page 70: ...0g 1E or 2E If any of the conditions are not met or if one of the dryer model codes listed above is displayed when the door is closed check that the wires between the door switch and the electronic con trol board are properly connected If the connections are okay replace the door switch assembly and its wiring and retest If the door switch assembly and wiring have been replaced and dryer still doe...

Page 71: ...6 14 NOTES ...

Page 72: ... 6 P2 7 G SENSOR MOVS G Y P1 1 Y R BK R W BK W 7 8 11 8 BU W 2 4 3 8 2 4 3 6 ELECTRONIC FS2 FS1 VALVE NO 1 IG IGR IGNITOR 50 500 HOLD ASSIST MAIN 22 000 BTU HR VALVE NO 2 4 1 3 2 5 FLAME SENSOR 4M 5M 6M DL NC 3M 3V 1V HS1 91 C 196 F 96 C 205 F HS2 TF1 TF2 TEMP L1 HEATER RTN HEATER V 10k 3 P3 P4 P1 3 P2 5 P2 4 P1 4 P1 5 HEATER RELAY P1 2 P2 3 N O 0 250 TERMINAL COM 0 250 TERMINAL N C P2 6 P2 7 P2 1...

Page 73: ...7 2 NOTES ...

Page 74: ...R LITERATURE ORDERS PHONE 1 800 851 4605 FOR TECHNICAL INFORMATION AND SERVICE POINTERS www servicematters com IN CANADA FOR PRODUCT SPECIFICATIONS AND WARRANTY INFORMATION CALL 1 800 688 2002 FOR TECHNICAL ASSISTANCE WHILE AT THE CUSTOMER S HOME CALL THE TECHNICAL ASSISTANCE LINE 1 800 488 4791 HAVE YOUR STORE NUMBER READY TO IDENTIFY YOU AS AN AUTHORIZED SERVICER FOR WHIRLPOOL PRODUCTS 1 800 253...

Page 75: ......

Reviews: