•
Do not place this appliance on or near a hot gas or electric burner, in or where it could touch a heated
oven or a microwave oven.
•
Do not use this appliance outdoors.
•
Do not place objects on the product or allow objects to obstruct the inlet or outlet openings, or operate
in close proximity to walls or curtains, etc.
•
The use of attachments or accessories not recommended or sold by the product distributor may cause
personal or property hazards or injuries.
•
This product is intended for normal domestic/household use only.
•
This appliance is not intended for use by persons (including children) with reduced physical, sensory or
mental capabilities, or lack of experience and knowledge, unless they have been given supervision or
instruction concerning use of the appliance by a person responsible for their safety.
•
Children should be supervised to ensure that they do not play with the appliance.
•
The appliance is not intended to be operated by means of an external timer or separate remote-control
system.
•
If the supply cord is damaged, it must be replaced by the manufacturer, its service agent or similarly
qualified persons in order to avoid a hazard.
•
Never use utensils to try to release trapped toast from the slots as it is highly dangerous to do so and it
can damage the appliance.
•
Allow the toaster to cool down, then turn it upside down and gently shake it to release trapped toast/bread
particles.
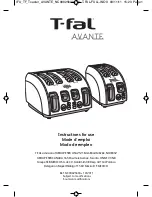
FEATURES
1. Cancel/Stop Button
2. Reheat Button
3. Defrost Buton
4. Pop-up Lever
5. Variable Browning Control
6. Toasting Slots
7. Crumb Tray
INSTRUCTIONS
1. Plug into an earthed power socket.
For the first use, it is recommended that the toaster be operated without bread to burn off the dust
accumulated on the new element that will disperse giving off an unpleasant smell; when doing this it is
recommended that the browning control be set to the medium setting.
2. Place bread into slots - use slices of equal size, thickness and freshness. Avoid torn and broken slices
that may get lodged in the toasting walls.
3. Set browning control to suit the required degree of brownness, from No.1 to No. 7 on the browning
control knob. (No.1- lightest, No.7 darkest). Different breads will require different settings. The higher
the number (1-7) the longer the toasting cycle and the darker the toast colour.
4. Press the pop-up lever down fully to the latched position.
NOTE:
The pop-up lever will not latch down unless the power is switched ON.
1
2
3
4
5
6
7