


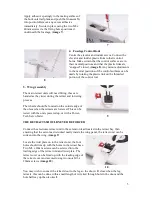


If you wish to install a pilot figure, do so now. We recommend that you drill two small holes
as shown in the clear canopy to allow any heat to disperse, (
image 18
). The canopy cover
may require some trimming to obtain a perfect fit. This should be tested and trimmed if
necessary before the canopy is assembled. Carefully apply adhesive to the foam section of the
canopy assembly. Use the adhesive sparingly and position the clear canopy in place on the
moulding, (
image 19
). Allow to dry thoroughly before attempting to fit the assembly onto the
fuselage.
18
19
The canopy is held in position with pre-installed magnetic catches. Do not attempt to fly the
model without the canopy secured in position.
8. Battery Installation
Your flight battery, (not included) needs to be firmly
secured in the battery compartment to prevent it from
moving in flight, (
image 20
). The model includes one
battery positioning strap, however the battery will
require an additional method of fixing to provide
adequate security. Because most experienced pilots will
have a preferred method of battery retention, this has not
been included with the model. We recommend the use of
additional straps combined with self-adhesive
20
“Velcro” tape.
9. Final Checks
Double check that all fixings and fasteners used on the model are secure, including snap
links, servos screws, wheel retaining screws etc. Check that all control surfaces are moving in
the correct direction in relation to control inputs from your transmitter.
We recommend the following control throws for initial flights, however these can be adjusted
to suit your personal preference after flight testing has been completed.
Elevator:
10mm
deflection each way.
Ailerons:
10mm
deflection each way.
Rudder:
20mm
deflection each way.
Flaps:
45°
deflection maximum.
The centre of gravity of your A1 Skyraider is
105mm
back from the furthest forward point of
the wing. Using the recommended 5550mAh flight battery, this centre of gravity should be
easily achieved. If you choose to use a lighter battery it will be necessary to additional ballast
to the model in order to achieve the correct centre of gravity.
8


