


Safety Precautions
1) Do not attempt to repair or modify this aircraft with non-factory parts.
2) Never fly this model over roads, railway lines, near to power lines, airports, buildings or
any people.
3) Do not fly this model in excessively strong winds, in the rain, or thunderstorms.
4) Do not fly or launch the model towards people.
5) Keep hands and face away from rotating propeller at all times.
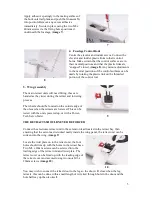
6) We strongly recommend that all fixings and fasteners used in the construction of this
model are checked regularly for integrity. Failure to do so could cause a crash or personal
injury.
7) We only recommend the use of 2.4GHz radio equipment with this model.
Disclaimer
1) This radio controlled model is not a toy. Used incorrectly it is capable of inflicting serious
injury to persons or damage to property. The owner/pilot assumes all responsibility for
any damage to persons or property resulting from the use of this product.
2) The manufacturer and distributor decline all responsibility for any liability arising from
use of this product.
3) It is very important that you follow all instructions for assembling and setting up of this
model. Failure to do so could result in a loss of control and possibly a crash.
Overview
Thank-you for purchasing this MAX-THRUST Douglas A1 Skyraider radio controlled model
aircraft.
The A1 Skyraider offers a stunning combination of terrific looks and sensational flight
performance. Manufactured from “EPOFLEXY” it is extremely robust, however, in the
event of a “less than perfect” arrival, we supply a range of spares to get you flying again in
the shortest time. It is capable of a wide range of aerobatic manoeuvres to thrill the
experienced pilot, but with reduced control throws it provides a solid and predictable flight
performance, perfect for the sports flyer. We are certain you will enjoy your new model,
please take the time to read this manual thoroughly and understand its contents completely
prior to commencing assembly.
Key Features
Powerful Brushless Motor
80A Brushless ESC
Retracting Undercarriage
Highly Detailed 4 Blade Propeller
Factory Applied Decals
Pre-Installed servos
“Live” Control Surface Hinging
Durable “EPOFLEXY” Construction
Steerable Retractable Tail Wheel
Specification
Wingspan: 1600mm
Length:
1232mm
Flying Weight: 2800g
Motor:
4258 Out-Runner
ESC:
80A
Servos:
4 x 9g - 2 x 17g
Battery:
3350mAh - 5550mAh 4S 14.8V Li-Po (Not Included)
1


