12
Initial OSD Settings
13
Initial OSD Settings
1-2
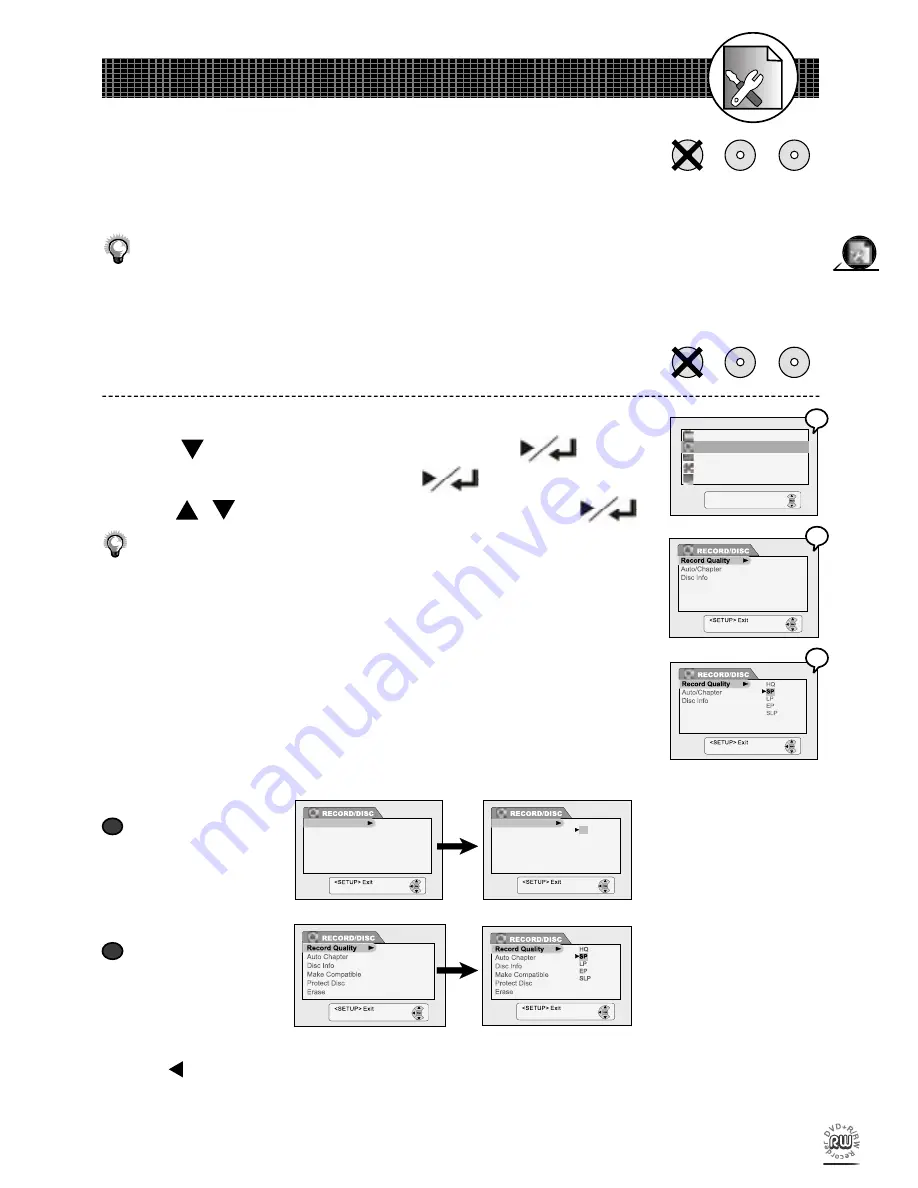
RECORD / DISC Setup
Record Quality Setting
1
Press
Setup
in the stop mode to display the menus.
2
Press to select “RECORD / DISC” and press
.
3
Select “Record quality” by pressing
.
4
Press
/
to select the preferred record quality and press
.
You can also press
Quality
on the remote control to call out the OSD setting.
Please refer to Chapter 4-2: Record Setup for Details. (page 46)
HQ
(High Quality): to record about one hour
SP
(Standard Play): to record about two hours
LP
(Long Play): to record about three hours
EP
(Extended Play): to record about four hours
SLP
(Standard Long Play): to record about six hours
•
If you insert a DVD+R or DVD+RW disc, the OSD will be shown as
follows:
TUNING
VIDEO
SYSTEM
TIMER
RECORD/DISC
<SETUP> Exit
The RECORD/DISC Setting OSD will vary depending on whether
you have inserted no disc, a DVD+R, or a DVD+RW. The disc pic-
tures next to the titles indicate the type of disc best suited to each
DVD+R
DVD+RW
No Disc
DVD+R
DVD+RW
No Disc
When a DVD+R
disc is placed:
Record Quality
Auto Chapter
Disc Info
Finalize
Record Quality
Auto Chapter
Disc Info
Finalise
Record Quality
Auto Chapter
Disc Info
Finalize
Record Quality
Auto Chapter
Disc Info
Finalise
HQ
LP
EP
SLP
SP
HQ
LP
EP
SLP
SP
When a DVD+RW
disc is placed:
of the functions described on pages 15-19.
•
Once you’ve inserted a DVD+R or DVD+RW disc, a Title Menu automatically appears on the Screen.
For details on how to edit the titles, please refer to Chapter 4-4: Editing (page 50).
•
If you insert a blank DVD+R disc, the DVD recorder will automatically start formatting the disc.
-To return to the Setup MENU screen
Press .
-To complete the setup operation
Press
Setup
to exit from Setup MENU screen.
a
a
b
b
4
4
3
3
2
2
Summary of Contents for DVDR100
Page 60: ......


