13
model no. 058-1294-8 | contact us 1-800-689-9928
OPERATING INSTRUCTIONS
SELECTING THE PROPER ELECTRODE
There is no golden rule that determines the exact rod or heat setting required for every situation.
The type and thickness of metal and the position of the workpiece determine the electrode type
and the amount of heat needed in the welding process. Heavier and thicker metals require more
amperage. It is best to practice your welds on scrap metal which matches the metal you intend
to work with to determine correct heat setting and electrode choice. See the following
troubleshooting tips to determine if you are using the correct electrode
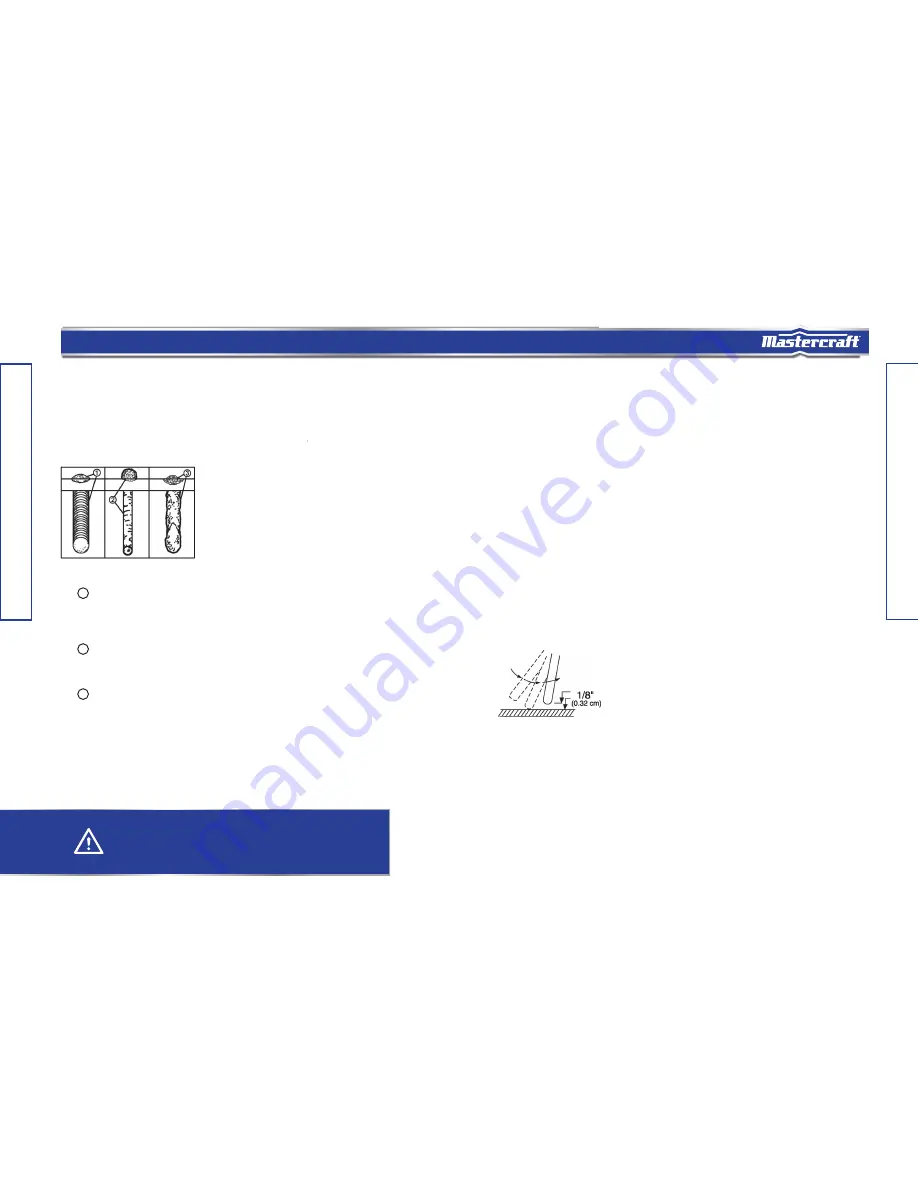
When the proper rod is used:
a.
1
The bead will lay smoothly over the work without ragged edges.
b.
The base metal puddle will be as deep as the bead that rises above it.
c.
The welding operation will make a crackling sound similar to the sound of eggs frying.
When a rod too small is used
:
a.
The bead will be high and irregular.
b.
The arc will be difficult to maintain.
When the rod is too large
:
a.
The arc will burn through light metals.
b.
The bead will undercut the work.
c.
The bead will be flat and porous.
d.
The rod may freeze or stick to the workpiece.
12
OPERATING INSTRUCTIONS
1. Setting the amperage control
The welder has an infinite output current control. It is capable of welding with 1/16, 5/64, 3/32, 1/8,
and 5/32" electrodes.
There is no golden rule that determines the exact amperage required for every situation. It is best to test
your welds on scrap metal which matches the metals you intend to work with to determine
correct setting for your job. The electrode type and the thickness of the workpiece metal determine the
amount of heat needed in the welding process. Heavier and thicker metals require more voltage
(amperage), whereas lighter and thinner metals require less voltage (amperage).
2. Welding techniques
The best way to teach yourself how to weld is with short periods of practice at regular intervals. All
practice welds should be done on scrap metal that can be discarded. Do not attempt to make any repairs
on valuable equipment until you have satisfied yourself that your practice welds are of good appearance
and free of slag or gas inclusions.
2.1 Holding the electrode
The best way to grip the electrode holder is the way that feels most comfortable to you. To position the
electrode to the workpiece when striking the initial arc it may be necessary to hold the electrode perpen-
dicular to the workpiece. Once the arc is started the angle of the electrode in relation to the workpiece
should be between 10 and 30 degrees. This will allow for good penetration, with minimal spatter.
2.2 Striking the arc
Scratch the work piece with the end of the electrode to start an arc and then raise it quickly to about a
1/8" gap between the rod and the workpiece. See the following picture
:
WARNING!
Rate of travel over the work also affects the weld. To ensure proper penetration and
enough deposit of rod, the arc must be moved slowly and evenly along the weld seam.
2
3
model no. 058-1294-8 | contact us 1-800-689-9928
model no. 058-1294-8 | contact us 1-800-689-9928
model no. 058-1294-8 | contact us 1-800-689-9928
model no. 058-1294-8 | contact us 1-800-689-9928


