Page 14
OPERATION
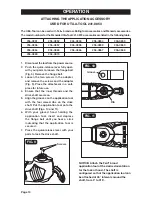
NOTICE: Attach the Menards application
accessories used for Utila-tool 241-0853
at the desired orientation for the task at
hand. The shaft is configured so that the
application tool can be attached at 30°
intervals around the shaft, from 0° to 330°.
Do not attach the
1-3/8” Precision End-Cut Blade, 1-1/4”
End-Cut Blade, 2” 3-Sided Bi-Metal Blade,
1-1/4” 3-Sided Bi-Metal Blade, 3/8” End-
Cut Blade, and Curved Plunge Blade, the
Scraper Blades or Carbide Grit Semicircle
Blade facing backwards (Fig. 4), as
operation in this position may cause
serious injury.
Use sharp, undamaged
saw blades only. Deformed, blunt saw
blades or saw blades that are otherwise
damaged can break.
For all accessories,
work with the accessory away from the
body. Never position hand near or directly
in front of working area. Always hold the
tool with both hands and wear protective
gloves.
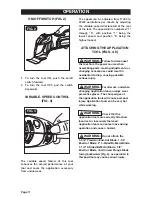
MOUNTING/CHANGING THE
SANDPAPER (FIG. 12)
FIG. 12
WARNING:
WARNING:
WARNING:
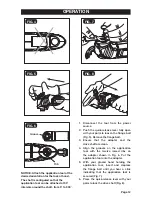
1. Disconnect the tool from the power
source.
2. Follow the directions for attaching the
application tool to attach the sanding
pad to the Utila-Tool.
3. Align the sandpaper with the sanding
pad and use your hand to press it
firmly onto the sanding pad.
4. Press the sandpaper firmly against a
smooth surface for a short period, then
turn on the tool. The burr will form a
non-slip bond with the outer edge of
the sandpaper felt. This will avoid
premature wear.
5. If one point has become worn, pull off
the sandpaper, turn it 120° and place
it on the sanding pad again.
CUTTING
Saw blades are ideal for making precise
cuts in tight areas, close to edges or flush
to a surface. Select a medium to high
speed for making the initial plunge; start
off at medium speed for increased control.
After making your initial cut, you can
increase speed for faster cutting ability.
Plunge cutting
The 1-3/8” Precision End-Cut Blade, 1-1/4”
End-Cut Blade, 2” 3-Sided Bi-Metal Blade,
1-1/4” 3-Sided Bi-Metal Blade, and 3/8”
End-Cut Blade, are intended to make
precise cuts to allow for installation of
flooring or wall material. While keeping
the teeth of the blade in the work surface,
move the back of the tool in a slow
sideways motion. This motion will help
expedite the cut. When plunge cutting,
it is important not to force the tool. If
you experience a strong vibration in your
hand during the plunge cut, this
indicates that you are applying too much
pressure. Back the tool out and let the
speed of the tool do the work.
Sanding paper
Sanding pad
Summary of Contents for 241-0854
Page 19: ...Page 18 NOTES ...
Page 20: ...Page 19 NOTES ...
Page 21: ...Page 20 NOTES ...
Page 22: ...Page 21 NOTES ...
Page 24: ...Page 24 02 2012 2012 Menard Inc Eau Claire WI 54703 ...

