background image

Page 29

mPower 300 Series (Rev G)

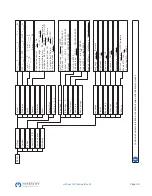
5.4.3.3  Menu “Reset Device”

Entering this menu item will prompt for acknowledgement to reset the system completely to default settings and set 

values. Selecting 

No

 will cancel the reset procedure, while selecting 

Yes

, submitted by 

Enter

 button, will instantly reset 

the system.

5.4.3.4 

Menu “Profiles”

See 

5.8 Loading and Saving a User Profile on page 46

.

5.4.3.5  Menus “Overview” and “About HW, SW...”

This menu pages display an overview of the set values (U, I, P), related protection settings (OVP, OCP, OPP), limits 

settings and an alarm history (counter) of alarms that might have occurred since the last time the unit was switched on. 

Furthermore, you can find information about the unit (model, serial number, firmware versions etc.). 

5.4.3.6  Menu “Communication”

Here settings for the Ethernet port (on rear side of unit) are made. The USB port there doesn’t require any settings.
When delivered or after a complete reset, the Ethernet port has following 

default settings

 assigned:

• 

DHCP: off

• 

IP: 192.168.0.2

• 

Subnet mask: 255.255.255.0

• 

Gateway: 192.168.0.1

• 

Port: 5025

• 

DNS: 0.0.0.0

• 

Host name: Client

• 

Domain: Workgroup

Those settings can be changed anytime at will, in the setup menu or via the system website, which you can open from the 

current IP or host name (also see 

4.9.1

).

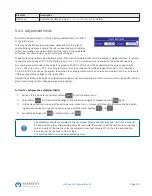
Submenu “IP Settings 1”

Element

Description

Get IP address

Manual

 (default): uses the default (after delivery or reset) or the last set network parameters. 

Those parameters are not overwritten by selection 

DHCP

 and remain when switching back from 

DHCP

 to 

Manual

DHCP

: after switching to DHCP and submitting the change with button 

Enter

, the unit will 

instantly try to get network parameters (IP, subnet mask, gateway, DNS) assigned from a DHCP 

server. If the attempt fails, the unit will use the settings from 

Manual

 again. In this case, the 

overview in screen 

View settings

 will indicate the DCHP status as 

DHCP (failed)

, otherwise as 

DHCP (active)

IP address

Only available with setting 

Get IP address = Manual

. Default value: 192.168.0.2

Permanent manual setting of the unit’s IP address in standard IP format

Subnet mask

Only available with setting 

Get IP address = Manual

. Default value: 255.255.255.0

Permanent manual setting of the subnet mask in standard IP format

Gateway

Only available with setting 

Get IP address = Manual

. Default value: 192.168.0.1

Permanent manual setting of the gateway address in standard IP format

Summary of Contents for mPower 300 Series

Page 1: ...mPower DC Power Supplies 300 Series Operating Guide and Reference Mar 2020 P N 501046 300 G ...

Page 2: ... Systems Inc All other trademarks are the property of their respective owners Global Support Contacts Web www marway com Email support marway com sales marway com Phone 800 462 7929 7am 5pm PST There may be updates to this documentation and the software it describes at http www marway com mpower dc power supplies ...

Page 3: ...s 20 4 8 2 Driver installation Linux MacOS 20 4 8 3 Alternative drivers 21 4 9 Initial Startup 21 4 9 1 Initial network setup 21 5 Operation and Application 5 1 Important Notes 22 5 1 1 Personal safety 22 5 1 2 General 22 5 2 Operating Modes 22 5 2 1 Voltage regulation 22 5 2 2 Current regulation 23 5 2 3 Power regulation 23 5 3 Alarm Conditions 24 5 3 1 Available alarm signals 24 5 3 2 Power fail...

Page 4: ...3 Calibration readjustment 50 6 3 1 Preface 50 6 3 2 Preparation 50 6 3 3 Calibration procedure 50 7 Contact and Support 7 1 General 53 7 2 Contact Options 53 8 Model Specifications Aappendix 8 1 Approved Operating Conditions 54 8 2 Model Data Table Footnotes 54 8 3 MPW 300 01 1U 1 500 Watt 100 240 Vac 55 8 4 MPW 300 11 1U 3 000 Watt 200 240 Vac 57 ...

Page 5: ... information for operation Symbol for general notices 1 2 Product Key Decoding of the product description on the label using an example Configurations 000 standard unit MPW 300 0 1 0080 050 000 mPower power supplies DC auto ranging series Max Output DC Volts Max Output DC Amps Input Power 0 1 phase 100 240 Vac 1 1 phase 200 240 Vac Enclosure Type 1 Rackmount 1U 1 3 Intended Product Usage The equip...

Page 6: ...has zero voltage Carry out earthing and short circuiting Provide protection from adjacent live parts The equipment must only be used as intended The equipment is only approved for use within the connection limits stated on the product label Do not insert any object particularly metallic through the ventilator slots Avoid any use of liquids near the equipment Protect the unit from wet damp and cond...

Page 7: ...crew next to the AC connector is a central grounding point for internal use Do not un screw to connect external GND potential here The device is grounded via the AC cable 2 Physical Overview 2 1 300 Series 1U Views Share Sense NC NC Analog Interface USB LAN Output Power Input Cursor Position Menu Cursor Position On ESC Enter 35 00A 80 00V 80 00V 120 00A Remote USB CV C D F A B E ...

Page 8: ...Page 8 mPower 300 Series Rev G 1 6 19 7 1 3 1U sides shown without DC terminal cover Note that DC outlet dimensions do not include cable bend radius 1U top shown without DC terminal cover ...

Page 9: ...s a galvanically isolated analog interface All interfaces are galvanically isolated up to 1500 Vdc In addition these systems include the ability to be used in parallel Each unit is configured for set values alarms etc and the built in Share bus manages the current load sharing Operating in this way allows up to 10 units to be combined into a single system with a total power of up to 48 kW The bloc...

Page 10: ...s see 5 4 3 Configuration in the setup menu Navigates through menus submenus and parameters direction up left or changes view mode Navigates through menus submenus and parameters direction down right or changes view mode Submits altered parameters or set values in submenus as well enters submenus Can also be used to acknowledge alarms Cancels changes of parameters in the setup menu or leaves subme...

Page 11: ...t to adjust can be selected by pushing the corresponding rotary knob in order to move the cursor The left hand rotary knob is always assigned to the DC output voltage and related parameters like OVP or U max whereas the right hand rotary knobs is either assigned to the DC output current and related parameters or to the DC output power In remote control condition no matter if analog or digital the ...

Page 12: ...g interface USB the built in USB port or a plug in interface module Ethernet the built in Ethernet LAN port Local The system has been locked by the user explicitly against remote control 3 2 1 2 Rotary knobs As long as the system is in manual operation the two rotary knobs are used to adjust set values as well as setting the parameters in the settings menu For a detailed description of the individ...

Page 13: ...wn in the technical data sheets These will influence the actual values 3 2 3 Share bus connector The 2 pole Phoenix socket named Share on the back of the unit is provided for connection to equally named sockets on other mPower power supplies to achieve a balanced load current distribution during parallel connection When multiple units up to 10 total are combined in parallel operation the Share bus...

Page 14: ...B port The USB B port on the back of the power supply is provided for connection to a PC for control communication and for firmware updates The driver is available as a download and installs as a virtual COM port Details for remote control can be found in the Programming Guide document on our web site The power supply can be addressed through the USB port using the international standard ModBus RT...

Page 15: ...hoes when carrying the equipment as due to its weight a fall can have serious consequences 4 1 2 Packaging It s recommended to keep the complete transport packaging for the lifetime of the power supply for relocation or return to the manufacturer for repair 4 1 3 Storage In case of long term storage of the equipment it is recommended to use the original packaging or similar Storage must be in dry ...

Page 16: ...f the unit With all models mounting brackets are included to mount the unit in a 19 rack A rackmount installation will usually mount the power supply on suitable weight rated rails not included and installed in 19 racks or cabinets The depth of the power supply and rack and its weight must be taken into account when selecting rails The handles on the front are for sliding in and out of the cabinet...

Page 17: ...n the input plug ensure that the unit is switched off by its mains switch The unit is delivered with a 3 wire mains cord L N GND If the unit is going to be connected to a standard 2 phase or 3 phase supply following phases are required Nominal power Phases Supply type 1 5 kW 3 kW L1 or L2 or L3 N GND At least wall socket 16 A The default input values of all models in this series are 230 V 16 A 50 ...

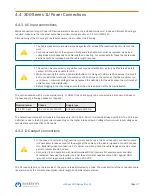
Page 18: ...copper bar It is recommended that connection of load cables always utilizes flexible cables with ring lugs 4 4 2 2 Cable lead and plastic cover A plastic cover for contact protection is included for the DC terminal It should always be installed The connection angle and the required bending radius for the DC cable must be taken into account when planning the depth of the complete unit especially wh...

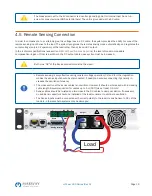
Page 19: ...is insufficient the DC output cable cross section must be increased Both pins NC of the Sense connector must not be wired Remote sensing is only effective during constant voltage operation CV and for other regulation modes the sense input should be disconnected if possible because connecting it generally in creases the oscillation tendency The cross section of the sense cables is noncritical Howev...

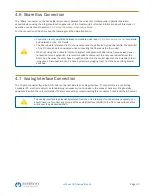
Page 20: ...ral units of a system configured with Share bus because less power is required for an application it is recommended to disconnect the not powered units from the Share bus because they may have a negative impact on the control signal on the bus due to their impedance Disconnection can be done by simply unplugging them from the bus or using bipolar switches 4 7 Analog Interface Connection The 15 pol...

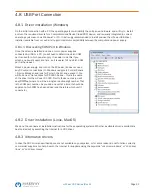
Page 21: ...s the newest Attach a power supply and turn on the AC power it does not need any DC output connections In Windows navigate to Control Panels Device Manager and look for Ports in the list and expand it You will find one or more entries for PS 9000 Series this is the name of the driver for the mPower DC 300 Next to those names you will see COMnn where nn will be a single or double digit number That ...

Page 22: ...iguration in the setup menu please refer to 5 4 3 7 Menu HMI Setup For the configuration via the system s web interface or EA Power Control you need the unit to be connected to a network or directly to a PC which can access the default IP 192 168 0 2 How to do the network setup on the system website 1 In case the system display is in any kind of menu exit the menu to the main display 2 Open the sy...

Page 23: ... is internally controlled by different control or regulation circuits which shall bring voltage current and power to the adjusted values and hold them constant if possible These circuits follow typical laws of control systems engineering resulting in different operating modes Every operating mode has its own characteristics which is explained below in short form 5 2 1 Voltage regulation Voltage re...

Page 24: ...n the range PN see diagram to the right While the DC output is enabled and constant power mode is active the condition CP mode active will be shown on the graphic display by the abbreviation CP and can also be read as a status message via digital interface Traditional range envelope A u t o r a n g i n g E x t e n d e d E n v e l o p e Output Voltage Output Current Range Envelope for the Same Powe...

Page 25: ...he unit DC output will be switched off temporarily Non critical Signal OVP OverVoltage Overvoltage shutdown of the DC output due to high voltage entering the unit or generated by the unit itself due to a defect or because the adjusted OVP threshold was lower than the actual output voltage Critical The unit and or the load could be damaged Signal OCP OverCurrent Shutdown of the DC output due to exc...

Page 26: ...es a negative load step it will make the voltage rise quickly resulting in an voltage overshoot for a short moment which can already trigger the OVP This function serves to warn the user of the power supply audibly or visually that the system probably has generated an excessive voltage which could damage the connected load application The system is not fitted with protection from external overvolt...

Page 27: ...or OVP Those signals must be ignored until the unit has finished booting and is ready to work 5 4 2 Switching the unit off On switch off the last output condition and the most recent set values are saved Furthermore a PF alarm power failure will be reported but can be ignored The DC output is immediately switched off and after a short while fans will shut down and after another few seconds the uni...

Page 28: ...utput off DC ON OFF If the DC output has been switched on before toggling the pin can switch the output off and on again DC output after power ON 5 Determines the condition of the DC output after power up OFF DC output is always off after switching on the unit Restore DC output condition will be restored to the condition prior to switch off DC output after PF alarm 6 Determines how the DC output s...

Page 29: ...e Client Domain Workgroup Those settings can be changed anytime at will in the setup menu or via the system website which you can open from the current IP or host name also see 4 9 1 Submenu IP Settings 1 Element Description Get IP address Manual default uses the default after delivery or reset or the last set network parameters Those parameters are not overwritten by selection DHCP and remain whe...

Page 30: ...ax ____ W General Calibration Reset Communication IP Settings 2 HMI Setup Language English Deutsch Display Language Brightness 1 10 HMI Lock HMI lock Lock all ON OFF possible Enable PIN Yes No Change user PIN START Key Sound Key sound ON OFF Alarm Sound Alarm sound ON OFF Page Setup View mode UI UP IP Settings 1 Get IP address Manual DHCP IP address 0 0 0 0 255 255 255 255 Subnet mask 0 0 0 0 255 ...

Page 31: ...een two subsequent bytes or blocks of a transferred message For more information about the timeout refer to the external programming documentation Programming Guide Timeout ETH s Default value 5 Adjustable time after which the unit will automatically disconnect the socket connection if there was no communication during that period 5 4 3 7 Menu HMI Setup These settings refer exclusively to the cont...

Page 32: ... 1 25 V 9 375 V As soon as the system is switched to analog remote control it would put out minimum 10V even there is nothing connected to voltage control input VSEL Beyond those limits values given by digital commands are not accepted and will return an error when using SCPI Values given from analog control voltages are ignored clipping How to configure the adjustment limits 1 Switch off the DC o...

Page 33: ... actual and set values of power P are displayed The set value of current is then only accessible in the setup menu or when switching to a different view mode with the arrow buttons or How to change the display mode in the menu 1 Switch off the DC output and push button to call the setup menu 2 In the menu navigate to HMI Setup and push Then in the submenu navigate to Page Setup and push again 3 Se...

Page 34: ...es for actual and set values 2 With mode UI selected and as long as the main display is active turn the left hand knob to adjust output voltage and the right hand knob to adjust the output current In mode UP turn the right hand knob to adjust the output power as long as the power set value with unit W Watts is displayed The arrow buttons can be used to toggle between current and power set value 3 ...

Page 35: ...I is not fully locked press the button Otherwise you are asked to disable the HMI lock first 2 This button toggles between on and off as long as a change is not restricted by an alarm or the system is locked in remote The current condition is displayed with the LED in the button LED on output on How to remotely switch the DC output on or off via the analog interface See section 5 5 4 Remote contro...

Page 36: ...inhibited condition the status Local will be displayed in the status area lower half middle of the display Activating the inhibit can be useful if the system is remotely controlled by software or some electronic device but it is required to make adjustments at the device or deal with emergency which would not be possible remotely Activating condition Local causes the following If remote control vi...

Page 37: ...l voltage or generated by the reference voltage on pin 3 As soon as remote control via the analog interface is activated the values displayed will be those provided by the interface The AI can be operated in the common voltage ranges 0 5 V and 0 10 V in each case 0 100 of the nominal value The selection of the voltage range can be done in the system setup See section 5 4 3 Configuration in the set...

Page 38: ...of them are also reported as signal on the analog interface socket see 5 5 4 4 for example the overvoltage alarm OV which is considered as critical In case of a hardware alarm occurring during remote control via analog interface the DC output will be switched off the same way as in manual control While alarms OT and OV can be monitored via the corresponding pins of the interface other alarms can t...

Page 39: ...range 0 4 Accuracy 0 10 V range 0 2 Input impedance Ri 40 k 100 k 9 VMON AO Actual voltage 0 10 V or 0 5 V correspond to 0 100 von UNom Accuracy 0 5 V range 0 4 Accuracy 0 10 V range 0 2 at IMax 2 mA Short circuit proof against AGND 10 CMON AO Actual current 0 10 V or 0 5 V correspond to 0 100 von INom 11 AGND POT Ground for all analog signals For SEL MON VREF Signals 12 13 REM SB DI DC output OFF...

Page 40: ... in the diagram with a relay as example V 2 AGND Analog Output AO Output from an OA circuit only min imally impedant See specifications table above 5 5 4 6 Analog interface examples a Switching off the DC output via the pin REM SB A digital output e g from a PLC may be unable to cleanly pull down the pin as it may not be of low enough resistance Check the specification of the controlling applicati...

Page 41: ...t from being switched on by any means This results in following possible situations DC output Pin REM SB Parameter REM SB Behaviour is off HIGH normal DC output not locked It can be switched on by pushbutton On Off front panel or via command from digital interface LOW inverted HIGH inverted DC output locked It can not be switched on by pushbutton On Off front panel or via command from digital inte...

Page 42: ...s of at least 10 kΩ must be used The power set value PSEL is always tied to VREF and will thus be permanently 100 If the control voltage is fed in from an external source it is necessary to consider the input voltage ranges for set values 0 5 V or 0 10 V Use of the input voltage range 0 5 V for 0 100 set value halves the effective resolution Example with potentiometers Example with external voltag...

Page 43: ...ke the OT and the PF alarm How to acknowledge an alarm in the display during manual control Push button or once How to acknowledge an alarm on the analog interface during analog remote control Switch off the DC output by pulling pin REM SB to the level that corresponds to DC output off then switch it on again See section 5 5 4 6 Analog interface examples for levels and logic How to acknowledge an ...

Page 44: ...itch off the DC output and push Menu to call the setup menu 2 In the menu navigate to Settings and press Enter Then in the submenu navigate to Protection and press Enter again 3 Set the limits for the hardware alarms relevant to your application if the default value of 110 of nominal is unsuit able 4 Accept the settings by pressing Enter or discard them with ESC Those thresholds are reset to defau...

Page 45: ...he HMI is locked and you can t even switch on the DC output In order to be able to do at least that use ON OFF Possible 4 The lock is activated as soon as you confirm your selection with Enter The system will automatically exit the menu and jump back to normal display with status Locked now being indicated Alternatively to the procedure above you can also lock the HMI while the DC output is switch...

Page 46: ... calling up the menu page and selecting a profile the most important settings can be seen but not changed How to save the current values and settings work profile as a user profile 1 Switch off the DC output and push button to call the setup menu 2 In the menu navigate to Profiles and push 3 In the submenu see figure to the right select a user profile 1 5 to save to and push again 4 From the selec...

Page 47: ...tely but not like a master unit All slaves can be monitored by any of the interfaces The Share Bus controls the process variable U voltage only This means the DC outputs of slave units have to be switched on or off either manually or remotely which is very easy in analog remote control using pins REM SB connected in parallel as well Share Sense NC NC Analog Interface USB LAN Output Power Input Sha...

Page 48: ...es The slaves can be controlled manually as usual or remotely via the analog or via digital interfaces but they don t react to set values changes the same way as the master They can if needed be monitored by reading actual values and status The master unit is not restricted and can be used like a stand alone unit Alarms and other problem situations Parallel operation due to the connection of multi...

Page 49: ... should only be wired for units with the same current rating like for example MPW 300 01 0080 100 1U with another MPW 300 01 0080 100 1U unit Series connection is not supported by the software and hardware of the system This means all units must be controlled separately regarding set values and DC output status whether it is manual control or digital remote control In remote control an almost sync...

Page 50: ...ded if this is in any way connected to the problem a fault description in as much detail as possible is attached if shipping destination is abroad the necessary customs papers are attached 6 2 1 Firmware updates Firmware updates should only be installed when they can eliminate existing bugs in the firmware in the system or contain new features The firmware of the control panel the communication un...

Page 51: ...sful calibration and readjustment a few tools and certain ambient conditions are required A measurement device multimeter for voltage with a max error of half the mPower s voltage error That measurement device can also be used to measure the shunt voltage when readjusting the current If the current is also going to be calibrated a suitable DC current shunt ideally specified for at least 1 25 times...

Page 52: ...to enter the measured output voltage from the multimeter at Measured value Enter it using the right hand rotary knob just like would adjust a set value Assure yourself the value is correct and submit with 5 Repeat points 3 and 4 for the next three calibration steps total of four steps How to calibrate the DC output current 1 Set the load to approx 102 nominal current of the mPower unit for the sam...

Page 53: ...th 5 After this the system requests you to enter the measured sensing voltage from the multimeter at Measured value Enter it using the right hand rotary knob just like would adjust a set value Assure yourself the value is correct and submit with 6 Repeat points 4 and 5 for the next three calibration steps total of four steps 6 3 3 3 Calibrating the actual values Actual values of output voltage wit...

Page 54: ...ately and send it together with a detailed description of the fault and if still under guarantee a copy of the invoice to the following address 7 2 Contact Options Questions or problems with operation of the unit use of optional components with the documentation or software can be addressed to technical support either by telephone or email Address Email Telephone Marway Power Solutions 1721 S Gran...

Page 55: ... of 3 or 3000 depending on whether the specification calls out kW or W For the model specific data tables on the following pages these are the referenced footnotes 1 Related to the nominal values the accuracy defines the maximum deviation between an adjusted values and the true actual value Example an 80 V model has min 0 1 voltage accuracy that is 80 mV When adjusting the voltage to 5 V the actua...

Page 56: ...enn 0 1 UNenn 0 1 UNenn 0 1 UNenn Line regulation at 10 ΔUAC 0 02 UNenn 0 02 UNenn 0 02 UNenn 0 02 UNenn 0 02 UNenn Load regulation at 0 100 load 0 05 UNenn 0 05 UNenn 0 05 UNenn 0 05 UNenn 0 05 UNenn Rise time 10 90 ΔU Max 15 ms Max 15 ms Max 15 ms Max 15 ms Max 15 ms Transient time after load step 1 7 ms 1 4 ms 2 2 ms 2 ms 2 ms Display Resolution See section 3 2 2 Resolution of the displayed val...

Page 57: ...ative terminal to GND Max 400 V DC 400 V DC 400 V DC 400 V DC 400 V DC Positive terminal to GND Max 480 V DC 600 V DC 760 V DC 900 V DC 1150 V DC Miscellaneous Cooling Temperature controlled fans front inlet rear exhaust Ambient temperature 0 50 C 32 122 F Storage temperature 20 70 C 4 158 F Humidity 80 not condensing Standards EN 60950 2006 A11 2009 A1 2010 A12 2011 AC 2011 A2 2013 EN 61326 1 201...

Page 58: ... UNenn 0 1 UNenn 0 1 UNenn 0 1 UNenn Line regulation at 10 ΔUAC 0 02 UNenn 0 02 UNenn 0 02 UNenn 0 02 UNenn 0 02 UNenn Load regulation at 0 100 load 0 05 UNenn 0 05 UNenn 0 05 UNenn 0 05 UNenn 0 05 UNenn Rise time 10 90 ΔU Max 15 ms Max 15 ms Max 15 ms Max 15 ms Max 15 ms Transient time after load step 1 7 ms 1 4 ms 2 2 ms 2 ms 2 ms Display Resolution See section 3 2 2 Resolution of the displayed ...

Page 59: ...sulation5 Negative terminal to GND Max 400 V DC 400 V DC 400 V DC 400 V DC 400 V DC Positive terminal to GND Max 480 V DC 600 V DC 760 V DC 900 V DC 1150 V DC Miscellaneous Cooling Temperature controlled fans front inlet rear exhaust Ambient temperature 0 50 C 32 122 F Storage temperature 20 70 C 4 158 F Humidity 80 not condensing Standards EN 60950 2006 A11 2009 A1 2010 A12 2011 AC 2011 A2 2013 E...

Page 60: ...wer DC Power Supplies 300 Series Operating Guide P N 501046 300 G 2020 Marway Power Systems Inc All rights reserved Marway Power Solutions 1721 S Grand Ave Santa Ana CA 92705 800 462 7929 marway marway com ...

Reviews: