Installation
9
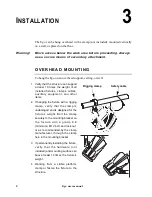
5 Install a safety cable that can hold at least 10 times the weight of the fixture through
the handle of the of the fixture.
6 Loosen the swivel locks, tilt the fixture to the desired angle, and retighten.
7 Verify that the fixture is at least 0.3 meters (12 in.) from the surface to be
illuminated and at least 0.1 meters (4 in.) from any combustible materials. Verify
that the clearance around the air vents is at least 0.1 meters (4 in.).
O P E R A T I O N F R O M T H E F L O O R
To operate the Ego from the floor:
1 Set the fixture on the floor so that the mounting
bracket is under the fixture. Adjust the mounting
bracket and tighten both swivel locks. Note that
the fixture may not be placed so that the clearance
around the air vent is impaired.
2 Verify that the fixture is stable, that it is at least 0.3
meters (12 in.) from the surface to be illuminated
a n d a t l e a s t 0 . 1 m e t e r s ( 4 i n . ) f r o m a n y
combustible materials. Verify that the clearance
around the air vents is at least 0.1 meters (4 in.).
Do not operate the fixture while it lies flat
without the mounting bracket extended as this
reduces the air flow to the fan; the fixture may
overheat and then the thermostatic switch will
temporarily cut the power.
L I N K I N G M U L T I P L E E G O S F O R
S I M U L T A N E O U S C O N T R O L
You can link multiple Egos using speaker cables with stereo mini-jack connectors
for the purpose of controlling them using the optional remote control.
The remote control is connected with a cable to the Remote In socket of the first
Ego fixture. Additional cables are used from the Remote Out sockets to the
Remote In sockets of subsequent fixtures, and so on, until all the Ego fixtures are
connected in a daisy chain. There is no need to terminate this link.


