background image

VMV-402-SH Manual

www.marshall-usa.com

3

4

Model Name

VMV-402-SH Quad-viewer/Switcher

Role of Usage

Quad-viewer or 4x1 Video Switcher

Video Input Support

[3G] 1080p @50/59.94/60Hz (4:2:2)
[HD] 720p @50/59.94/60Hz, 1080i @50/59.94/60Hz, 1080p 
@24/30/60Hz

Audio Pass Through

Embedded surround sound (up to 7.1ch) or stereo digital audio

Input

4x BNC [SDI]

Program Output

1x HDMI + 1x BNC(SDI)

HDMI connector

Type A [19-pin female]

RJ-45 connector

WE/SS 8P8C

ESD Protection

Human body model — ±12kV [air-gap discharge] & ±8kV 
[contact discharge]

Mechanical

Housing

Metal enclosure

Mounting

1U rack-mounting case with ears

Dimensions [L x W x H]

8.25” X 7” X 1.75”
209mm X 178mm X 44.5mm

Weight

 1Kg (2.2 lbs) with rack ears

Power supply

12 - 24 Volts DC

Power consumption

12 Watts nominal
0.5 amp at 24 volts 1 amp at 12 volts

Operation Temperature

0~40°C [32~104°F]

Storage Temperature

-20~60°C [-4~140°F]

Relative Humidity

20~90% RH [no condensation]

5. Specifications

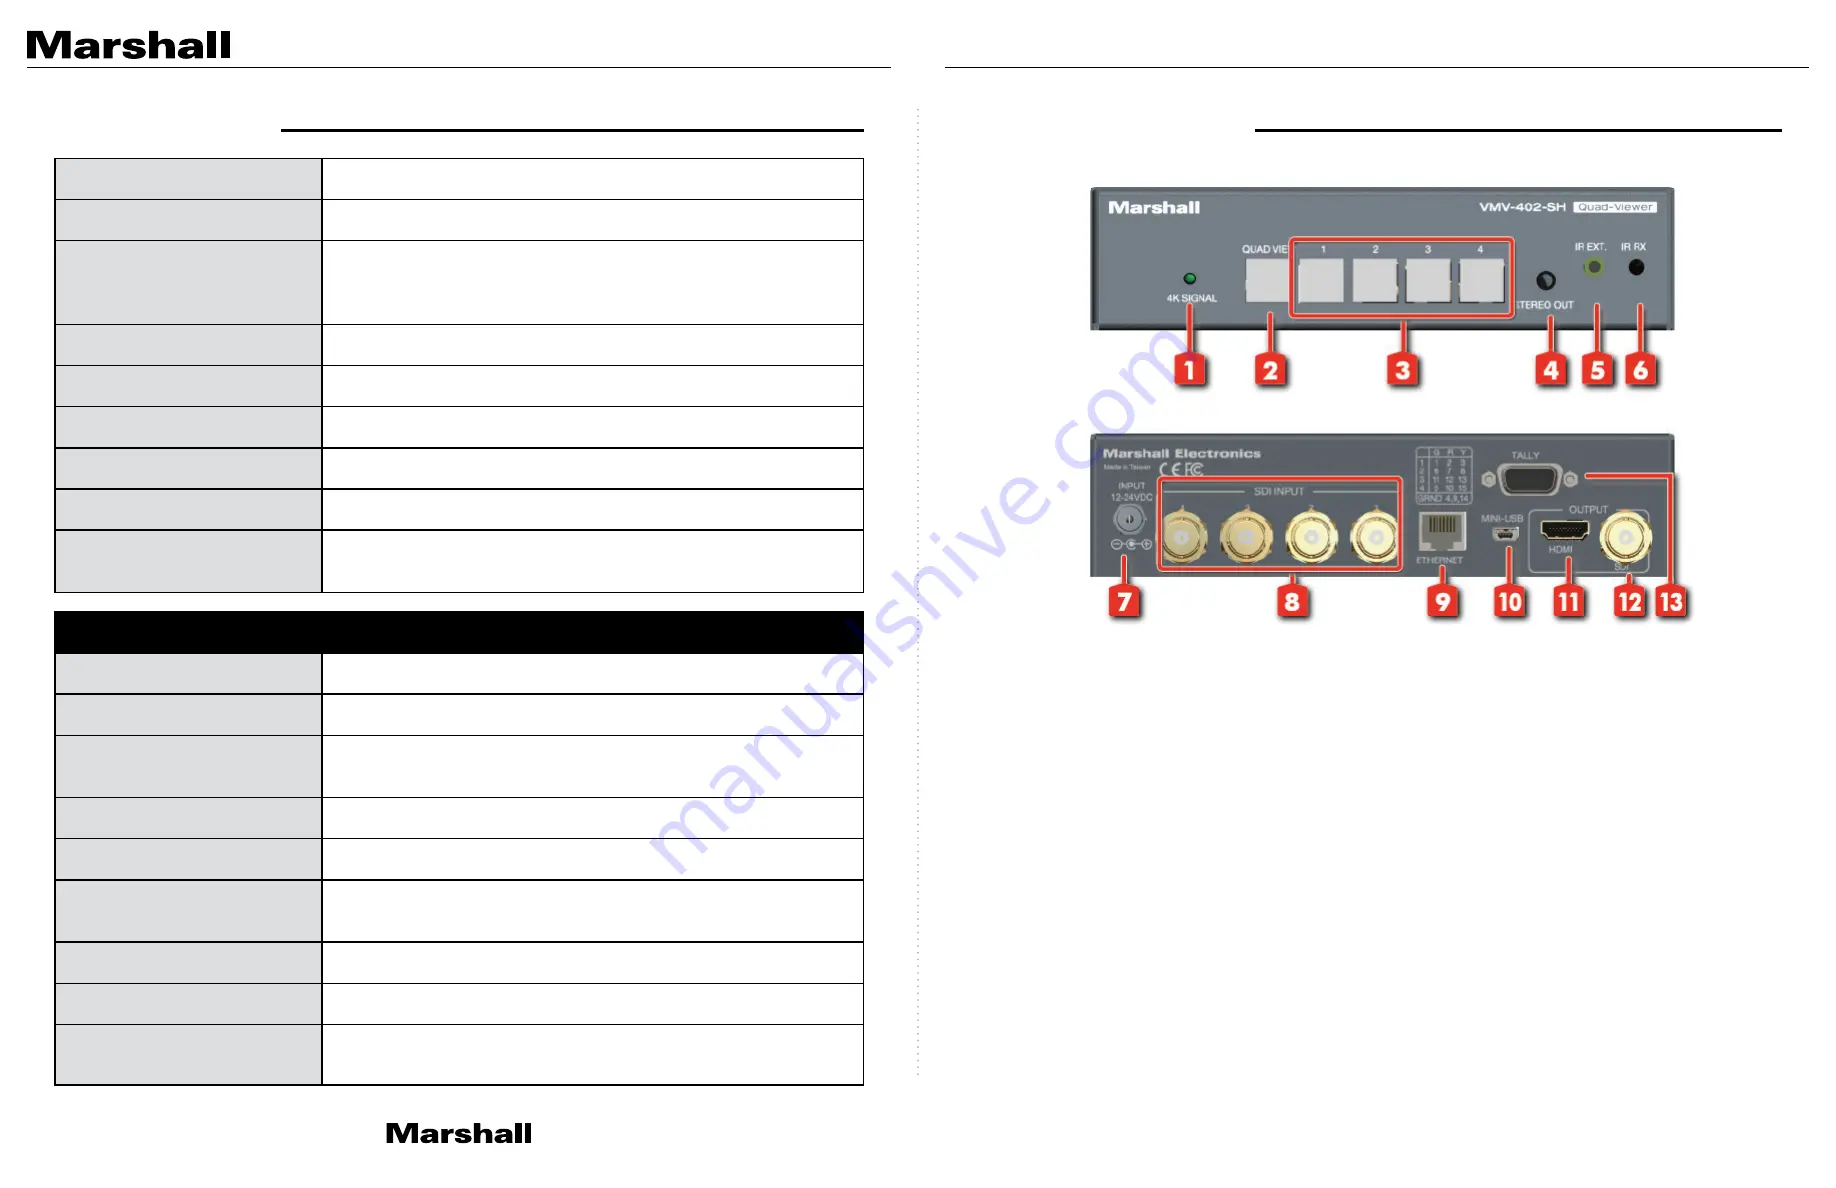
6. Panel Descriptions

JR101017a

5

5. Panel Descriptions

1. 

4K Signal LED: 

Lighted when output is set for 4K (HDMI output)

2. 

Quadview Button: 

Toggles between default quad-view layouts

3. 

Input Select Buttons: 

Selects between sources. The button will illuminate when source is selected.

4. 

Stereo out:

 Stereo audio output

5. 

IR Extension: 

3.5mm output for IR receiver extension cable

6. 

IR Sensor: 

IR sensor for receiving commands from IR remote

7. 

DC 24V Input:

 Connects to the +12V or +24V DC power supply unit

8. 

Source 1-4:

 3G-SDI inputs

9. 

Ethernet:

 Ethernet control port

10. 

Mini-USB Input:

 Connects to computer for control

11. 

HDMI Output:

 Provides the selected Program Output

12. 

SDI Output:

 Provides the selected Program Output

13. 

Tally

Front Panel

Rear Panel

VMV-402-SH

 Manual

www.marshall-usa.com

1.  4K Signal LED: 

Lighted when output is set for 4K when HDMI output is set to UHD format 

(HDMI output).

2.  Quadview Button: 

Changes output to quad view mode.

3.  3. Input Select Buttons: 

Selects between sources. The button will illuminate when source is 

selected.

4.  Stereo out: 

Stereo audio output.

5.  IR Extension:

 3.5mm jack for IR extension cable.

6.  IR Sensor: 

IR sensor for receiving commands from IR remote.

7.  DC 24V Input: 

Connects to the +12V or +24V DC power supply unit.

8.  Source 1-4: 

3G-SDI inputs.

9.  Ethernet: 

Ethernet control port.

10. Mini-USB Input:

 USB control / update port.

11. HDMI Output: 

Program Out.

12. SDI Output: 

Program Out.

13. Tally GPI connector

Summary of Contents for VMV-402-SH

Page 1: ...Broadcast A V Division VMV 402 SH 4 Input 3G SDI Switcher with Quad Mode and Ethernet Control User Manual ...

Page 2: ...The Robust design makes the 402 at home on any rack mount or throw down box application Inputs are automatically scaled rate converted to match the selected output format Mixed input formats and frame rates are easily accommodated Output formats up to 1080p50 60 for SDI and UHD 50 60 4 2 0 sampling for HDMI are available Four 3G HD SD SDI Inputs One 3G HD SD SDI Output One HDMI Output Select each ...

Page 3: ...ween default quad view layouts 3 Input Select Buttons Selects between sources The button will illuminate when source is selected 4 Stereo out Stereo audio output 5 IR Extension 3 5mm output for IR receiver extension cable 6 IR Sensor IR sensor for receiving commands from IR remote 7 DC 24V Input Connects to the 12V or 24V DC power supply unit 8 Source 1 4 3G SDI inputs 9 Ethernet Ethernet control ...

Page 4: ...ktop Icon during the installation 9 2 Updating the Firmware It is strongly recommended that the firmware in the VMV 402 SH be updated before using the product 1 Double click on the new desktop icon 2 The Port Setting page will appear 3 Check that RS 232 over USB is selected and that a COM Port number is available 4 If no COM Port appears recheck the USB connection close and restart the Control App...

Page 5: ...pdate The Update Page will appear 11 Please confirm that the Update Version is newer or the same as the existing Device Version 12 Click on the Update button to begin the update process 13 A short countdown will appear The NOTE at the bottom of the page means that user preferences like IP address Quad mode labels etc will not be changed during the update process The Update process page will appear...

Page 6: ...e all windows and restart the Control App 9 3 Setting Up the VMV 402 SH for the First Time Configuring the VMV 402 SH the first time is most easily done using the USB connection and running the control application by following the steps as described above It is recommended to use this method of connection BEFORE attempting an Ethernet connection 9 4 Most Common Settings Easily the most important s...

Page 7: ...the Default button to reset both horizontal and vertical positions Brightness Saturation and Contrast Adjust video settings to match a projector or other display These settings affect the entire output image including Quad Mode Click the Default button to set all three back to normal 9 7 Quad Mode Settings Clicking on the Labels tab brings all settings for Quad Mode onto one page The icons across ...

Page 8: ...ting then select TCP IP and confirm that the default address 192 168 1 110 is displayed Click the Connect button and the Main page should appear shortly 9 9 Establishing a New Static IP address To change the Static address to a custom Static address from the Utilities tab first select IP Setting then fill out the fields for the new IP Address Subnet Mask and Gateway Confirm that DHCP Enable is NOT...

Page 9: ...ithout notice Warranty V 1 2 15 9 10 Setting DHCP Mode The VMV 402 SH may be operated in DHCP mode That is the address is not Static but is instead set automatically by a router on the network When DHCP mode is enabled the current IP address may change As mentioned in the sections above it is best to connect to the unit first with a Static address In this way the control app learns the specific MA...

Reviews: