background image

 Central Station 60212

17

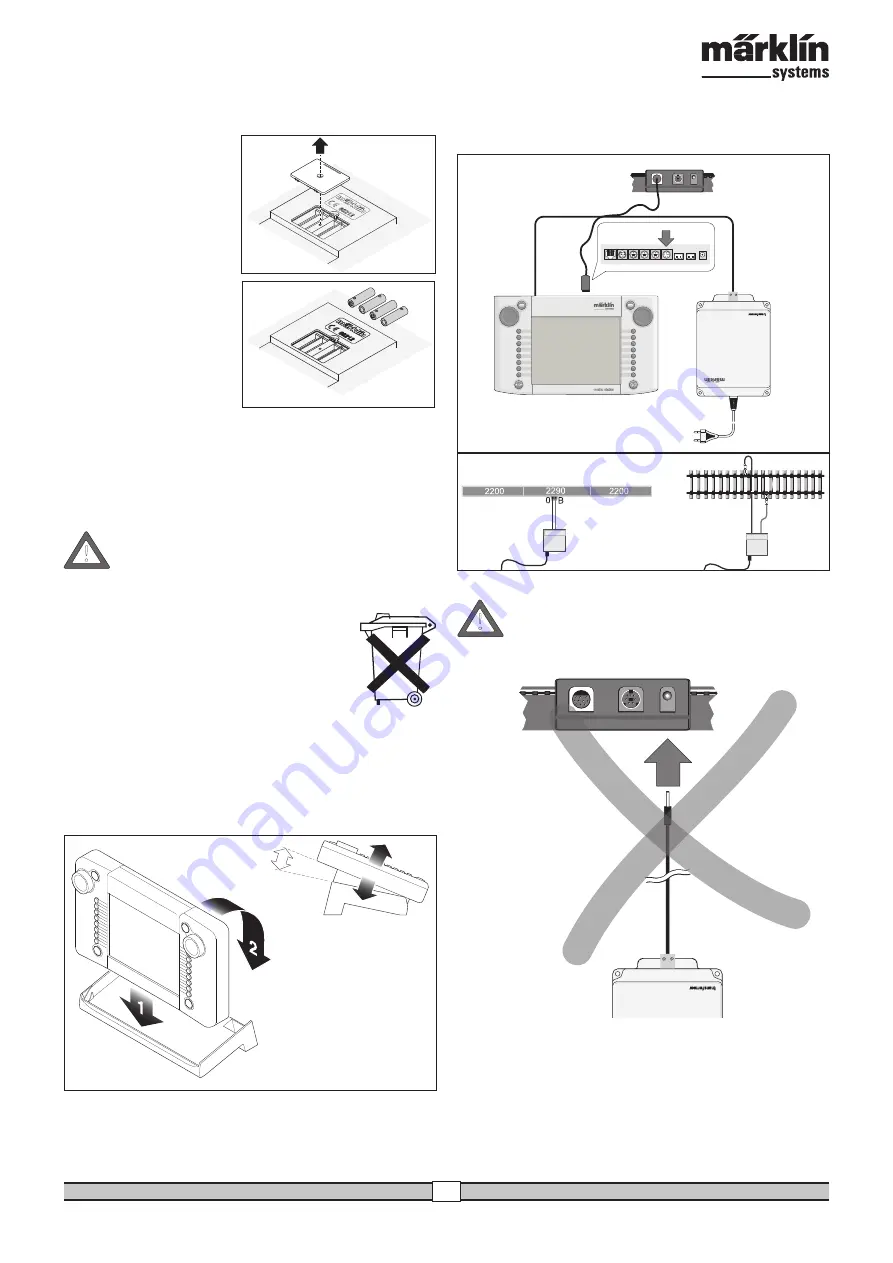
2.2.1. Installing / Changing Batteries 

The battery’s job: Storing the current train and accessory data for 

starting up the system again, after it has been turned off. Batteries 

are not included with the Central 

Station.

1. Remove the cover on the 

housing of the Central Station 

for the battery holder.

2. Batteries to use. Only 1.5 volt 

batteries (AAA size, diame-

ter = 10.5 mm x 44.5 mm / 

7/16” x 1-3/4”). Rechargeable 

batteries are not suitable! Pay 

attention to the polarity and 

the markings in the battery 

holder when installing the 

batteries (“+” and “-”). 

3. Put the cover back on. If you 

like it, you can fix the cover 

with the included screw.

-  Use only high quality batteries 

(example: alkaline batteries).

-  Do not remove the batteries until the Central Station is turned off.

-   If the Central Station is not going to be used for a long period of 

time, then the batteries should be removed. (to protect against the 

batteries leaking)

- If your batteries are weak or totally run down, a warning symbol will 

appear in the lower right and left corners of the screen.

Caution! Never attempt to recharge batteries! Doing so involves 

the danger of injury and fire!

Batteries Do Not Belong in Your Garbage Container!

Every user in the European Community is obliged by 

law to turn in used batteries at a collection point in his 

community or at the dealer from whom he purchased 

the batteries. The batteries will then be taken to an 

environmentally recycling point. 

Batteries containing hazardous materials are marked 

with this symbol and with chemical symbols  

(Cd = cadmium, Hg = mercury, Pb = lead).

2.2.2. Setting Up the Central Station 

Mount the Central Station on its stand. Make sure when doing this 

that the Central Station is securely in place with the snap-in connec-

tion on the back between it and the stand. The angle of the Central 

Station on its stand can be adjusted.

2.2.3. Connections to a Layout

1. Make sure that the power cord for the Central Station’s transfor-

mer is unplugged from the household current.

2. Install the connecting cable between the transformer and the 

Titel:

»Batteriefach öffnen«

Seite Nr:

6

Datei:

6 Batteriefach öffnen.AI

Datei-Typ:

Adobe Illustrator 10.0

Anleitung:

610 571 »Centralstation«

Artikel-Nr.:

60212

Datum:

22.11.2004


Central Station.

3. Connect the feeder wires to the layout.

2 alternatives: 

a. Connection through a connector box (24088 for H0 C Track, 60115 

for H0, 60111 for 1 Gauge)

Caution: Never connect the transformer for the Central 

Station to the connector box!

b. Direct Connections 

Connections with the plugs (611 719) included with the Central Sta-

tion and the following connecting hardware specific to the individual 

track systems: 

C: 74040 feeder wire set + any standard section of track. The 74046 

    may not be used.

K: Red and brown wire (7105, 7102 with a wire cross section of 0.19 

    sq. mm / 0.0003 sq. in. or red and brown wire from the 71060 

    wire assortment with a wire cross section of 0.75 sq. mm / 0.001 

    sq. in.) + a 2290 feeder track. Do not use the 2292 feeder track.

60115

60111

red

brown

red

brown



!

!

Summary of Contents for 60212

Page 1: ...systems Central Station ...

Page 2: ...edarf S 15 7 Zusätzliche Hinweise S 15 Table of Contents 1 Introduction Pg 16 2 Basic Information for Using the Central Station Pg 16 2 1 Operation Function Elements Pg 16 2 2 Installation Pg 16 2 2 1 Installing Changing Batteries Pg 17 2 2 2 Setting up the central Station Pg 17 2 2 3 Connenctions to a Layout Pg 17 2 2 4 Connections for a Programming Track Pg 18 2 2 5 Direct Connections for a Mobi...

Page 3: ...he use of the Central Station on your model railroad layout Your Märklin Service Team 2 Basic Information for Using the Central Station 2 1 Operation Function Elements 1 Display with switching function Touch Display 2 Locomotive Controller 1 3 Button for Locomotive 1 4 Auxiliary Functions 1 5 Stop Button 6 Go Button 7 Locomotive Controller 2 8 Button for Locomotive 2 9 Auxiliary Functions 2 Conten...

Page 4: ... taken to an environmentally recycling point Batteries containing hazardous materials are marked with this symbol and with chemical symbols Cd cadmium Hg mercury Pb lead 2 2 2 Setting Up the Central Station Mount the Central Station on its stand Make sure when doing this that the Central Station is securely in place with the snap in connec tion on the back between it and the stand The angle of the...

Page 5: ...g interference with television and radio reception cannot be guaranteed This type of connection may therefore not be done Important In any event the adapter cable 10 to 7 pin must be used This adapter cable comes with the Mobile Station listed under item no 60652 or is available as a spare part under item no 610 479 at your authorized Märklin Systems dealer When the Mobile Station is connected to ...

Page 6: ...ve selected No locomotive selected Please select a locomotive from the locomotive list enter a new locomotive manually or select a locomotive from the database Please select a locomotive from the locomotive list enter a new locomotive manually or select a locomotive from the database 3 2 2 Operating the Touch Screen The Central Station has a Touch Screen a screen that reacts to being touched By si...

Page 7: ...2 5 Note When you have pushed the emergency stop button changes for the commands to the locomotives and so lenoid accessories can still be entered on the Central Station These new commands are not carried out until the layout is again supplied with power When the STOP status is activated by a short circuit a short circuit symbol will appear for se veral seconds in the lower left and right corners ...

Page 8: ...then enter a designation for the locomotive in the entry field next to the Name field by using the keyboard This designation will then always appear on the part of the screen for the locomotive controller when you call up the locomotive The name can consist of a maximum of 16 characters Note If you don t make an entry in this field the preset designation New will appear as the name The Central Statio...

Page 9: ...een is not the same as that of the model 2 Locomotive Running Characteristics Settings In this instance the following parameters can be set for certain decoders Reverse operation The forward and reverse direction of travel can be swapped on the locomotive Vmax Setting the maximum speed in the highest speed level Vmin Setting the speed in the lowest speed level Acceleration rate Setting the amount ...

Page 10: ...of the Central Station Has the direction changed Then the decoder is evaluating the direction command Turning Auxiliary Functions On and Off The controllable functions for a locomotive are represented with appropriate pictograms on the locomotive controller part of the Central Station At the same time these pictograms also give information about whether the functions are on or off on the locomotiv...

Page 11: ...combination which can evaluate direction of travel data The locomotives you put into a multiple unit motive power com bination should be fairly similar in their running characteristics maximum speed acceleration rate etc Do not put lightweight locomotives or cars between locomotives in a multiple unit motive power combination The combination may cause derailments Keep in mind the total power requi...

Page 12: ...gnation Type A new selection window will open in which you search for the appropriate screen symbol This selection window can be navigated with the control knob or with the activation areas on the screen as you have already seen with settings for locomotive Address Enter here the digital address for the solenoid accessory in question You can enter a value either numerically from 1 to 256 or in the...

Page 13: ...sibilities for controlling a three way turnout Note When the Central Station is in the emergency stop state solenoid accessories cannot be operated Manual chan ges to the setting for the solenoid accessories are not recognized by the system Deleting Solenoid Accessories Press on the symbol Setting up Solenoid Accessories in upper menu list on the screen A selection area with the three different se...

Page 14: ...nu list on the upper edge of the screen A selection field will appear which will give you access to various selection fields General Settings In this area you can set the language used on the Central Stati on change the brightness of the background lighting change the contrast for the screen and carry out a RESET of the entire Central Station Important When you do a reset of the entire Central Stati...

Page 15: ...he cable connection for the layout with the connection for the programming track new settings have been confirmed control area with the check mark in the lower right In the Expanded control area you have the possibility of changing or adding to the designa tion for the Mobile Station you have just selected The keyboard blended into the screen will help you here This function only makes sense when m...

Reviews: