


16
ENGLISH
RECORDING MUSIC
Your Music Server allows you to record music from CDs
and add it to the music library stored on the Hard Disk. It
also has a built-in modem which allows it to connect to the
Internet via a standard telephone line. If you provide this
connection your Music Server automatically checks the
Internet CD database when you record a CD, and
downloads the album title, track titles, artist name, and
genre for the CD. If you do not provide an Internet
connection you can label the CDs you record manually.
RECORDING FROM A CD
•
Press the
OPEN/CLOSE
key on the front panel to
open the CD tray.
•
Place a CD in the tray.
•
Push the
OPEN/CLOSE
key on the front panel.
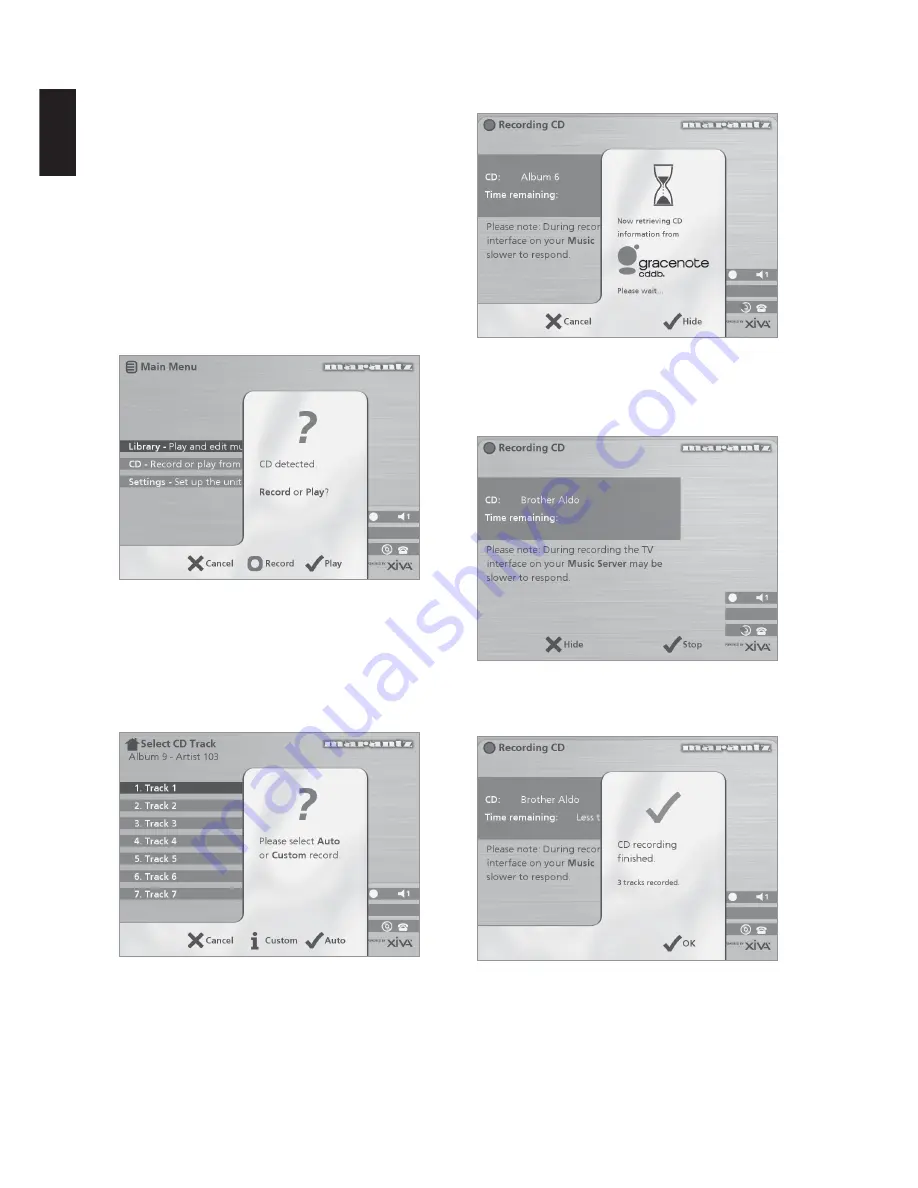
The following prompt is automatically displayed:
•
Press the
K
Record
action key to record the album
onto the Hard Disk.
Note:
If you already have a CD in the tray, select the
CD
option from the
Main Menu
to display the contents of the
disc; press the
K
Rec. CD
to begin recording.
The following display then allows you to choose whether to
do an auto (one-touch) recording of the entire CD, or a
custom recording which allows you to select the tracks you
want to record and the recording quality:
To make an auto (one-touch) recording
•
Press the
5
Auto
key.
An
Auto
recording will automatically look up the track and
artist information on an internet CD database, and then
record all the tracks on the album.
The quality of the recording is specified in the
Settings
menu (under
Recording Quality
). For more information on
the settings menu see the chapter called
Advanced
Settings
p.25.
Once recording has begun your Music Server will connect
to the Internet to retrieve the CD information:
Once the search has been completed you will receive a
confirmation to tell you if the CD has been found.
•
Press the
5
OK
key to continue.
The following display shows the approximate progress of
the recording:
You can cancel the recording at any time by pressing the
5
Stop
key.
Once recording is complete the following screen confirms
how many tracks have been successfully recorded.
Summary of Contents for DH9300
Page 9: ...7 ENGLISH FRONT VIEW REAR VIEW ...
Page 34: ...32 ENGLISH ...
Page 40: ...6 FRANÇAIS VUEARRIERE VUE AVANT ...
Page 70: ...6 ESPAÑOL PANEL POSTERIOR PANEL FRONTAL ...


