background image


HX Nitro Start up


Quick Reference Guide Series  

o


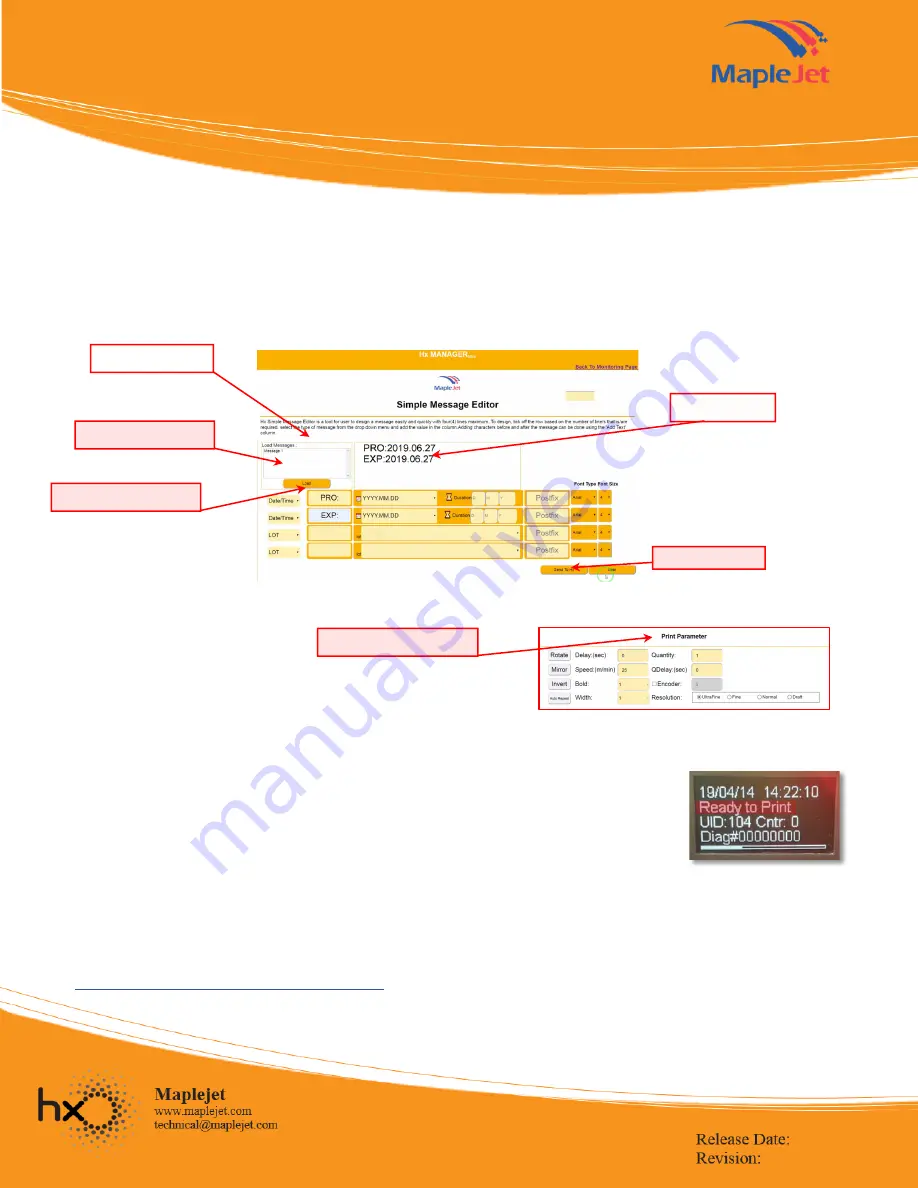
Select Date/Time (you will notice first row will change accordingly) 

o


Add ‘PRO:’ & ‘EXP:’ as prefix 

o


On the second row (for EXP), select the expiration duration 

o


Use Arial and font size 4  

o


Set print parameters as recommended in Figure 13 

o


Send the message to Hx Nitro with the submit button 


NOTE: To get the best quality of the print, keep the paper as closely as possible to the printer. 

For training videos please check below link


https://www.maplejet.com/hx-training-videos/ 

Figure 14. OLED display in Hx Nitro  
showing “Ready to Print”  

Load saved messages 

1.Select Message Type 

2.Enter Text before message 

Message Preview 

Figure 12. Simple Message Editor  

3.Send to Hx Nitro 

4.Configure print parameters 

Figure 13. Print Parameter  

Load saved messages 

10 

ü


Printing 


Connect the DB9 sensor.  


Press the “Print On” button and a “Ready to Print” message as shown in Figure 14 should 
appear on the device’s display. “ 


Move the paper by hand in front of nozzles (see Figure 9) and trigger the sensor to print. 


Summary of Contents for HX Nitro

Page 1: ...is connection does not require Access Point Router and is suitable for small enterprise with single Hx Nitro device This type of connection is limited to a single Hx Nitro at a time Search on your smartphone or tablet for Wi Fi Network and connect to Hx_UID Printer Serial Number found on the printer s OLED display Type the default password 123456789 Once connected open any browser and type the Dir...

Page 2: ... password of the Access Point or Company Wi Fi router When connected see connection status in Fig 4 change Wi Fi connection to Access Point or Company Wi Fi Open any browser and type the IP Address found at the printer s OLED display e g 192 168 1 198 Log in page with password protection will display Type the default password 123456 Check Connecting to Hx Nitro via Access Point ü Hx Manager Cartri...

Page 3: ...r in front of cartridge nozzle follow Figure 10 Check Quick Start Up and Print Test video ü Designing message in Simple Message Editor and sending message to Hx Nitro To design simple messages such as Production Expiration Date Text Lot Number simple message editor can be used Open Hx Manager and proceed to Simple Message Editor see Figure 12 Check Simple Editor Training Video 2 Select Ink Type ba...

Page 4: ...as possible to the printer For training videos please check below link https www maplejet com hx training videos Figure 14 OLED display in Hx Nitro showing Ready to Print Load saved messages 1 Select Message Type 2 Enter Text before message Message Preview Figure 12 Simple Message Editor 3 Send to Hx Nitro 4 Configure print parameters Figure 13 Print Parameter 10 ü Printing Connect the DB9 sensor ...

Reviews: