background image


HX Nitro Start up


Quick Reference Guide Series  


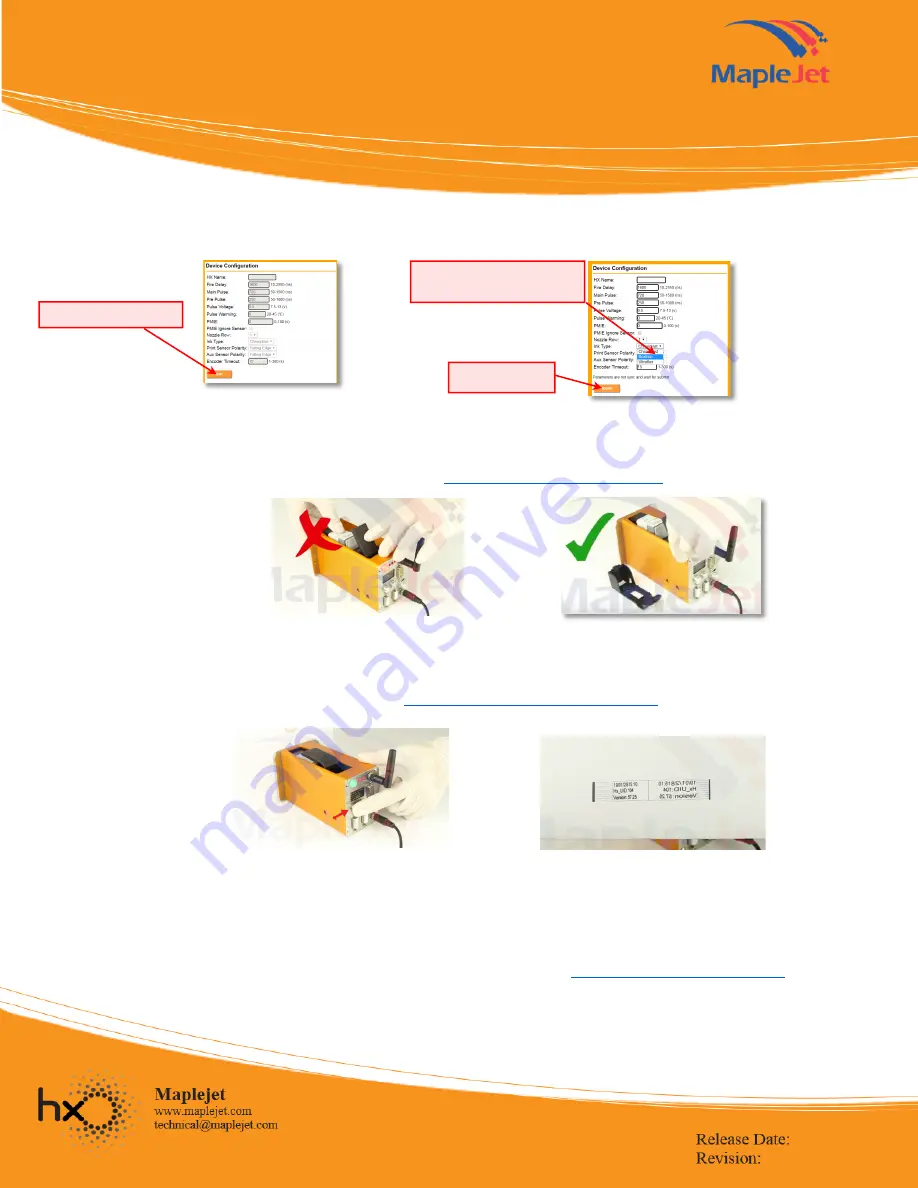
On the device configuration section found in Figures 6 & 7 below, click the “Edit” button and select ink type based on the 
ink cartridge. Click “Submit”. 


ü


Mounting ink cartridge 


Remove the cartridge cap, place it in a steady position then gently push the lock.  


Avoid pushing the cartridge while locking the handle. 

Check Mounting Ink Cartridge video


ü


Print Test 


After inserting cartridge, it is recommended to do print test. Press the print test button and slide a white blank paper in 

front of cartridge nozzle (follow Figure 10). 

Check Quick Start Up and Print Test video


ü


Designing message in Simple Message Editor and sending message to Hx Nitro 


To design simple messages such as Production/Expiration Date, Text, Lot Number, simple message editor can be used.  


Open Hx Manager and proceed to Simple Message Editor (see Figure 12).


Check Simple Editor Training Video 


2. Select Ink Type based on 
your cartridge 

3. Click to Submit 

Figure 6. Device configuration section “Edit” button 

Figure 7. Device configuration section ink selection 

Figure 8. Wrong way of inserting the ink cartridge 

Figure 9. Correct way of inserting the ink cartridge 

1. Click on Edit button 

Figure 11. Print Test Result 

Figure 10. Print Testing 

Summary of Contents for HX Nitro

Page 1: ...is connection does not require Access Point Router and is suitable for small enterprise with single Hx Nitro device This type of connection is limited to a single Hx Nitro at a time Search on your smartphone or tablet for Wi Fi Network and connect to Hx_UID Printer Serial Number found on the printer s OLED display Type the default password 123456789 Once connected open any browser and type the Dir...

Page 2: ... password of the Access Point or Company Wi Fi router When connected see connection status in Fig 4 change Wi Fi connection to Access Point or Company Wi Fi Open any browser and type the IP Address found at the printer s OLED display e g 192 168 1 198 Log in page with password protection will display Type the default password 123456 Check Connecting to Hx Nitro via Access Point ü Hx Manager Cartri...

Page 3: ...r in front of cartridge nozzle follow Figure 10 Check Quick Start Up and Print Test video ü Designing message in Simple Message Editor and sending message to Hx Nitro To design simple messages such as Production Expiration Date Text Lot Number simple message editor can be used Open Hx Manager and proceed to Simple Message Editor see Figure 12 Check Simple Editor Training Video 2 Select Ink Type ba...

Page 4: ...as possible to the printer For training videos please check below link https www maplejet com hx training videos Figure 14 OLED display in Hx Nitro showing Ready to Print Load saved messages 1 Select Message Type 2 Enter Text before message Message Preview Figure 12 Simple Message Editor 3 Send to Hx Nitro 4 Configure print parameters Figure 13 Print Parameter 10 ü Printing Connect the DB9 sensor ...

Reviews: