background image

32L31/37L31/42L31/50L31 中性英文说明书(欧洲模数)(30

8

B方案)T9大板 

1304154

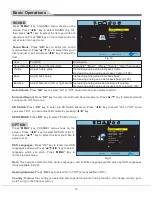
PVR  File  System:

  Press  "

OK

"  key  to  enter  into  PVR  File  System 

submenu(Fig.12).  Choosing  storage  disk  in  "select  disk"  submenu  ,  Press 
"

/

"  key  to  select  "Check  PVR  File  System",  then  the  machine  start 

check by pressing "

OK

" key. After checking successful, press "

MENU

" key 

to exit menu operation. Press "

REC

" key to record.

Note

:  Insert  U  disk  into  the  interface  of  the  machine  before  operating  the 

PVR  File System function.

Restore  User  Default:

  The  screen  display  "Are  you  sure?"  by  pressing 

"

OK

" key .You can press "

t

" key to resume the factory setting or press "

u

" key to cancel current operation.

Blue Screen:

 Press "

OK

" key to select "On" or "Off". Open or close Blue Screen function.

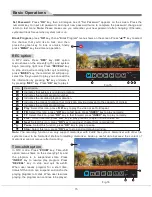
TIME

Press  "

MENU

"  key,  CHANNEL  menu  shows  on  the 

screen.  Press  "

t

/

u

"  key  to  select  TIME  (Fig.13),   

then Press "

/

" key to select the item you'd like to 

adjust or set.

Clock: 

When  in  DTV  input  source,  The  clock  will  be 

synchronized with TV programme. 

Off  Time:

  Press  "

OK

"  key  to  enter  into  Off  Time 

submenu.  Press  "

/

"  key  to  select  Off Time,  Hour 

and Minute, then press "

t

/

u

" key to adjust value to  set the off timers that the TV will switch off automatically at 

the time you select. 

Note:

 Yon can set Hour and Minute only the Off Time is not under ''Off'' Mode.

On Time: 

Press "

OK

" key to  to enter into On Time submenu.  Press "

/

" key to select On Time, Hour and 

Minute, DTV, channel, Volume, then press "

t

/

u

" key to adjust value to  set the on  timer that the TV will switch 

on automatically and  tune to the mode of your choice at the time  you select.

Sleep  Time: 

Press  "

OK

"  key  to  enter  into  Sleep  Time  submenu.  Press  "

/

"  key  to  select  sleep  time:  Off, 

10min, 20min, 30min, 60min, 90min, 120min, 180min, 240min.

Time Zone: 

Press "

OK

" key to enter into Time Zone submenu. Press "

/

/

t

/

u

" key to select your time zone.

LOCK 

Press  "

MENU

"  key,  CHANNEL  menu  shows  on  the 

screen.  Press  "

t

/

u

"  key  to  select  LOCK.  After 

pressing  "

OK

"  key,  press  the  Numerical  key  to  input 

default  password  0000  for  entering  LOCK  menu 
(Fig.14), and then press "

/

" key to select the item 

you'd like to adjust or set.

Lock System: 

Press "

OK

" key to select "On" or "Off", 

Block program option can work when It is on state.

14

Check  PVR  File  System

Format

Free  Record  Limit

USB  Disk

Time  Shift  Size

Speed

MENU: RETURN

Start

6 Hr.

Select Disk

C:

Fig.12

Clock

Off Time
On Time
Sleep Timer
Time Zone

TIME

--   --     --   --

Off

Off

Off

London  GMT

OK: ENTER

MENU: RETURN

Fig.13

Basic Operations

Lock  System

Set Password
Block Program

LOCK

Off

OK: ENTER

MENU: RETURN

Fig.14

Summary of Contents for LED5002

Page 1: ...ted properly Keep the power plug and socket free of dust and metal pieces Do not damage the power cord 1 It is prohibited to refit the power cord 2 Do not put heavy object on the power cord 3 Keep the power cord away from heat source 4 Do not drag the power cord when unplugging Do not connect too many appliances to one power strip or else it may cause fire due to high power consumption Do not let ...

Page 2: ...rce on the panel Displaying the same image for a long time or active image with fixed words icons will leave image persistence on screen which will not disappear after powering off for a long time This undesirable phenomenon is not covered by warranty Healthy TV watching Watch in appropriate light poor light or long time watching may hurt your eyes Unplug the power cord of the device to cut off th...

Page 3: ...allation Mounting the TV set Remark The actual base and appearance may be different from the picture please refer to the device Fasten the base supporting cover to the back cover of machine It needn t to operate this step when base support cover had been installed and then Insert base assembly to supporting shield hole of complete machine back cover as illustrated direction of arrow to make suppor...

Page 4: ...You can select one of them and connect to corresponding input or output ports of the TV set After connected press SOURCE key then menu of signal source will be displayed on the screen Press the key to select the input signal and press OK key to confirm The connecting mode is shown in the figure USB 1 interface USB 2 interface Coaxial cable interface Note 2 The peripheral equipment and cables descr...

Page 5: ...input connection PC audio cable VGA cable RF Antenna connection When connecting outdoor antenna to signal port of the TV set please turn off the main power switch of the TV set first Do not approach the outdoor antenna to high voltage mains power line to avoid electric shock The wired network antenna connected to this TV set must be isolated from the protective grounding or else it will cause fire...

Page 6: ... won t be used or battery voltage is too low please take out the battery to avoid corrosion due to battery liquid leakage Do not mix different types of batteries or used and new batteries Do not throw the batteries into fire charge or break up or charge short circuit disassemble heat or burn the used batteries Please follow the environmental protection regulations to disposal of the batteries 7 1 ...

Page 7: ...he information of current program Record key Press this key to return to last watching channel Select NICAM mode in ATV or select audio Languages in DTV For teletext operation or USB operation Switch to radio channel or for USB operation Muti function red key Muti function green key or display subtitle message when current channel has subtitle option Muti function yellow key or Favourite key to se...

Page 8: ...TV for the first time Fig 1 Press t u key on the remote control to select language which you wish and press OK key on the remote control to confirm then the screen display DVB select type menu at the same time Press key on the remote control to select DTV type which you wish and press OK key on the remote control to confirm then the screen display Tune type and Country Fig 2 Press t u key to selec...

Page 9: ...e one in TV mode Users can take it as reference Note t u key in this Manual stand for the direction cursor keys on the remote control unless specifically defined The operating instructions in the text below are all based on keys on the remote control Please understand the keys on the panel by yourself CHANNEL Press MENU key CHANNEL menu shows on the screen Press key to select the item you d like t...

Page 10: ...he red key then press t key to delete the channel Press u key to cancel operation MOVE After selecting channel press the green key press key to select the channel position that you d like to move then press OK key to confirm You can press MENU key to return main menu SKIP After selecting channel press the blue key SKIP icon appears behind the channel which you select press the blue key again to ca...

Page 11: ...Middle Item Picture Mode Contrast Brightness Color Sharpness Tint Function Select picture mode Adjust the contrast of whole picture Adjust brightness and blackness of whole picture Adjust the color of whole picture Adjust the sharpness of whole picture Adjust the tint of whole picture Description Standard Soft User Dynamic four modes Increasing analog value increases Contrast Decreasing analog val...

Page 12: ...o select language which you wish Press MENU key to return previous menu Note The operation method of the Audio Languages and Subtitle Language are the same as OSD Languages Only available in DTV Hearing Impaired Press OK key to select On or Off only available in DTV Country Displays the country you selected before performing Auto Tuning function To change country go to Auto Tuning in the Channel m...

Page 13: ...t the time you select Note Yon can set Hour and Minute only the Off Time is not under Off Mode On Time Press OK key to to enter into On Time submenu Press key to select On Time Hour and Minute DTV channel Volume then press t u key to adjust value to set the on timer that the TV will switch on automatically and tune to the mode of your choice at the time you select Sleep Time Press OK key to enter ...

Page 14: ... after formatting Time shift option In DTV mode Press ZOOM key Time shift option menu shows on the screen Fig 16 and the program is in suspended state Press INDEX key to resume play program Press REVEAL key to stop and quit time shift When user leaves program for a short time time shift function can suspend and cache the playing program to U disk When user resumes playing the program can continue ...

Page 15: ...a storage device above 500mA is used which is a normal phenomenon Basic Operations 16 Icon Description Press the red key to enter the sub menu You can choose the time of the appointment to record you want Press the green key to display the detail information about the program Press the yellow key to see the setting that you have done before Press the blue key to set the time that you want to remin...

Page 16: ...eturn to previous menu Repeat Press t u key to select this function press OK key to select repeat one or repeat all or not repeat Music Press t u key to select this function press OK key to play background music Music and photos need to place in the identical folder or you may select some music in music file first Playlist Press t u key to select this function press OK key to show playlist Info Pr...

Page 17: ...image has shadows 1 TV signal is reflected by valley or building 2 Direction of antenna is incorrect 1 Use high directional antenna 2 Adjust direction of antenna No image No sound Power plug is loose power cord don t connect well Symptom Factor Solution Snowflake speckle and sound noise TV image is better but has noise Antenna cable connector is loose cable is damaged Check the antenna cable conne...

Page 18: ...AC 60 50Hz 8W 8W 3 Unpacking 848 515 47 mm 3 Unpacking 848 562 47 mm Net Weight 10 5kg 3 Packing 1060 612 145 mm Gross Weight 12 5kg 3 Unpacking 848 562 47 mm Net Weight 12 5kg 3 Packing 1060 612 145 mm Gross Weight 14 5kg Panel size Max Resolution Best Resolution Pixel Pitch Active Area Power Supply Power Consumption of Speaker Dimension L H W and Weight Excluding base Including base 42 1920 1080...

Page 19: ...P 576i 576P 720P 1080i 1080P ATV PAL B G I D K SECAM L B G D K DTV DVB T DVB T2 optional Operating environment temperature 5 40 RH 10 85 atmospheric pressure 86kPa 104kPa Storage environment temperature 20 55 RH 5 95 atmospheric pressure 86kPa 104kPa VGA display mode Power management VGA SVGA 70Hz 60Hz 60Hz 60Hz 60Hz 720 400 640 480 800 600 1024 768 1360 768 XGA 1 2 3 4 5 NO WXGA Recommended mode ...

Reviews: