4 - 7
B - ATTACHMENT WITHOUT HYDRAULICS AND HYDRAULIC LOCKING DEVICE
(OPTION)
MT 732 Série C-E2
MT 732 Turbo Série C-E2
MT 932 Série C-E2
MT 932 Turbo Série C-E2
TAKING UP AN ATTACHMENT
- Ensure that the attachment is in a position facilitating the locking to the carriage. If it is
not correctly oriented, take the necessary precautions in order to move it safely.
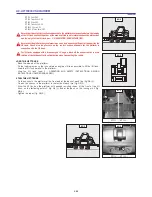
- Check that the rods on the locking cylinder are retracted (fig. A).
- Place the lift truck with the jib lowered in front of and parallel to the attachment, tilt the
carriage forwards (fig. B).
- Bring the carriage under the locking tube of the attachment, slightly lift the jib, incline the
carriage backwards in order to position the attachment (fig. C).
- Lift the attachment off the ground to facilitate locking.
HYDRAULIC LOCKING
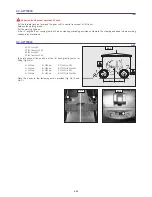
- Put the valve in position A (fig. D), that is to say, the hydraulic circuit of the attachment
locking open.
- Lift up and push the lever of the distributor 1 (fig. E) to the right in order to completely
lock the attachment on the carriage.
- Close the valve in position B (fig. D), that is to say, the hydraulic circuit of the attachment
locking closed.
Always close the valve in position B (fig. D) after the locking of the attachment, in order to avoid
accidental unlocking and use the attachment safety.
HYDRAULIC RELEASING
- Put the valve in position A (fig. D), that is to say, the hydraulic circuit of the attachment
locking open.
- Lift up and push the lever of the distributor 1 (fig. E) to the left in order to unlock the
attachment.
LAYING AN ATTACHMENT
- Proceed in the reverse order of paragraph TAKING UP AN ATTACHMENT while making sure
you place the attachment flat on the ground and in closed position.
E
A
B
C
D
B
A
1
MT 732 ... / MT 932 ...
Summary of Contents for MT 732
Page 2: ......
Page 4: ......
Page 5: ...ROUGH TERRAIN FORKLIFT TRUCK GENERAL SAFETY STANDARDS I...
Page 22: ......
Page 23: ...1 1 1 1 OPERATING OPERATING AND SAFETY AND SAFETY INSTRUCTIONS INSTRUCTIONS...
Page 24: ...1 2...
Page 44: ...1 22...
Page 45: ...2 1 2 DESCRIPTION 2 DESCRIPTION...
Page 46: ...2 2...
Page 55: ...2 11...
Page 86: ...2 42...
Page 87: ...3 1 3 MAINTENANCE 3 MAINTENANCE...
Page 88: ...3 2...
Page 99: ...3 13...
Page 109: ...3 23...
Page 115: ...3 29...
Page 121: ...3 35...
Page 123: ...3 37...
Page 129: ...4 1 4 4 PICKING UP PICKING UP THE THE ATTACHMENTS ATTACHMENTS...
Page 130: ...4 2...
Page 132: ...4 4...
Page 138: ...4 10...


