REPLACE
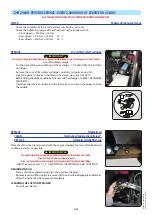
Engine crankcase ventilation filter
- Open the engine cover (
2 - DESCRIPTION - INSTRUMENTS AND CONTROLS).
- Remove the air filter 1 and its holder.
- Carefully clean the outside of the filter 2 and its holder to prevent dust from getting
into the system.
- Disconnect the hose 3 at the filter.
- Unscrew the cover 4.
- Take out the filter 5 and discard it together with the seal of the cover 3.
- Check the condition of the recycling valve (cracks, breaks or abnormal deposits)
inside the head of the filter 6.
- Refit a new seal on the cover and insert a new filter (
FILTER CARTRIDGES AND
BELTS).
- Tighten the cover 4 by hand only and lock in place by a quarter turn.
- Reconnect the hose 3.
- Refit the air filter.
REPLACE
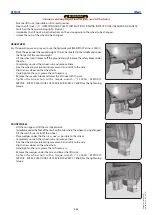
Dry air filter cartridge
For very dusty atmospheres, there are pre-filtration elements (
FILTER CARTRIDGES
AND BELTS).
In very dusty atmospheres, with pre-filtration, the cartridge replacement interval must
be reduced to 250 hours.
IMPORTANT
Replace the cartridge in a clean location.
Never operate the lift truck with the air filter removed or damaged.
- Switch off the engine.
- Open the engine cover (
2 - DESCRIPTION - INSTRUMENTS AND CONTROLS).
- Loosen the locks and remove cover 1.
- Gently remove the cartridge 2 to reduce dust falling as far as possible.
- Leave the safety cartridge in place.
- Carefully clean the following parts with a damp, clean lint-free cloth.
• The inside of the filter and cover.
• The inside of the filter inlet hose.
• The gasket surfaces in the filter and in the cover.
- Check pipes and connections between the air filter and the engine.
- Check the connection and condition of the clogging indicator on the filter.
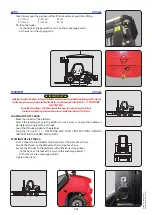
- Before fitting check the condition of the new cartridge (
FILTER CARTRIDGES
AND BELTS).
- Introduce the cartridge into the filter axis, pressing on the edges and not the middle.
- Reassemble the cover, guiding the valve downwards.
3 - 27
2
1
1
4
3
2
5
4
6
647837 M1 (A052020)
MC 18-2/18-4 D K ST5 S1
Summary of Contents for MC 18-2 D K ST5 S1
Page 5: ...1 OPERATING AND SAFETY INSTRUCTIONS 1 1 647837 M1 A052020 MC 18 2 18 4 D K ST5 S1...
Page 6: ...1 2 647837 M1 A052020 MC 18 2 18 4 D K ST5 S1...
Page 7: ...1 3 647837 M1 A052020 MC 18 2 18 4 D K ST5 S1...
Page 25: ...2 DESCRIPTION 2 1 647837 M1 A052020 MC 18 2 18 4 D K ST5 S1...
Page 26: ...2 2 647837 M1 A052020 MC 18 2 18 4 D K ST5 S1...
Page 71: ...2 47 647837 M1 A052020 MC 18 2 18 4 D K ST5 S1...
Page 73: ...3 MAINTENANCE 3 1 647837 M1 A052020 MC 18 2 18 4 D K ST5 S1...
Page 91: ...3 19 647837 M1 A052020 MC 18 2 18 4 D K ST5 S1...
Page 97: ...3 25 647837 M1 A052020 MC 18 2 18 4 D K ST5 S1...
Page 105: ...3 33 647837 M1 A052020 MC 18 2 18 4 D K ST5 S1...
Page 112: ...3 40 647837 M1 A052020 MC 18 2 18 4 D K ST5 S1...
Page 113: ...4 OPTIONAL ADAPTABLE ATTACHMENTS FOR THE RANGE 4 1 647837 M1 A052020 MC 18 2 18 4 D K ST5 S1...
Page 114: ...4 2 647837 M1 A052020 MC 18 2 18 4 D K ST5 S1...
Page 116: ...4 4 647837 M1 A052020 MC 18 2 18 4 D K ST5 S1...
Page 119: ...ATTACHMENTGUARDS FORK GUARD PART NO 227801 4 7 647837 M1 A052020 MC 18 2 18 4 D K ST5 S1...
Page 120: ...4 8 647837 M1 A052020 MC 18 2 18 4 D K ST5 S1...


