


To edit TP
To add, delete, rename or sort TP list. Follow below steps.
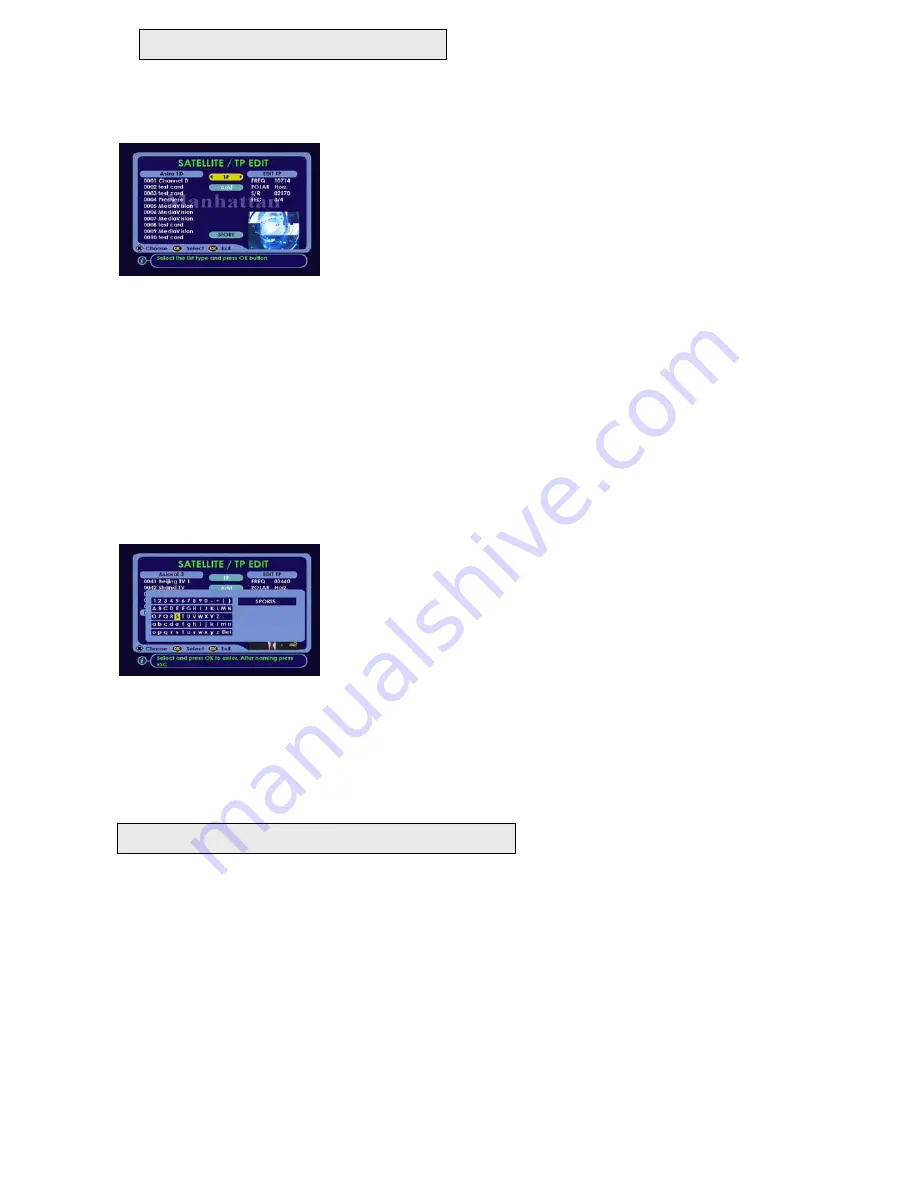
EDIT MENU: SATELLITE / TP EDIT
In EDIT menu select ‘Satellite / TP Edit’ and press OK. Press VOL down once to
change to TP menu. Then press CH down once.
1. TO ADD A TP
Press OK on ‘Add’ and the menu will change as below. Follow instructions as
indicated. After pressing ESC the new TP name will be entered at the bottom of
the list. After adding press ESC. The cursor will now be on the TP data on the
right. Follow below steps.
•
Freq ---
Use 0-9 buttons and enter the frequency for that TP
•
Polarity ---
Press VOL up / down to change polarity
•
S / R ---
Use 0-9 buttons and enter symbol rate for that TP
•
FEC ---
Press VOL up / down and select forward error correction (FEC). If you do not happen to know the FEC value
then select ‘Auto’. After this press ESC then select STORE and press OK.
This TP will be called up when performing channel search.
2. TO DELETE A TP
Press OK
once
on ‘Delete’ cursor will move to list. Press CH or PAGE up / down and select the TP you want to delete. Then
press OK on that TP. After deleting press ESC and select STORE and press OK.
3. TO RENAME A TP
Press OK on ‘Rename’ and cursor will move to list. Press CH or PAGE up / down and select the TP you want to rename.
Then press OK on that TP. The menu will change as below. Follow instructions as indicated. After pressing ESC, the new TP
name will be entered. After naming press ESC and select STORE and press OK.
ADD or RENAME a TP
Press CH up / down to move up and down the lines.
Press VOL up / down to move within the line.
Press OK on the letter to enter.
After naming, press ESC.
4. TO SORT TP LIST
Press OK on ‘Sort’ The TP’s you have added will be sorted by frequency. Lower frequency TP’s will be moved to the top of
the list and vise versa.
5. TO EDIT EXISTING TP
Select TP menu and press OK once cursor will move to list. Press CH or PAGE up / down to scroll through the list. Press
OK on the TP you want to edit. The cursor will default on EDIT TP on the right. Enter channel data as described in step 1
above.
ADDITIONAL INFORMATION
NIT ( Network Information Table) SEARCH
When downloading channels using this method, it will first Auto tune the TP’s in the receiver’s database. After this it will
search for any NIT information, which may be broadcasted by the service provider, from the signal available and additionally
tune those TP’s which are not included in the database.
The additional TP channels will be added to the TV Channel list at the bottom.
SIGNAL BAR INDICATIONS
In Channel Search and viewing mode ( when the channel banner is displayed) it will indicate the signal conditions as below
Blue signal : Indicates noise only with no actual signal
Green signal: Indicates actual signal
18


