background image

11

TO SELECT SUBTITLES ON A CHANNEL

Press SUB.T (Blue) key. Select required language and press OK. The subtitles will appear after a few seconds. 
If not transmitted, it will state 

No Subtitles available

.

TO SELECT AUDIO LANGUAGE

You can select an audio by pressing LANG key. The screen will display options on the top left. Select required 
language and press OK. To change the output, press the AUDIO key repeatedly.

TO ACTIVATE SLEEP TIMER

Press SLEEP key repeatedly to switch on and select duration of the timer. The time (minutes) will be displayed 
on the top left. You can program the timer for maximum 2 hours. After the time has lapsed, the receiver will 
switch to standby.

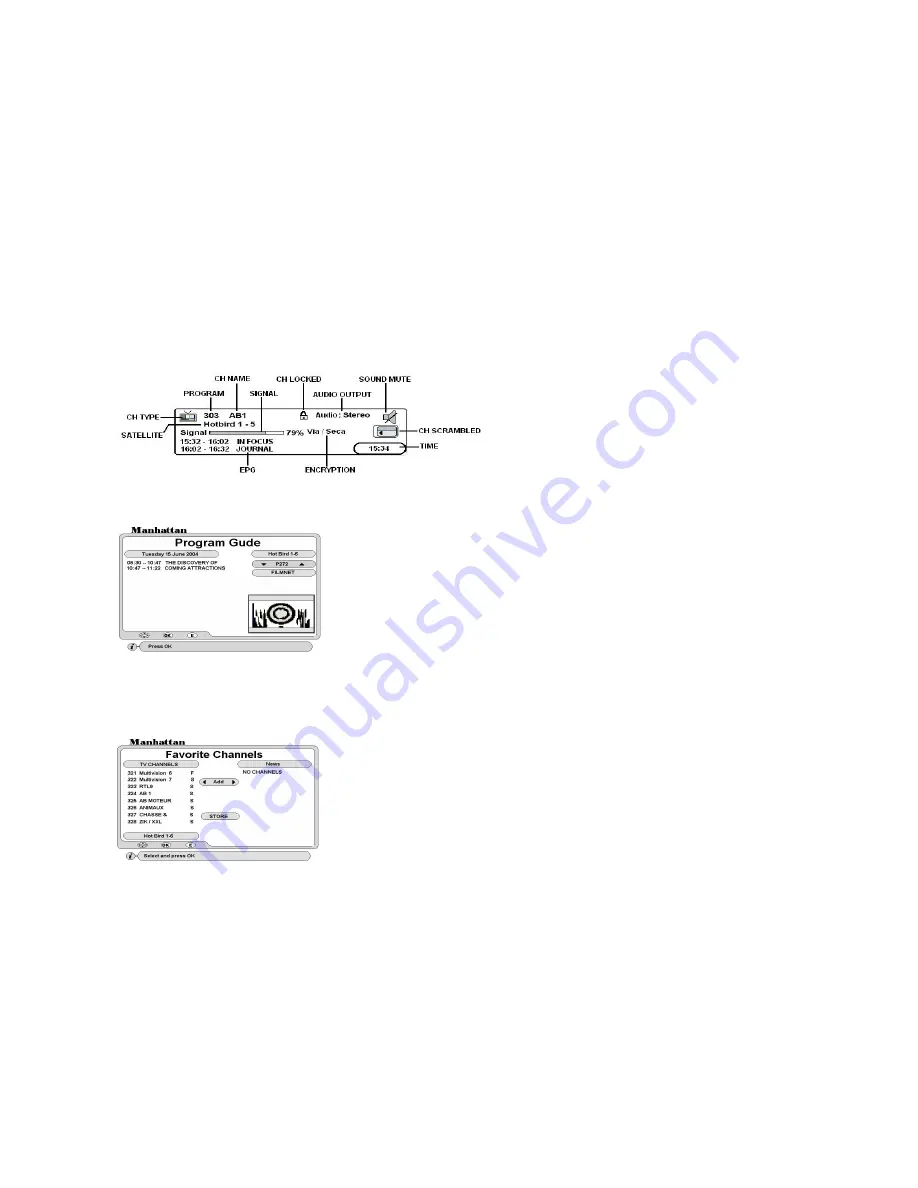
CHANNEL BANNER

Press INFO key once to display the channel banner. Press INFO key again and channel data will appear above 
the channel banner.

ELECTRONIC PROGRAM GUIDE (EPG)

INSTALLING FAVORITE CHANNELS

There are 11 TV and 11 Radio channel lists you can create. You can rename the headings to your requirement. 
Go to INSTALL menu and select Favorite Channels. Follow below steps.

DELETING A FAVORITE CHANNEL

Select 

Delete 

and press OK, the cursor will move to channel list on the right.  Select  channel  and  press  OK. 

Finally press EXIT.

STORE: After above settings and exiting, move down to STORE and press OK

VIEWING FAVORITE CHANNELS

To select favorite channel, press FAV key. Press VOL up / down key to change list and press OK on  required 
channel.

To display correct EPG it is important to set the time first.

To display EPG, what’s on now and next, press EPG (red) key.

PROG No. 

Select program number or press OK

HIGHLIGHTED EVENT: 

Press OK for details and PAGE up / down for next page.

NOTE:

If  there  is  no  EPG  transmitted,  it  will  state  ‘  No  Data’.  After  changing 

channel please allow few seconds before you press EPG key. 

TO CHANGE A HEADING:

Press 

FAV 

key

TO CHANGE CHANNEL LIST:

Press 

SAT 

key

TO  ADD  CHANNELS: 

Press OK on 

Add

, the cursor will move to channel list. 

Select channel and press OK. This channel name will appear on the right under 
the favorite heading. Finally press EXIT.

TO  RENAME  A  HEADING:

Select 

Rename 

and  press  OK.  A  keypad  will 

appear. Select character and press OK. After naming press EXIT key. 

Summary of Contents for Plaza ST 250

Page 1: ...PLAZA MODELS ST 250 ST 350 Digital Satellite Receiver Instruction Manual English http www plaza st com ISSUE3 ...

Page 2: ...0 UPGRADING SOFTWARE 10 UPGRADING SOFTWARE VIA PC 10 TELETEXT FUNCTION 10 TO SELECT SUBTITLES ON A CHANNEL 11 TO SELECT AUDIO LANGUAGE 11 TO ACTIVATE SLEEP TIMER 11 CHANNEL BANNER 11 ELECTRONIC PROGRAM GUIDE EPG 11 INSTALLING FAVORITE CHANNELS 11 VIEWING FAVORITE CHANNELS 11 TO LOCK MENU AND CHANNELS 12 ADVANCED INSTALLATION 12 CHANNEL EDIT 12 TO DELETE CHANNELS 12 TO RENAME CHANNEL 12 TO MOVE CHA...

Page 3: ...arch search option by All FTA All Data Built in Teletext Supporting Teletext and DVB Subtitle function SATCODX compatibility EPG access for current next and 7 days for on screen channel information Parental control facility by channel and menu locks 22 different favorite groups 11 TV 11 Radio Last channel recall facility and Last viewed channel remembered after power down Time display on Info bann...

Page 4: ... to switch ON the receiver or to switch to STANDBY F2 DIGIT LED DISPLAY This will display the channel number or certain programming functions when using the menus In standby mode it will display the time F3 REMOTE CONTROL SENSOR Location of the infrared receiver Do not obstruct this when using the remote control F4 TV RADIO Press this button to change from TV channels to RADIO channels and vise ve...

Page 5: ...ear on your screen wherein you can configure all your settings Language Select the required OSD language Transparency Adjust transparency of channel banner and channel list Info Display Select display time of the channel banner If you select On it will remain on until exit key is pressed Audio Lang Subtitle Lang Select default language This sets all channels to that language Screen Saver Select ti...

Page 6: ...your TV supports Auto Sensing then select Auto Screen Format Select the picture format for your TV STORE After above settings move to store and press OK key Time Settings In standby mode the front display and channel banner will indicate the time after setting as below Year Month Date Hour Minutes Press VOL up down to select STORE After above settings move to store and press OK key Event Timer You...

Page 7: ...ls with Network Identification Table automatically NIT FTA All TP for Free to Air Video and Radio channels with Network Identification Table automatically TP All Selected TP for all Video and Radio channels To select move to TP Data and press OK for sub menu Using DiSEqC USALS menu you can search and download up to 40 satellites automatically at a time Follow settings below Search Index Set index ...

Page 8: ...tes in the index are searched CHANNEL SEARCH Manual Scan and Search Configure Channel Search as described earlier then go to Positioner and select DiSEqC 1 2 If you only have a fixed antenna then select None Move the antenna until you find the correct position maximum signal and quality and store the position START Press OK to start search Using a mechanical polarizer for your lnb For fixed antenn...

Page 9: ... The search will stop after this frequency Polarity select polarity Positioner Select positioner if required Configure this as described earlier Start Press OK Transponder search will start Below Searching page will appear TO CHANGE CHANNEL OR SATELLITE There are two ways of changing channel or satellite as below TO SELECT A CHANNEL WITHIN THE SAME SATELLITE Press OK key and channel list will appe...

Page 10: ...xt mode press T TEXT Green key on your remote To call up a page enter using 0 9 keys To change page sequentially use PAGE up down keys To exit from Teletext mode press T TEXT key again or press EXIT Common Interface After inserting card and CAM slots A or B will initialize showing the CAM type Select the slot you are using and press OK for sub menu Follow the menu instructions for checking or chan...

Page 11: ...o to INSTALL menu and select Favorite Channels Follow below steps DELETING A FAVORITE CHANNEL Select Delete and press OK the cursor will move to channel list on the right Select channel and press OK Finally press EXIT STORE After above settings and exiting move down to STORE and press OK VIEWING FAVORITE CHANNELS To select favorite channel press FAV key Press VOL up down key to change list and pre...

Page 12: ... RENAME A SATELLITE Select Rename and press OK Select the satellite you want to rename and press OK A keypad will appear Select character and press OK After naming press EXIT Go to INSTALL menu and select Parental Lock Lock Press VOL up down to turn it on Old Password Use 0 9 keys and enter 0000 This is the default password New Password Use 0 9 keys and enter four digits of your choice Confirm Use...

Page 13: ... models with PVR ready We recommend Samsung IBM and Fujitsu type Hard Disks Other Hard Disks may cause interference with the receivers tuning function FITTING THE HARD DISK DRIVE WARNING DO NOT FIT THE HARD DISK WHILST THE RECEIVER IS POWERED ON DISCONNECT FROM MAINS POWER PRIOR TO FITTING For fitting see diagram below Re fit the hard disk bracket using screws A Check that the connecting cables ar...

Page 14: ... and press OK PVR REMOTE KEYS PREV To cue backwards using a marker Press repeatedly to move the marker Then press PLAY again NEXT To cue forwards using a marker Press repeatedly to move the marker Then press PLAY again Play Select Play and press OK once the cursor will highlight a recorded event Select the event and press OK Delete Select Delete and press OK once the cursor will highlight a record...

Page 15: ...remote control Replace with new You have lost or forgotten your password Apply master password or contact your Manhattan dealer SPECIFICATI TUNER Input Connector F type IEC 169 24 Female Frequency Range 950MHz to 2150MHz Input Impedance 75 Ohm Signal Level 25 to 65 dBm LNB Power Polarization Vertical 14V Horizontal 18V 600mA Max with Overload Protection LNB Control 22KHz 4 KHz Tone burst A B and D...

Page 16: ... not at hazardous energy levels under normal and single fault conditions This power supply is for use in pollution degree 2 environments This power supply is defined as a Class II power supply PHYSICAL DIMENSIONS Size W X H X D 380 X 68 X 296 mm Eurosat and Manhattan are registered trademarks of Eurosat Distribution Ltd Eurosat reserves the right to alter product specifications without prior notic...

Reviews: