background image


M&V S.r.l. 

Via L. Guerra, 9 

80040 Cercola (NA) 

Ph./Fax +39 0815552428 

e-mail: 

[email protected]


© M&V S.r.l. 


vesuvius userguide10 June 2015.doc 


Page 6 of 24 

Information Technology Solutions 

V

ESUVIUS OWNERS MANUAL


Operation with Internal Tank 

If operating with the internal tank, ensure the mains 
water/tank switch underneath is off (not lit). Access 
and clean the internal tank as described in the mains 
water connection section. The only difference is the 
tank must be manually filled with water. Decalcified 
water, or water suitably treated for espresso 
machines should be used. 
 
Even if the switch is accidentally placed in the mains 
plumbed position (illuminated), when running 
tanked. The Vesuvius will still work perfectly 
normally and not leak water, as a blanking cap is 
fitted to prevent water leaking from the mains inlet 
pipe. This of course needs to be removed if running 
plumbed. 
 

Preparing the Vesuvius for operation 

The machine has been correctly installed as per the 
previous guidance and is ready to be filled for the 
very first time. You can think of this process as 
bringing your machine to life. Be watchful during this 
time for anything abnormal and to ensure everything 
is working correctly. The portafilter should not be 
locked into the group yet. 

Filling the Vesuvius for the first time 

There are 2 boilers in the Vesuvius, the Service 
Boiler (Steam & Hot water) and the Brew boiler, for 
coffee brew water only. The Service boiler has a 
water level probe and will not switch on it's heating 
element until the water level reaches the probe. The 
brew boiler does not have this probe and does not 
know whether the water level is low or not. This 
makes some simple precautions important during 
the first time fill. 
 
Usually the brew boiler will be full of water from 
factory testing, but if for any reason it has been 
emptied prior to shipping the following procedure is 
advised, 
 

1.  Open the side panel and observe the water 

level in the tank. 

2.  Switch on the machine at the mains and 

once the firmware has loaded, turn the 
machine on from the front panel. Within a 
few moments, the pump may start to run 

3. 

Lift the brew lever, always do this!


4.  the water level in the tank should fall and 

within a short time water should flow from 
the group within approx 90s. Lower the lever 
when water exits the group. 

5.  If the pump continues to run, 

you should 

open the steam valve to aid the filling of 
the service boiler (only open this once 
the brew boiler is full, see 4 above).

 The 

level of water in the tank should continue to 
drop when the pump is running and the 
service boiler will stop filling automatically.  

If water does not appear from the group within 90s 
and the tank level is not going down when the pump 
runs, check for a blockage, kinked pipe, or other 
obvious problem. Wait approximately 1 minute and 
try again. 

If the service boiler continues to fill with the lever 
down, again check the level of water in the tank is 
reducing. If not, switch the machine off, check for a 
kinked hose or other blockage. Then switch on and 
try again. 

If the service boiler is filling, the water level is 
dropping in the tank, 

but the pump does not stop 

filling due to a fault

. You will notice water exiting 

from the steam wand (if open), this is a warning to 
switch the machine off..  Please contact your dealer 
for advice. 

Flushing the Vesuvius before using 

Although the machine is tested at the factory, we 
always advise that you flush before first use. This 
removes any stale water and manufacturing 
residues from the machine. The following procedure 
should be used. 

1. Lift the lever and draw 1 litre through the group in 
200ml amounts pausing for 15 seconds each time. 

2. Switch on the steam boiler, under the eco option 
in the main menu (see page 10). Once the steam 
boiler has come up to temperature. Switch the 
steam boiler off, 

then switch the machine off

 and 

with a jug under the hot water tap, open the hot 
water tap and drain as much water off as possible. 
The pump should not run during this process. Switch 
the Vesuvius on, allow the service boiler to refill and 
repeat this process. 

These procedures will remove any stale water and 
residues. Any "new machine" taste, will correct itself 
in a week or so. 

Summary of Contents for Vesuvius

Page 1: ...ia L Guerra 9 80040 Cercola NA Ph Fax 39 0815552428 e mail info mevsrl net M V S r l vesuvius userguide10 June 2015 doc Page 1 of 24 Information Technology Solutions VESUVIUS OWNERS MANUAL VESUVIUS OW...

Page 2: ...lay programming functions 9 Main Vesuvius Screens 9 Turning the Steam Service boiler on or off 10 Main Menu Screen 11 Eco Mode Explained 12 Eco Mode Explained cont 13 The profile screen 15 Programming...

Page 3: ...r your dealer Always keep all packaging including any plastic bags internal packing screws and rubber transit feet etc All packing materials should be kept out of reach of children and disposed of res...

Page 4: ...cedure should be used 1 All 4 screws securing the lid should be removed There are 1 on each side shown by the arrows 4 in total Note they are NOT on the top 2 The sides of the crate are secured by 4 m...

Page 5: ...when plumbing in Use the flexible hose provided with the machine connect it to a connection hose 3 8 male with a shut off valve The use of a water softer or filtration system is advised The drip tray...

Page 6: ...the firmware has loaded turn the machine on from the front panel Within a few moments the pump may start to run 3 Lift the brew lever always do this 4 the water level in the tank should fall and withi...

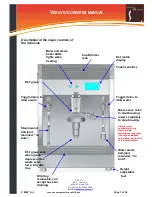
Page 7: ...Height adjustable feet Cup Warmer rack Dot matrix display Touch sensitive Brew and steam boiler LEDs lights when heating Water wand ball joint mounted no burn Toggle Valve to draw water Drip tray remo...

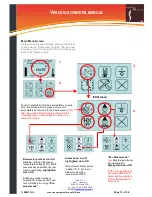
Page 8: ...uminated on off rocker switch Side Panel access toggle Removable panel access heating element removal service boiler drain plug Plumbed Tanked operation rocker switch Illuminated when set for plumbed...

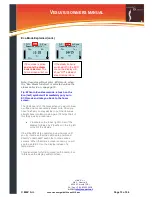
Page 9: ...oiler temperature and pressure The next Zone shows what pressure profile is being used and this is a sideways scrolling display The third zone has a tank water level indicator which actually only show...

Page 10: ...Please note that the steam on off function is completely independent of ECO mode So Eco Steam above might be highlighted but if the steam function is not switched on nothing happens and the steam boil...

Page 11: ...ely be returned to the Home screen Note this only works if ECO mode is enabled via the Time Economy option page 20 is set to a value other than 0 1 3 2 4 Eco Steam mode only affects steam boiler recom...

Page 12: ...time to warm up again In full eco mode both boilers the display switches to green when it enters ECO mode ECO setting is most useful when restricted to operate on the Steam boiler only Touch to highl...

Page 13: ...you may decide to put the Vesuvius straight back into Eco mode Again if it helps think of this fairly quick procedure as 2 touches on the lower right corner of the display followed by 2 touches on th...

Page 14: ...Touch to change time and day Touch to access service menu Does nothing touch to continue This actually shows E61 group lever operations The Vesuvius has an internal On Off timer with 2 on off times ea...

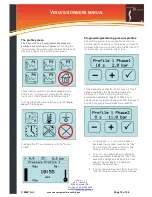
Page 15: ...rofiles The profiling system is very easy to use and can achieve results as simple or complex as you care to program After you touch and hold a profile icon P1 for 5 seconds you will enter this screen...

Page 16: ...ve to use them all Phase 1 Preinfusion times for the first low pressure phase You can choose to move straight to maximum pressure but the Vesuvius benefits from a preinfusion phase Note the preinfusio...

Page 17: ...suvius uses pressure transducer commercial valve system and PID algorithm to control pump pressure Although not perfect it is better than a simple on off control which would be unable to manage rapidl...

Page 18: ...24V 110W commercial unit Low water alarm Visual only Feet Metal height adjustable Steam and hot water wands Ball joint no burn Steam on left water on right Portafilters 2 1 single and 1 double spout...

Page 19: ...at the point indicated for 10 seconds The options are shown in the order they appear Increase or decrease to improve visibility for particular display setting Set this to your preference can be normal...

Page 20: ...fill level leave on Mid Low allows higher boiler water level High is less Both boilers heat at once or brew boiler priority if enabled Reduces max power consumption to 1500W approx Does nothing impor...

Page 21: ...ore 1 Closing the mains water solenoid preventing flooding if a fault develops on a plumbed machine 2 Showing the red fill tank screen when the water level is low 3 The length of time the pump will ru...

Page 22: ...repair may be very simple e g a leaking high pressure PTFE pipe joint and the dealer can talk you through quickly fixing it At other times it may be more serious and require the machine to be returned...

Page 23: ...he sensitivity of the water sensor 1 loosen the 2 allen keys holding the sensor 3 unscrew the central screw in order to make better pictures we removed the side panel but you can do this also without...

Page 24: ...uerra 9 80040 Cercola NA Ph Fax 39 0815552428 e mail info mevsrl net M V S r l vesuvius userguide10 June 2015 doc Page 24 of 24 Information Technology Solutions V ESUVIUS OWNERS MANUAL Appendix 2 Elec...

Reviews: