background image


                    M&R Companies  1N 372 Main St. Glen Ellyn, IL  60137 USA 


27 

Tel:  +630-858-6101      Fax:  +630-858-6134      

www.mrprint.com


| store.mrprint.com


V.062414


Every 3 Months 


WARNING:

 To prevent possible injury to personnel and/or damage to the equipment, lock 

out and tag the electrical service to the equipment. 


Clean Heating Element Reflector


Items required:


1 - Isopropyl Alcohol 

1 - Lint Free Cloth 

1 - Lint Free Gloves 

1. 

Wearing lint free gloves, remove Quartz Heating Elements (1). 

2. 

Clean the Heating Element Reflector (2) using Isopropyl Alcohol on a lint free cloth. 

3. 

 Reinstall Quartz Heating Elements. 


Summary of Contents for Red Chili 1418

Page 1: ...Red Chili Nv3 Part MAN REDCHILI 95 00 USD V 062414...

Page 2: ......

Page 3: ...2 Defined Purpose 9 2 3 Warranty 10 3 Specifications 11 4 Assembly and Installation 11 4 1 Assembly 11 4 1 1 Quartz Heating Elements 11 4 2 Installation 13 4 2 1 Install Photoelectric Sensor 15 4 2 2...

Page 4: ...of the machine Energy Sources M R equipment may use one of more of the following energy sources Compressed Air Pneumatic Energy Electricity Gas Natural Gas or Propane Each form of energy presents its...

Page 5: ...the safe operation or normal functioning of this equipment ensure that the equipment is immediately shut down sources of power to the equipment are shut off and secured and that personnel not trained...

Page 6: ...working on or near this equipment are knowledgeable in its safe operation and closely supervise inexperienced employees keep bystanders away from the equipment 6 Make sure the area around the equipmen...

Page 7: ...gation of notice to holders of this document with respect to changes subsequently made M R Printing Equipment Inc and its subsidiaries make no representation or warranty expressed or implied whether p...

Page 8: ...e record the information from your product s rating plate on the sample plate shown below Date Installed Installed by Optional Features and Special Information Contacting M R If you need service or ha...

Page 9: ...i rigid flat substrates as more fully set forth in the manual specific to that product Any other use of this equipment is not permitted Exposure Equipment Exposure Equipment is designed to produce pho...

Page 10: ...mproper installation or use of the equipment 3 Operation of the equipment with defective safety devices 4 Operation of the equipment with safety devices removed disabled not working in whole or in par...

Page 11: ...16 x 18 51 x 61 cm 20 x 24 51 x 71 cm 20 x 28 81 x 112 cm 32 x 44 1 Incoming voltage differs from the voltage s listed calculate amperage accordingly Other electrical configurations are available Cont...

Page 12: ...unit with the Quartz Heating Elements in the horizontal normal operating position 1 The Quartz Heating Element has a female electrical connector at both ends 1 Hold the Quartz Heating Element near bo...

Page 13: ...Proximity adjustments for Challenger III presses are made through the Operator Interface Detailed instructions can be found in the press operator s manual 2 Reset the Emergency Stop button and connec...

Page 14: ...Locks 1 5 Dimensions between the surface of the Quartz Heating Elements and the pallet surface should be approximately 2 1 4 5 7 cm Proper distance is determined by the type of ink used and the type...

Page 15: ...ets as they are indexed around the press The Photoelectric Sensor is installed at the factory on the right side of the unit for use on presses set up for clockwise rotation For presses set up for coun...

Page 16: ...the press PLC WARNING Ensure none of the pallets are positioned under the unit for an excessive amount of time while the unit is on Extreme heat can damage pallets garments and or cause a fire 1 Place...

Page 17: ...ING Ensure none of the pallets are positioned under the unit for an excessive amount of time while the unit is on Extreme heat can damage pallets garments and or cause a fire 1 Place the Press PLC Foo...

Page 18: ...e the switch in the On position to turn on Place the switch in the Off position to turn off 2 Digital Controller The Digital Controller selects output power exposure time and lamp section selection Th...

Page 19: ...put and Exposure Time Place the Power switch in the On position The control displays the Power Output Setting on the top line and the Flash Exposure Time on the lower line F1 Power Output Press F1 to...

Page 20: ...quartz heating elements are arranged in three sections OUTSIDE O CENTER C and INSIDE I Press F3 to select lamp sections for curing operation the control displays SECT on the top line and O C I on the...

Page 21: ...ow down button until the number 1969 displays on the lower line The SETUP menu displays The control exits the SETUP menu automatically after 10 seconds To exit immediately press ENT Set Electrical Fre...

Page 22: ...uartz Heating Elements turn off completing the exposure cycle 5 2 1 Adjusting Photoelectric Sensor The amount of ambient light garment color and the color of the floor all influence how the photoelect...

Page 23: ...nce of equipment creation of a preventive maintenance history for each piece of equipment Preventive maintenance documentation can be an invaluable resource This schedule is based on an 8 hour day and...

Page 24: ...e any dirt or spray which may have accumulated on the surface of the unit 1 Check and Clean Blower Fan Cover and Air Vent Red chili 2024 2028 3244 Items required 1 Vacuum Use a vacuum to clean the Blo...

Page 25: ...ctrical service to the equipment Clean Heating Elements Items required 1 Isopropyl Alcohol 1 Lint Free Cloth 1 Lint Free Gloves Wearing lint free gloves clean the Quartz Heating Elements 1 using Isopr...

Page 26: ...tweight Machine Oil Apply one drop of oil to the ball bearing assembly 1 Do not over lubricate the bearing Lubricate Vertical Tube Items required 1 Permatex Super Lube with Teflon Grease M R Part No 7...

Page 27: ...o personnel and or damage to the equipment lock out and tag the electrical service to the equipment Clean Heating Element Reflector Items required 1 Isopropyl Alcohol 1 Lint Free Cloth 1 Lint Free Glo...

Page 28: ...very 3 Months Every 6 Months Yearly Every 3 Years Date performed Initials Check Quartz Heating Element Operation X Clean Surface of Unit X Check and Clean Blower Fan Cover and Air Vent Red Chili 2024...

Page 29: ...pallets Check the distance between the surface of the Quartz Heating Elements and the pallet surface at all four corners Dimensions between the surface of the Quartz Heating Elements and the pallet su...

Page 30: ...the audible signal is sounding The Digital Controller displays the alarm message AL 1 The high temperature switch mounted on the inside of the reflector assembly has opened up This is due to excessiv...

Page 31: ...Plate similar to the one shown below Note You must verify whether your equipment is 50 Hz CE or 60 Hz UL and order parts accordingly DANGER Operating this equipment with incorrect electrical parts ca...

Page 32: ...6101 Fax 630 858 6134 www mrprint com store mrprint com V 062414 Control Panel UL CE Control Panel UL CE Part Name Part Numbers 1 Toggle Switch 208 230 380 V 50 60 Hz 1010003 Toggle Switch 380 415 V...

Page 33: ...e Relay 1 Pole 75A 208 230V 1011205 1011205 Heat Sink 1031004 1031004 Solid State Relay 1 Pole 75A 380 480V 1011690 1011690 Heat Sink 1031004 1031004 2 Blower 1016042 1016042 3 Circuit Breaker 2 Pole...

Page 34: ...50 60 Hz 1010003 Toggle Switch 380 415 V 50 Hz 1010011 2 Blower Fan 230 V 50 60 Hz 1009082A 3 Power Supply 208 230 380 415V 50 60 Hz 1018102 4 Digital Controller 1012180 5 Circuit Breaker 2 Pole 50A...

Page 35: ...s 32 X 44 1 Solid State Relay 1 Pole 75A 380 480V 1011207 Heat Sink 1031004 2 Blower 1016042 3 Terminal Strip 1003002A 4 Circuit Breaker 2 Pole 2A CB4 380V 1006446A Circuit Breaker 1 Pole 2A CB4 380 4...

Page 36: ...CE Reflector Assembly UL CE Part Name Part Numbers Red Chili 1418 1618 Red Chili 2024 Red Chili 2028 Red Chili 3244 1 Quartz Lamp 208 230V 1007210B 1007210A 1007210A Quartz Lamp 380 415V 1007251A 1007...

Page 37: ...124 4 Fan Guard With Filter 1009012 5 Mirror Assembly 9Q11025 A 6 Heat Sink 9Q11028 7 Rail 9Q00280 1 8 Rail Post 9Q11029 9 Top Front Cover With Nuts 9Q11020 10 Fans Inside Cover 9Q11004 11 Sensor Brac...

Page 38: ...51 A 9Q00201 3 Bottom Grill 9Q00281 B 9Q00281 B 4 Inside Ceiling 9Q00292 B 9Q00206 C 5 Top Cover 9Q00293 C 9Q00282 C 6 Control Box Door 9Q00271 E 9Q00271 E 7 Stopper 9Q00294 9Q00294 8 Rail 2 5 Long 9Q...

Page 39: ...Top Assembly UL CE 32 X 44 Top Assembly UL CE Part Name Part Number All Models 1 Lamp Holder Weldment 9Q00414 2 Red Chili Hinge 9Q00401 3 Mirror Panel 9Q00409 4 Inside Ceiling 9Q00411 5 Top Cover 9Q00...

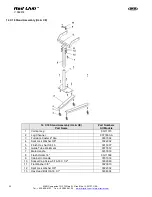
Page 40: ...Numbers All Models 1 Vertical Leg 9Q11073 2 Leg Channel 9071803 A 3 Furniture Caster 2 Dia 3037002 4 Split Lock Washer 3 8 3022002 5 Finish Hex Nut 3 8 16 3013007 6 Guide Tube Weldment 9071812 7 Male...

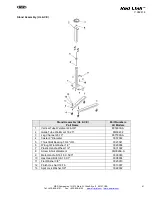
Page 41: ...Weldment 26 3 8 8014830 A 2 Guide Tube Weldment 18 25 9Q00232 3 Leg Channel 26 13 9071803 A 4 Caster 2 Diameter 3037002 5 Thrust Ball Bearing 1 3 4 OD 3023341 6 Wrought Flat Washer 1 2 3020004 7 Plas...

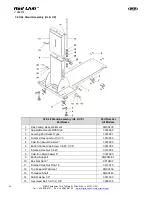
Page 42: ...table Handle With Stud 3033060 3 Leveling Pad Socket Type 3037021 4 Finished Hex Jam Nut 1 2 13 3013050 5 Cast Iron Swivel Caster 2 3037022 6 Button Socket Cap Screw 1 4 20 X 1 2 3001005 7 Finished He...

Page 43: ...8 16 X 1 3033033 17 Finished Hex Jam Nut 3 4 16 3013031 18 Thrust Ball Bearing 1 3 4 3023341 19 Bearing Support Flange 1 875 9Q00452 20 2 Piece Split Collar 3 4 3011016 21 SAE Washer 5 16 3021023 22 H...

Reviews: