
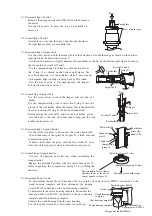


Push the crank shaft from the crank cap side to pull out it
as shown on the bottom-right figure.
Since the ball bearing 6001, ball bearing 6002, helical gear
43 and helical gear 29 are inserted by pressing, use the arbor
press to pull out them.
At this time use care not to miss the flat washer 8.
5-2. Assembling of crank
For assembling, follow in the reverse order against
disassembling.
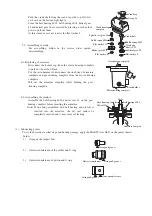
6-1. Replacing of armature
Disconnect the holder cap from the motor housing complete
to pull out the carbon brush.
Use the resin hammer to disconnect the one body of armature
complete and gear housing complete from the motor housing
complete.
Pull out the armature complete while holding the gear
housing complete.
6-2. Assembling of armature
Assemble the ball bearing 6000 and oil seal 12 on the gear
housing complete before inserting the armature.
Note) If one body assembled with ball bearing and oil seal is
inserted into the armature, the oil seal cannot be
completely inserted and it may cause oil leaking.
(2) Lubricating points
To avoid abrasion at earlier stage and heating damage, apply the MAKITA oil XLD on the points shown
below.
1) O ring on the impact bolt
2) Outer circumference of the striker and O ring
3) Outer circumference of piston and O ring
Crank cap
O ring 36
Crank housing
complete
Spiral bevel gear 29
Ball bearing 6001
Flat washer 12
Crank shaft
Ball bearing 6002
Circle clip
(shaft)S-15
Helical gear 29
Flat washer 8
Gear housing complete
Gear housing complete
Motor housing complete
Brush holder
Press
Oil seal 12
Armature complete
O ring and groove
O ring and groove
O ring and groove
Outer circumference
Outer circumference
Ball bearing 6000
Flat washer 8
Helical gear 43


