background image

7

OPERATION

Hammer drilling operation

CAUTION:

There is a tremendous and sudden twisting force
exerted on the tool/bit at the time of hole break-
through, when the hole becomes clogged with
chips and particles, or when striking reinforcing
rods embedded in the concrete. Always use the
side grip (auxiliary handle) and firmly hold the tool
by both side grip and switch handle during opera-
tions. Failure to do so may result in the loss of con-
trol of the tool and potentially severe injury.

When drilling in concrete, granite, etc., move the action
mode changing knob to the position of 

 symbol to use

“rotation with hammering” action.

Be sure to use a tungsten-carbide tipped bit.
Position the bit at the desired location for the hole, then
pull the switch trigger. Do not force the tool. Light pres-
sure gives best results. Keep the tool in position and pre-
vent it from slipping away from the hole.
Do not apply more pressure when the hole becomes
clogged with chips or particles. Instead, run the tool at an
idle, then remove the bit partially from the hole. By
repeating this several times, the hole will be cleaned out
and normal drilling may be resumed.

NOTE:

Eccentricity in the bit rotation may occur while operating
the tool with no load. The tool automatically centers itself
during operation. This does not affect the drilling preci-
sion.

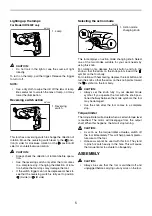
Blow-out bulb (optional accessory)

After drilling the hole, use the blow-out bulb to clean the
dust out of the hole.

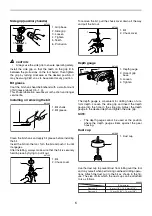
Drilling in wood or metal

Use the optional drill chuck assembly. When installing it,
refer to “Installing or removing drill bit” described on the
previous page.

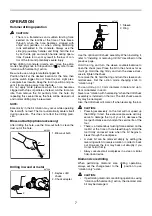
Hold the ring and turn the sleeve counterclockwise to
open the chuck jaws. Place the bit in the chuck as far as
it will go. Hold the ring firmly and turn the sleeve clock-
wise to tighten the chuck.

To remove the bit, hold the ring and turn the sleeve coun-
terclockwise. Set the action mode changing knob to
“rotation only”.

You can drill up to 13 mm diameter in metal and up to
24 mm diameter in wood.

Never use “rotation with hammering” when the drill chuck
assembly is installed on the tool. The drill chuck assem-
bly may be damaged.
Also, the drill chuck will come off when reversing the tool.

CAUTION:

Pressing excessively on the tool will not speed up
the drilling. In fact, this excessive pressure will only
serve to damage the tip of your bit, decrease the
tool performance and shorten the service life of the
tool.

There is a tremendous twisting force exerted on the
tool/bit at the time of hole breakthrough. Hold the
tool firmly and exert care when the bit begins to
break through the workpiece.

A stuck bit can be removed simply by setting the
reversing switch to reverse rotation in order to back
out. However, the tool may back out abruptly if you
do not hold it firmly.

Always secure small workpieces in a vise or similar
hold-down device.

Diamond core drilling

When performing diamond core drilling operations,
always set the change lever to the 

 position to use

“rotation only” action.

CAUTION:

If performing diamond core drilling operations using
“rotation with hammering” action, the diamond core
bit may be damaged.

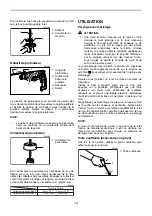
1. Blow-out bulb

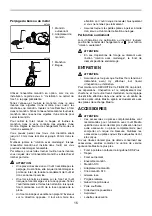
1. Keyless drill 

chuck

2. Chuck adapter

1

001302

1

2

007236

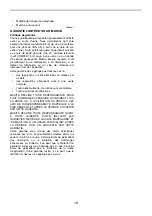
1. Sleeve
2. Ring

1

2

007237

Summary of Contents for HR1830F

Page 1: ...ERENCE AVERTISSEMENT Pour votre propre s curit pri re de lire attentivement avant l utilisation GARDER CES INSTRUCTIONS POUR R F RENCE ULT RIEURE ADVERTENCIA Para su seguridad personal LEA DETENIDAMEN...

Page 2: ...act with grounded surfaces such as pipes radiators ranges and refrigera tors There is an increased risk of electric shock if your body is grounded 6 Do not expose power tools to rain or wet condi tion...

Page 3: ...s with care Keep cutting tools sharp and clean Properly maintained tools with sharp cutting edges are less likely to bind and are easier to control 21 Check for misalignment or binding of moving parts...

Page 4: ...h locations 8 Hold the tool firmly with both hands 9 Keep hands away from moving parts 10 Do not leave the tool running Operate the tool only when hand held 11 Do not point the tool at any one in the...

Page 5: ...e for your work needs by using this knob For rotation only depress the lock button and turn the knob so that the arrow on the knob points toward the symbol on the tool body For rotation with hammering...

Page 6: ...r down all the way and pull the bit out Depth gauge The depth gauge is convenient for drilling holes of uni form depth Loosen the side grip and insert the depth gauge into the hole in the side grip Ad...

Page 7: ...y When installing it refer to Installing or removing drill bit described on the previous page Hold the ring and turn the sleeve counterclockwise to open the chuck jaws Place the bit in the chuck as fa...

Page 8: ...efects from workmanship and materials for the period of ONE YEAR from the date of original purchase Should any trouble develop during this one year period return the COMPLETE tool freight prepaid to o...

Page 9: ...prise inversez sa position si elle n entre toujours pas bien demandez un lectricien qualifi d installer une prise de courant polaris e Ne modifiez pas la fiche de l outil La double isolation limine l...

Page 10: ...as commander par son interrupteur est dangereux et doit tre r par 18 D branchez la fiche de l outil avant d effectuer un r glage de changer d accessoire ou de ranger l outil De telles mesures pr venti...

Page 11: ...si les vis sont bien serr es 6 Par temps froid ou lorsque l outil est rest inutilis pendant une longue p riode faites le r chauffer pendant quelques minutes en le faisant fonctionner vide Cela r chauf...

Page 12: ...Allumage de la lampe Pour le mod le HR1830F uniquement ATTENTION Evitez de regarder directement le faisceau lumineux ou sa source Pour allumer la lampe appuyez sur la g chette Pour l teindre rel chez...

Page 13: ...bloquer d clenchant constamment le limiteur de couple ASSEMBLAGE ATTENTION Avant d effectuer toute intervention sur l outil assurez vous toujours qu il est hors tension et d branch Poign e lat rale po...

Page 14: ...et de subir une blessure grave Lors du per age dans le b ton le granite etc d placez le bouton de changement de mode sur la position du symbole pour utiliser un mouvement de rotation avec martelage As...

Page 15: ...ar l outil risque de reculer brusquement si vous ne le tenez pas fermement Assurez toujours les petites pi ces percer l aide d un tau ou d un mode de fixation analogue Perforation au diamant Lors d op...

Page 16: ...s imposent suite une usure normale l outil a t malmen mal utilis ou mal entretenu l outil a subi des modifications MAKITA D CLINE TOUTE RESPONSABILIT POUR TOUT DOMMAGE ACCESSOIRE OU INDIRECT LI LA VEN...

Page 17: ...a de corriente invierta la clavija Si a n as no encaja p ngase en contacto con un electricista cualificado para que le instale una toma de corriente polarizada No modifique la clavija de ninguna forma...

Page 18: ...utilice la herramienta si el interruptor no la enciende o la apaga Cualquier herramienta que no pueda ser controlada con el interruptor ser peligrosa y deber ser reparada 18 Desconecte la clavija de...

Page 19: ...de poner en funcionamiento la herramienta 6 Cuando hace fr o o cuando la herramienta no se ha utilizado por un tiempo prolongado deje que la herramienta entre unos segundos en calor oper ndola sin car...

Page 20: ...ptor gatillo y luego su ltelo Encendido de las linternas S lo para el modelo HR1830F PRECAUCI N No mire a la luz ni vea la fuente de luz directamente Para encender la l mpara apriete el gatillo Suelte...

Page 21: ...ue tienden a taladrar o a pasar f cilmente por los orificios lo que provocar que el limitador de torsi n se accione con demasiada frecuencia MONTAJE PRECAUCI N Aseg rese siempre de que la herramienta...

Page 22: ...o contrario podr resultar en la p rdida del control de la herramienta y posiblemente graves heridas Al estar taladrando en concreto granito etc mueva la perilla de cambio de modalidad del accionamient...

Page 23: ...roceda Sin embargo la herramienta podr retroceder bruscamente si no la sujeta firmemente Sujete siempre las piezas de trabajo peque as en un tornillo de banco o herramienta de sujeci n similar Perfora...

Page 24: ...ran reparaciones debido al desgaste normal la herramienta haya sido abusada mal usada o mantenido indebidamente se hayan hecho alteraciones a la herramienta EN NING N CASO MAKITA SE HAR RESPONSABLE DE...

Page 25: ...25...

Page 26: ...26...

Page 27: ...27...

Page 28: ...dos por el lijado serrado amolado taladrado y otras actividades de la construccion contienen sustancias quimicas reconocidas por el Estado de California como causantes de cancer defectos de nacimiento...

Reviews: