Makita GA041GZ02 Instruction Manual Download Page 12

12

ENGLISH

Electric brake

Electric brake is activated after the tool is switched off.

The brake does not work when the power supply is shut 

down, such as the battery is removed accidentally, with 

the switch still on.

If the tool consistently fails to quickly stop after turning 

off the switch, have the tool serviced at a Makita Service 

Center.

Electronic function

Accidental re-start preventive 
function

When installing the battery cartridge while the switch is 

ON, the tool does not start.

To start the tool, turn off the switch, and turn it on again.

Active Feedback sensing Technology

The tool electronically detects situations where the 

wheel or accessory may be at risk to be bound. In the 

situation, the tool is automatically shut off to prevent 

further rotation of the spindle (it does not prevent 
kickback).

To restart the tool, switch off the tool first, remove the 

cause of sudden drop in the rotation speed, and then 
turn the tool on.

Soft start feature

Soft start feature reduces starting reaction.

ASSEMBLY

CAUTION:


Always be sure that the tool is 

switched off and the battery cartridge is removed 

before adjusting or checking function on the tool.

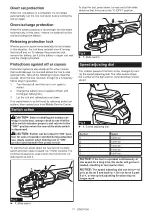
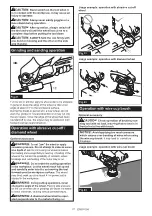
Installing side grip (handle)

CAUTION:


Always be sure that the side grip is 

installed securely before operation.

Screw the side grip securely on the position of the tool 

as shown in the figure.

Fig.6

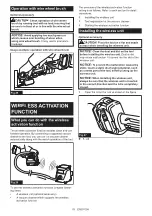
Installing or removing wheel guard

WARNING:


When using a depressed center 

wheel, flap disc or wire wheel brush, the wheel 

guard must be fitted on the tool so that the 

closed side of the guard always points toward the 
operator.

WARNING:


Make sure that the wheel guard is 

securely locked by the lock lever with one of the 
holes on the wheel guard.

WARNING:


When using an abrasive cut-off 

/ diamond wheel, be sure to use only the special 

wheel guard designed for use with cut-off wheels.

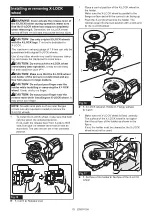
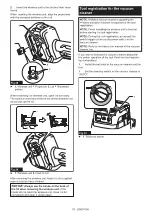
For depressed center wheel, flap 

disc, wire wheel brush / abrasive cut-

off wheel, diamond wheel

1.


While pushing the lock lever, mount the wheel 

guard with the protrusions on the wheel guard aligned 
with the notches on the bearing box.

3

2

1

Fig.7

►    

1.

 Lock lever 

2.

 Notch 

3.

 Protrusion

Summary of Contents for GA041GZ02

Page 1: ...INSTRUCTION MANUAL Cordless Angle Grinder GA039G GA040G GA041G ENGLISH Original instructions Read before use...

Page 2: ...table power pack PDC01 PDC1200 The cord connected power source s listed above may not be available depending on your region of residence Before using the cord connected power source read instruction a...

Page 3: ...tool is switched off and when it is running idle in addition to the trigger time Vibration The vibration total value tri axial vector sum determined according to EN62841 2 3 Work mode surface grindin...

Page 4: ...d power tools Unmodified plugs and matching outlets will reduce risk of electric shock 2 Avoid body contact with earthed or grounded surfaces such as pipes radiators ranges and refrigerators There is...

Page 5: ...s etc in accordance with these instructions tak ing into account the working conditions and the work to be performed Use of the power tool for operations different from those intended could result in...

Page 6: ...y from work area Anyone entering the work area must wear personal protective equipment Fragments of workpiece or of a broken accessory may fly away and cause injury beyond immediate area of operation...

Page 7: ...t off wheel from the cut while the wheel is in motion otherwise kickback may occur Investigate and take corrective action to eliminate the cause of wheel binding 4 Do not restart the cutting operation...

Page 8: ...oring battery cartridge in a con tainer with other metal objects such as nails coins etc 3 Do not expose battery cartridge to water or rain A battery short can cause a large current flow overheating p...

Page 9: ...10 The wireless unit is an accurate instrument Be careful not to drop or strike the wireless unit 11 Avoid touching the terminal of the wireless unit with bare hands or metallic materials 12 Always re...

Page 10: ...ausing injury to you or someone around you CAUTION Do not install the battery cartridge forcibly If the cartridge does not slide in easily it is not being inserted correctly Indicating the remaining b...

Page 11: ...ita Service Center Switch action CAUTION Before installing the battery car tridge into the tool always check to see that the slide switch actuates properly and returns to the OFF position when the rea...

Page 12: ...ture Soft start feature reduces starting reaction ASSEMBLY CAUTION Always be sure that the tool is switched off and the battery cartridge is removed before adjusting or checking function on the tool I...

Page 13: ...g to the work so that the oper ator can be protected Align the lock lever with one of the holes in the wheel guard and then release the lock lever to lock the wheel guard 2 1 A C C Fig 9 1 Wheel guard...

Page 14: ...ng wheel Not available in some countries Fig 12 Installing wire cup brush Optional accessory CAUTION Do not use wire cup brush that is damaged or which is out of balance Use of dam aged brush could in...

Page 15: ...not put your finger near the release lever while installing the X LOCK wheel It may pinch your finger NOTE No additional parts such as inner flanges or lock nuts are required to install or remove the...

Page 16: ...ing wheel guard and a vacuum cleaner Refer to the instruction manual attached to the dust collecting wheel guard for assembling and using it 1 2 Fig 20 1 Dust collecting wheel guard 2 Hose of the vac...

Page 17: ...depth of cut Overstressing the wheel increases the loading and susceptibility to twisting or binding of the wheel in the cut and the possibility of kickback wheel breakage and overheating of the motor...

Page 18: ...t optional accessory A vacuum cleaner which supports the wireless activation function The overview of the wireless activation function setting is as follows Refer to each section for detail procedures...

Page 19: ...If the hooks do not catch the wireless unit close the lid completely and open it slowly again Tool registration for the vacuum cleaner NOTE A Makita vacuum cleaner supporting the wireless activation...

Page 20: ...forming two or more tool registra tions for one vacuum cleaner finish the tool registra tion one by one Starting the wireless activation function NOTE Finish the tool registration for the vacuum clean...

Page 21: ...er to the table below for the meaning of the lamp status Status Wireless activation lamp Description Color On Blinking Duration Standby Blue 2 hours The wireless activation of the vacuum cleaner is av...

Page 22: ...d then become red After that press the wireless activation button on the tool in the same way 1 1 2 2 Fig 37 1 Wireless activation button 2 Wireless activation lamp If the cancellation is performed su...

Page 23: ...the power button on the vacuum cleaner is turned on Push the wireless activation button briefly and perform the tool registration cancellation procedures again The tool registration procedures for the...

Page 24: ...r formed by Makita Authorized Service Centers always using Makita replacement parts Air vent cleaning The tool and its air vents have to be kept clean Regularly clean the tool s air vents or whenever...

Page 25: ...thick ness greater than the maximum thickness as specified in SPECIFICATIONS the wires may catch on the guard leading to breaking of wires 2 6 7 4 5 5 2 2 8 10 9 3 1 Fig 40 Application 100 mm 4 model...

Page 26: ...to persons Only use accessory or attachment for its stated purpose If you need any assistance for more details regard ing these accessories ask your local Makita Service Center Makita genuine battery...

Page 27: ...27...

Page 28: ...www makita com Makita Europe N V Makita Corporation 3 11 8 Sumiyoshi cho Anjo Aichi 446 8502 Japan Jan Baptist Vinkstraat 2 3070 Kortenberg Belgium 885968 225 EN 20211221...

Reviews: