8-3
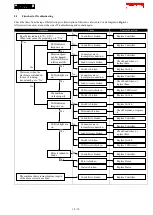
Flowchart of Troubleshooting
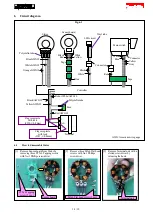
Check the items from the top of the following list. (Description of the item is referred to Circuit diagram in
Fig. 6-1
.)
After corrective action, return to the start of Troubleshooting and re-check again.
Symptom
Cause
Corrective action
No
Controller is broken.
Replace Controller.
Does Tester indicate 0.7V ~ 0.9V?
When tester cannot be prepared, go to “Yes”.
Yes
The machine
works properly.
Yes
No
Controller is broken.
Replace Controller.
No
Connectors are in
incomplete connection.
Replace Controller.
Rotation speed
can be changed.
Forward/ Reverse
rotation are OK.
Lead wires are broken.
Check Lead wires, or
replace them.
Switch is broken.
Replace Switch.
No
Connectors are in
incomplete connection.
Replace Controller.
LED job light are
on.
Lead wires are broken.
Check Lead wires, or
replace them.
LED circuit is broken.
Replace LED circuit.
Switch is broken.
Replace Switch.
Yes
Yes
Switch is broken.
Replace Switch.
Terminal is broken.
Check Terminal, or replace
it.
Controller is broken.
Replace Controller.
No
No
Connectors are in
incomplete connection.
Replace Controller.
LED job light are
on.
Lead wires are broken.
Check Lead wires, or
replace them.
Switch is broken.
Replace Switch.
LED circuit is broken.
Replace LED circuit.
Controller is broken.
Replace Controller.
Rotor is broken.
Replace Rotor.
Stator is broken.
Replace Stator.
No
Yes
Rotor is rubbed to
Stator.
Yes
Yes
Motor runs when the
machine is switched on.
In case of running
inconstantly, go to “No”.
Yes
No
Controller is broken.
Replace Controller.
The machine shows same symptom in spite
of the above corrective actions.
LED indicator
lamps are on.
LED indicator
lamps are on.
18 / 19


