11 ENGLISH
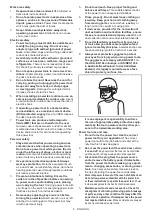
Installing and removing long
nozzles
Optional accessory
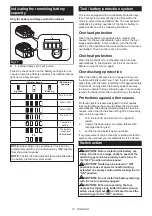
A set of long nozzles helps clean dust out of small holes
and narrow spots. Nozzle lengths can be arranged
according to your requirements.
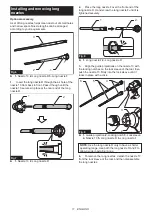
1
2
3
Fig.6
►
1.
Nozzle 13
2.
Long nozzle R
3.
Long nozzle F
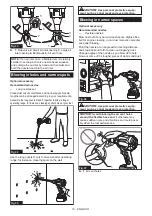
1.
Insert the long nozzle R through the air hole of the
nozzle 13 from back to front. Pass it though until the
nozzle 13 secures in place at the rear end of the long
nozzle R.
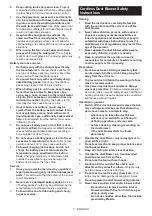
1
2
Fig.7
►
1.
Nozzle 13
2.
Long nozzle R
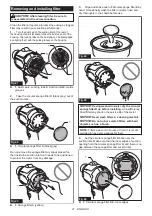
2.
Place the long nozzle F over the front end of the
long nozzle R. Hand screw the long nozzle F until it is
tightened securely.
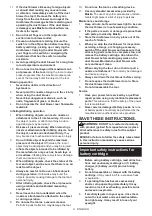
1
2
Fig.8
►
1.
Long nozzle F
2.
Long nozzle R
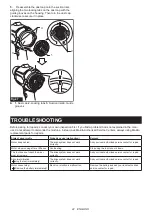
3.
Align the guide projections on the nozzle 13 with
the locking notches on the lock sleeve of the tool, then
push the nozzle 13 firmly into the lock sleeve until it
locks in place with a click.
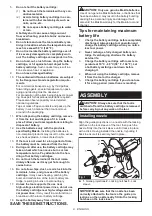
1
2
3
4
5
6
Fig.9
►
1.
Guide projection
2.
Locking notch
3.
Lock sleeve
4.
Nozzle 13
5.
Long nozzle R
6.
Long nozzle F
NOTE:
Use the long nozzle R only to have a shorter
operating range. Use both the long nozzle R and F to
allow a wider operating range.
4.
To remove the long nozzles, detach the nozzle 13
from the lock sleeve of the tool, and then disassemble
the long nozzles.


