background image

Installing or removing drill bit 

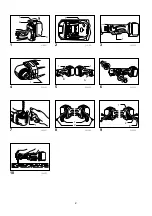
Fig.7 

To install the bit, place it in the chuck as far as it will go. 
Tighten the chuck by hand. Place the chuck key in each 
of the three holes and tighten clockwise. Be sure to 
tighten all three chuck holes evenly. 
To remove the bit, turn the chuck key counterclockwise in 
just one hole, then loosen the chuck by hand. 
After use, return the chuck key to the storage cavity on 
the tool. 

Chuck key holder 

Fig.8 

To install the chuck key holder, fix it to the convex portion 
of the tool housing on either side and then secure it with a 
screw. To remove, loosen the screw and then take it out. 

Hook 

Fig.9 

The hook is convenient for temporarily hanging the tool. 
This can be installed on either side of the tool. 
To install the hook, insert it into a groove in the tool 
housing on either side and then secure it with a screw. To 
remove, loosen the screw and then take it out. 

OPERATION 


CAUTION: 

• 

Hold the tool firmly with one hand on the gripping 
part of the tool and the other hand on the side grip 
when performing the tool. 

Fig.10 

Drilling operation 

Drilling in metal 

To prevent the bit from slipping when starting a hole, 
make an indentation with a center-punch and hammer at 
the point to be drilled. Place the point of the bit in the 
indentation and start drilling. 
Use a cutting lubricant when drilling metals. The 
exceptions are iron and brass which should be drilled dry. 


CAUTION: 

• 

Pressing excessively on the tool will not speed up 
the drilling. In fact, this excessive pressure will only 
serve to damage the tip of your bit, decrease the 
tool performance and shorten the service life of the 
tool. 

• 

There is a tremendous force exerted on the tool/bit 
at the time of hole break through. Hold the tool 
firmly and exert care when the bit begins to break 
through the workpiece. 

• 

A stuck bit can be removed simply by setting the 
reversing switch to reverse rotation in order to back 
out. However, the tool may back out abruptly if you 
do not hold it firmly. 

• 

Always secure small workpieces in a vise or similar 
hold-down device. 

• 

If the tool is operated continuously until the battery 
cartridge has discharged, allow the tool to rest for 
15 minutes before proceeding with a fresh battery. 

MAINTENANCE 


CAUTION: 

• 

Always be sure that the tool is switched off and the 
battery cartridge is removed before attempting to 
perform inspection or maintenance. 

• 

Never use gasoline, benzine, thinner, alcohol or the 
like. Discoloration, deformation or cracks may 
result. 

To maintain product SAFETY and RELIABILITY, repairs, 
any other maintenance or adjustment should be 
performed by Makita Authorized Service Centers, always 
using Makita replacement parts. 

OPTIONAL ACCESSORIES 


CAUTION: 

• 

These accessories or attachments are 
recommended for use with your Makita tool 
specified in this manual. The use of any other 
accessories or attachments might present a risk of 
injury to persons. Only use accessory or 
attachment for its stated purpose. 

If you need any assistance for more details regarding 
these accessories, ask your local Makita Service Center. 

• 

Drill bits 

• 

Chuck key 

• 

Chuck key holder 

• 

Hook 

• 

Plastic carrying case 

• 

Various type of Makita genuine batteries and 
chargers 


NOTE: 

• 

Some items in the list may be included in the tool 
package as standard accessories. They may differ 
from country to country. 

Summary of Contents for BDA350

Page 1: ...rrmaskin BRUKSANVISNING N Batteridrevet vinkelboremaskin BRUKSANVISNING FIN Akkukulmaporakone K YTT OHJE LV Bezvada le a urbma na LIETO ANAS INSTRUKCIJA LT akumuliatorinis kampinis gr tas NAUDOJIMO IN...

Page 2: ...2 1 2 3 1 012091 1 2 012128 1 3 008955 1 4 008953 1 1 A B 5 008954 6 008956 1 7 008957 1 2 8 008959 1 2 3 9 008958 10 008952...

Page 3: ...m s2 ENG901 1 The declared vibration emission value has been measured in accordance with the standard test method and may be used for comparing one tool with another The declared vibration emission va...

Page 4: ...RTRIDGE 1 Before using battery cartridge read all instructions and cautionary markings on 1 battery charger 2 battery and 3 product using battery 2 Do not disassemble battery cartridge 3 If operating...

Page 5: ...battery capacity is too low and the tool will not operate In this situation remove and recharge the battery Switch action Fig 3 CAUTION Before inserting the battery cartridge into the tool always chec...

Page 6: ...bit decrease the tool performance and shorten the service life of the tool There is a tremendous force exerted on the tool bit at the time of hole break through Hold the tool firmly and exert care wh...

Page 7: ...olerans K 1 5 m s2 ENG901 1 Det deklarerade vibrationsemissionsv rdet har uppm tts i enlighet med standardtestmetoden och kan anv ndas f r j mf randet av en maskin med en annan Det deklarerade vibrati...

Page 8: ...ng kan leda till allvarliga personskador ENC007 7 VIKTIGA S KERHETSANVISNINGAR F R BATTERIKASSETT 1 Innan batterikassetten anv nds ska alla instruktioner och varningsm rken p 1 batteriladdaren 2 batte...

Page 9: ...in avtryckaren igen Batterisp nningen faller Den kvarvarande batterikapaciteten r f r l g och maskinen fungerar inte I detta l ge tar du bort batteriet och laddar det Avtryckarens funktion Fig 3 F RSI...

Page 10: ...h f rkortar maskinens livsl ngd Det utvecklas en enorm kraft p maskinen borret vid h lgenomslaget H ll ett stadigt tag i maskinen och var f rsiktig n r borret b rjar tr nga igenom arbetsstycket Ett bo...

Page 11: ...ENG901 1 Den angitte verdien for de genererte vibrasjonene er blitt m lt i samsvar med standardtestmetoden og kan brukes til sammenlikne et verkt y med et annet Den angitte verdien for de genererte v...

Page 12: ...alvorlige helseskader ENC007 7 VIKTIGE SIKKERHETSINSTRUKSJONER FOR BATTERIET 1 F r du begynner bruke batteriet m du lese alle anvisninger og forsiktighetsregler p 1 batteriladeren 2 batteriet og 3 de...

Page 13: ...r for lav og verkt yet vil ikke fungere I dette tilfellet fjern og lad batteriet opp igjen Bryterfunksjon Fig 3 FORSIKTIG F r du setter batteriet inn i maskinen m du alltid kontrollere at startbrytere...

Page 14: ...verkt yeffekten og forkorte verkt yets levetid I gjennombrudds yeblikket virker det en enorm kraft p verkt yet boret Hold verkt yet i et fast grep og v r forsiktig n r boret begynner bryte gjennom arb...

Page 15: ...Virhemarginaali K 1 5 m s2 ENG901 1 Ilmoitettu t rin p st arvo on mitattu standarditestausmenetelm n mukaisesti ja sen avulla voidaan vertailla ty kaluja kesken n Ilmoitettua t rin p st arvoa voidaan...

Page 16: ...niin ett laiminly t ty kalun turvaohjeiden noudattamisen V RINK YTT tai t m n k ytt ohjeen turvam r ysten laiminly nti voi johtaa vakaviin henkil vahinkoihin ENC007 7 AKKUA KOSKEVIA T RKEIT TURVAOHJEI...

Page 17: ...a aina ennen akun kiinnitt mist ty kaluun ett liipaisinkytkin kytkeytyy oikein ja palaa OFF asentoon kun se vapautetaan K ynnist ty kalu painamalla liipaisinkytkint Mit voimakkaammin kytkint painetaan...

Page 18: ...e varovainen kun ter alkaa tulla l pi ty kappaleesta Kiinni juuttunut ter irrotetaan helposti vaihtamalla ter n py rimissuuntaa ja peruuttamalla Pid kuitenkin ty kalusta lujasti kiinni sill se voi t k...

Page 19: ...mma noteikta saska ar EN60745 Darba re mu urb anu met l Vibr cijas emisija ah D 2 5 m s2 vai maz k Neskaidr ba K 1 5 m s2 ENG901 1 Pazi ot vibr cijas emisijas v rt ba noteikta atbilsto i standarta p r...

Page 20: ...anas gad jum var g t smagas traumas ENC007 7 SVAR GI DRO BAS NOTEIKUMI AKUMULATORA LIETO ANAI 1 Pirms akumulatora lieto anas izlasiet visus nor d jumus un br din jumus kuri attiecas uz 1 akumulatora...

Page 21: ...s akumulators ir p rkarsis d gad jum aujiet akumulatoram atdzist pirms v lreiz nospiest sl d a m l ti Zema akumulatora jauda Akumulatora atlikus jauda ir p r k zema un darbar ks nedarbosies d gad jum...

Page 22: ...Iz mums ir dzelzs un misi kuri j urbj bez sm rvielas UZMAN BU P rm r gs spiediens uz darbar ku urb anas trumu nepalielin s B t b p rm r gs spiediens tikai boj s urbja uzgali samazin s darbar ka jaudu...

Page 23: ...e imas metalo gr imas Vibracijos skleidimas ah D 2 5 m s2 arba ma iau Paklaida K 1 5 m s2 ENG901 1 Paskelbtasis vibracijos emisijos dydis nustatytas pagal standartin testavimo metod ir j galima naudot...

Page 24: ...ORIAUS KASETEI 1 Prie naudodami akumuliatoriaus kaset perskaitykite visas instrukcijas ir persp jimus ant 1 akumuliatori kroviklio 2 akumuliatori ir 3 akumuliatori naudojan io gaminio 2 Neardykite aku...

Page 25: ...muliatoriaus energija per ma a ir rankis negali veikti Tokiu atveju i imkite akumuliatori ir kraukite j Jungiklio veikimas Pav 3 D MESIO Prie d dami akumuliatoriaus kaset rank visuomet patikrinkite ka...

Page 26: ...pad ti pa eisti gr to gal pabloginti rankio darb ir sutrumpinti jo eksploatavimo trukm rank ir gr t veikia didel sukamoji j ga kai gr iama skyl Laikykite rank tvirtai ir atsargiai i r kite kada gr ta...

Page 27: ...2 ENG901 1 Deklareeritud vibratsiooniemissiooni v rtus on m detud koosk las standardse testimismeetodiga ning seda v ib kasutada he seadme v rdlemiseks teisega Deklareeritud vibratsiooniemissiooni v r...

Page 28: ...uhendi ohutusn uete eiramine v ib p hjustada t siseid vigastusi ENC007 7 T HTSAD OHUTUSALASED JUHISED AKUKASSETI KOHTA 1 Enne akukasseti kasutamist lugege 1 akulaadijal 2 akul ja 3 seadmel olevad k ik...

Page 29: ...laadige seda L liti funktsioneerimine Joon 3 HOIATUS Kontrollige alati enne akukasseti t riista k lge paigaldamist kas l liti p stik funktsioneerib n uetekohaselt ja liigub lahtilaskmisel tagasi v lja...

Page 30: ...terjali l bistamisel rakendub t riistale puurile v ga suur j ud Hoidke t riista kindlalt ning olge t helepanelik kui otsak hakkab puuritavast materjalist l bi tungima Kinnikiilunud puuri saab lihtsalt...

Page 31: ...1 800 314 314 1 7 1 8 14 4 18 EPTA 01 2003 ENE032 1 ENG104 1 A EN60745 LpA 73 A 3 A 80 ENG202 3 EN60745 ah D 2 5 2 1 5 2 ENG901 1 ENH101 15 Makita Corporation Makita BDA340 BDA350 2006 42 EC EN60745...

Page 32: ...32 30 1 2009 000230 Tomoyasu Kato Makita Corporation 3 11 8 Sumiyoshi cho Anjo Aichi 446 8502 JAPAN GEA010 1 GEB051 2 1 2 3 4 5 6 7 8 ENC007 7 1 1 2 3 2 3 4 5 1 2...

Page 33: ...33 3 6 50 C 122 F 7 8 9 1 2 3 10 C 40 C 50 F 104 F 4 1 2...

Page 34: ...34 3 4 10 15 5 A B 6 7 8 9...

Page 35: ...35 10 15 Makita Makita Makita Makita Makita...

Page 36: ...36 Makita Corporation Anjo Aichi Japan www makita com 884822D989...

Reviews: