

4
ENGLISH
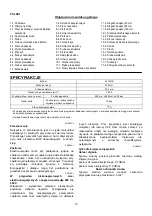
Explanation of general view
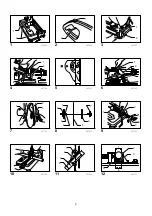
1-1. Base
1-2. Bolt holes
2-1. Lock button / Lock-off button
2-2. Switch trigger
3-1. Screw
3-2. Spark guard
4-1. Socket wrench
4-2. Guide plate
4-3. Move
4-4. Hex bolts
6-1. Socket wrench
6-2. Guide plate
6-3. Hex bolts
7-1. Shaft lock
7-2. Safety guard
7-3. Socket wrench
8-1. O-ring
8-2. Inner flange
8-3. Ring
8-4. Spindle
8-5. Cut-off wheel
8-6. Outer flange
8-7. Hex bolt
9-1. Vise plate
9-2. Vise nut
9-3. Vise handle
10-1. Spacer block
11-1. Guide plate
11-2. Straight piece of wood (Spacer)
11-3. Over 45 mm long
11-4. Over 65 mm long
11-5. Over 190 mm long
12-1. Diameter of workpiece
12-2. Guide plate
12-3. Spacer block
12-4. Width of spacer block
12-5. Vise
13-1. Blocks
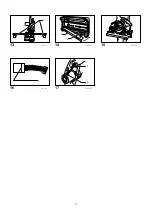
14-1. Under cover
14-2. Wing bolt
16-1. Limit mark
17-1. Screwdriver
17-2. Brush holder cap
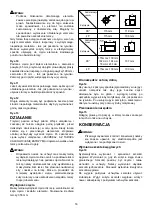
SPECIFICATIONS
Model 2414NB
Wheel diameter
355 mm
Hole diameter
25.4 mm
No load speed (min
-1
) 3,800
Dimensions (L x W x H)
With under cover
500 mm x 280 mm x 620 mm
Net weight
With European type safety
guard and under cover
18.5 kg
Safety class
/II
• Due to our continuing programme of research and development, the specifications herein are subject to change without notice.
• Note: Specifications may differ from country to country.
ENE007-2
Intended use
The tool is intended for cutting in masonry and ferrous
materials with appropriate abrasive cut-off wheel. Follow
all laws and regulations regarding dust and work area
health and safety in your country.
ENF002-1
Power supply
The tool should be connected only to a power supply of
the same voltage as indicated on the nameplate, and
can only be operated on single-phase AC supply. They
are double-insulated in accordance with European
Standard and can, therefore, also be used from sockets
without earth wire.
ENF100-1
For public low-voltage distribution systems of
between 220 V and 250 V.
Switching operations of electric apparatus cause voltage
fluctuations. The operation of this device under
unfavorable mains conditions can have adverse effects
to the operation of other equipment. With a mains
impedance equal or less than 0.26 Ohms it can be
presumed that there will be no negative effects. The
mains socket used for this device must be protected with
a fuse or protective circuit breaker having slow tripping
characteristics.
ENG005-1
For European countries only
Noise and Vibration
The typical A-weighted noise levels are
sound pressure level: 97 dB (A)
sound power level: 110 dB (A)
Wear ear protection.
The typical weighted root mean square acceleration
value is not more than 2.5 m/s
2
.
ENH003-10
EC Declaration of Conformity
We Makita Corporation as the responsible
manufacturer declare that the following Makita
machine(s):
Designation of Machine: Portable cut-off
Model No./ Type: 2414NB
are of series production and
Conforms to the following European Directives:
98/37/EC until 28th December 2009 and then with
2006/42/EC from 29th December 2009
And are manufactured in accordance with the following
standards or standardised documents:
EN61029
Summary of Contents for 2414NB
Page 3: ...3 1 13 003767 1 2 14 005272 15 003768 1 16 001145 1 2 17 003769...
Page 10: ...10 Fig 1 Fig 2 Fig 3 Fig 4 0 170 35 205 70 240 Fig 5 Fig 6 0 45 35 205 70 240 Fig 7 Fig 8...
Page 12: ...12 Fig 16 Fig 17 17...
Page 39: ...39...
Page 40: ...40 Makita Corporation Anjo Aichi Japan 884151A853...


