14 ENGLISH
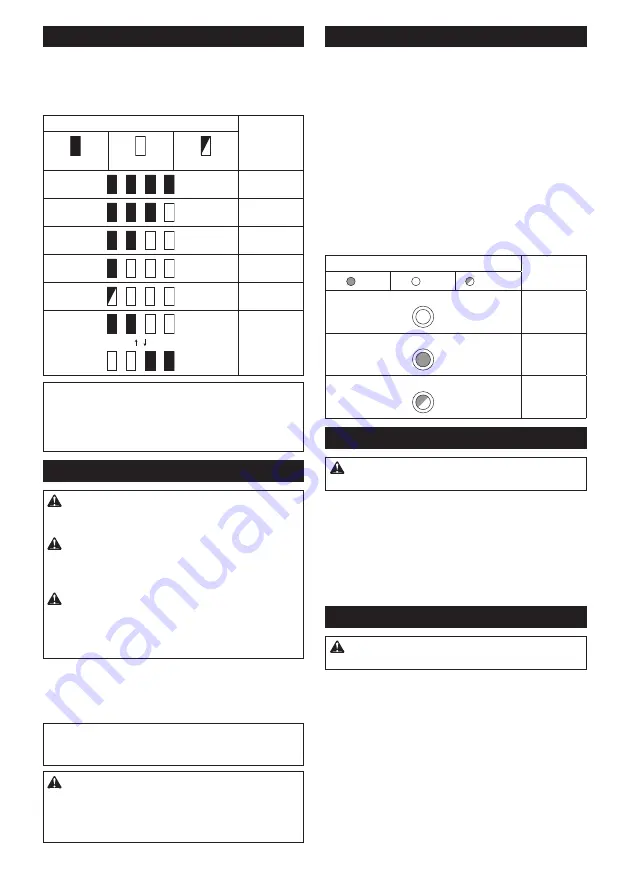
Indicating the remaining battery capacity
Press the check button on the battery cartridge to indi
-
cate the remaining battery capacity. The indicator lamps
light up for a few seconds.
►
Fig.8:
1.
Indicator lamps
2.
Check button
Indicator lamps
Remaining
capacity
Lighted
Off
Blinking
75% to 100%
50% to 75%
25% to 50%
0% to 25%
Charge the
battery.
The battery
may have
malfunctioned.
NOTE:
Depending on the conditions of use and the
ambient temperature, the indication may differ slightly
from the actual capacity.
NOTE:
The first (far left) indicator lamp will blink when
the battery protection system works.
Switch action
WARNING:
Before installing the battery cartridge into
the tool, always check to see that the switch trigger actuates
properly and returns to the "OFF" position when released.
WARNING:
NEVER defeat the lock-off button
by taping down or some other means.
A switch with
a negated lock-off button may result in unintentional
operation and serious personal injury.
WARNING:
NEVER use the tool if it runs when you
simply pull the switch trigger without pressing the lock-off
button.
A switch in need of repair may result in unintentional
operation and serious personal injury. Return tool to a Makita
service center for proper repairs BEFORE further usage.
To prevent the switch trigger from being accidentally pulled, a lock-
off button is provided. To start the tool, depress the lock-off button
and pull the switch trigger. Release the switch trigger to stop.
►
Fig.9:
1.
Switch trigger
2.
Lock-off button
NOTICE:
Do not pull the switch trigger hard
without pressing in the lock-off button.
This can
cause switch breakage.
CAUTION:
The tool starts to brake the circular saw
blade rotation immediately after you release the switch
trigger. Hold the tool firmly to respond the reaction of the
brake when releasing the switch trigger.
Sudden reaction
can drop the tool off your hand and can cause a personal injury.
Automatic speed change function
This tool has "high speed mode" and "high torque
mode".
The tool automatically changes the operation mode
depending on the work load. When the work load is low,
the tool will run in the "high speed mode" for quicker
cutting operation. When the work load is high, the tool
will run in the "high torque mode" for powerful cutting
operation.
►
Fig.10:
1.
Mode indicator
The mode indicator lights up in green when the tool is
running in "high torque mode".
If the tool is operated with excessive load, the mode
indicator will blink in green. The mode indicator stops
blinking and then lights up or turns off if you reduce the
load on the tool.
Mode indicator status
Operation
mode
On
Off
Blinking
High speed
mode
High torque
mode
Overload
alert
Adjusting depth of cut
CAUTION:
After adjusting the depth of cut,
always tighten the lever securely.
Loosen the lever on the depth guide and move the base
up or down. At the desired depth of cut, secure the base
by tightening the lever.
For cleaner, safer cuts, set cut depth so that no more
than one blade tooth projects below workpiece. Using
proper cut depth helps to reduce potential for danger-
ous KICKBACKS which can cause personal injury.
►
Fig.11:
1.
Lever
Bevel cutting
CAUTION:
After adjusting the bevel angle,
always tighten the lever securely.
Loosen the lever and set for the desired angle by tilting
accordingly, then tighten the lever securely.
►
Fig.12:
1.
Lever
Positive stopper
The positive stopper is useful for setting the des-
ignated angle quickly. Turn the positive stopper so
that the arrow on it points your desired bevel angle
(22.5°/45°/56°). Loosen the lever and then tilt the tool
base until it stops. The position where the tool base
stops is the angle you set with the positive stopper.
Tighten the lever with the tool base at this position.
►
Fig.13:
1.
Positive stopper
Summary of Contents for 0088381749152
Page 2: ...Fig 1 Fig 2 Fig 3 Fig 4 Fig 5 Fig 6 2 3 1 Fig 7 2 ...
Page 3: ...1 2 Fig 8 2 1 Fig 9 1 Fig 10 1 Fig 11 1 Fig 12 1 Fig 13 1 2 Fig 14 1 Fig 15 3 ...
Page 6: ...1 Fig 31 Fig 32 1 Fig 33 2 1 3 4 Fig 34 1 2 3 Fig 35 1 Fig 36 6 ...
Page 7: ...2 1 2 1 Fig 37 Fig 38 1 Fig 39 1 2 Fig 40 1 Fig 41 1 Fig 42 7 ...


