background image

36

37

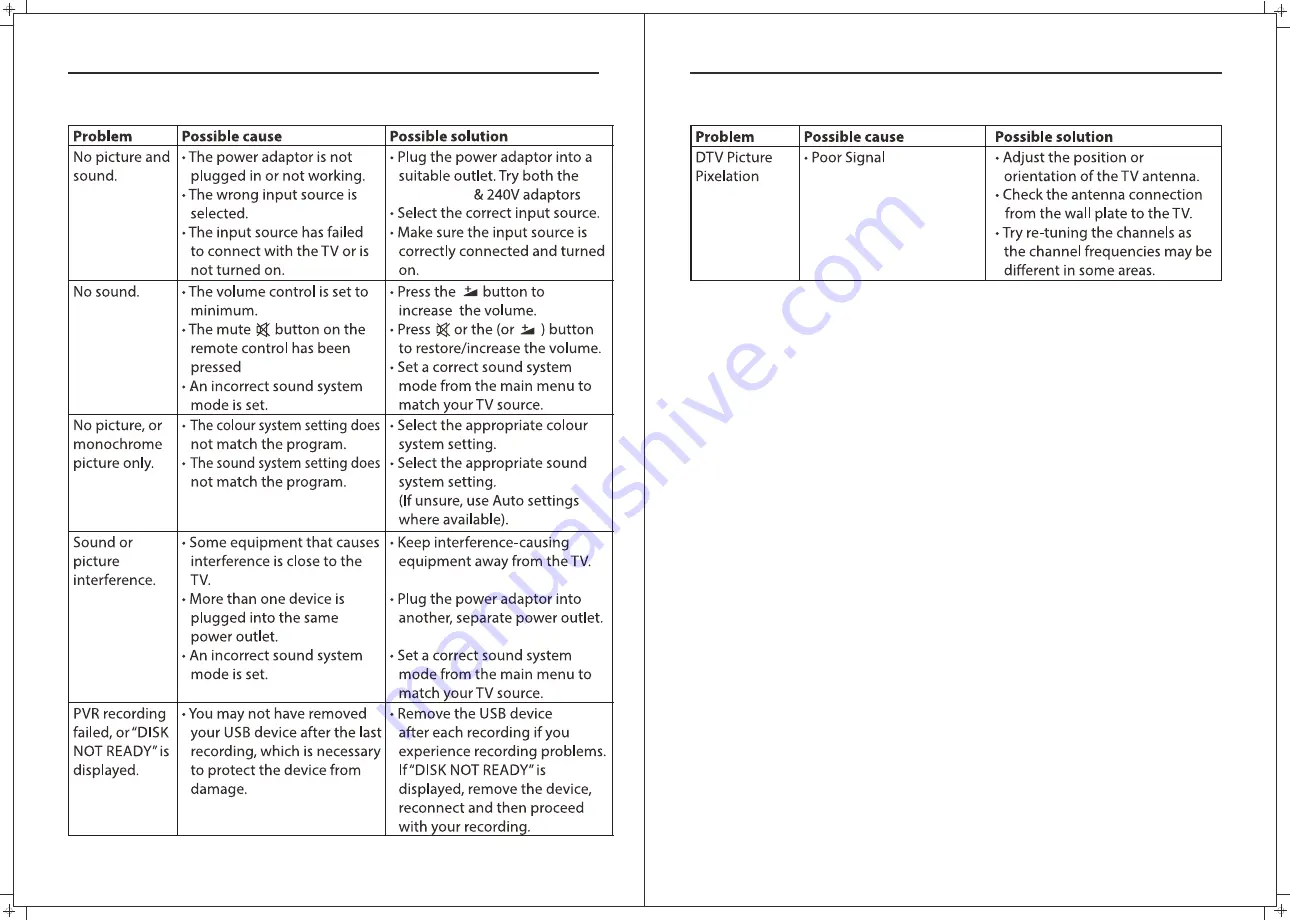
Troubleshooting

9

/

30V


DC

Troubleshooting

 (Cont.)

NOTE

: Thank you for purchasing a Majestic quality TV. Our products have been designed with 

over 15 years of engineering excellence and are designed of the highest quality standard in
the Marine and RV industry. Should you encounter any problems that cannot be easily 
addressed within this instruction manual please feel free to contact us at these locations:

   Australia (Int’l Head Office): 073 102 3575
   New Zealand: 09 415 6936
   USA: 561 459 1900
   All other countries please email [email protected]

  Feel free to visit our website for more updated specifications or technical support 
www.majestic-global.com


Summary of Contents for L195DA

Page 1: ...USER S MANUAL LED TV INSTRUCTION MANUAL Model L195DA ...

Page 2: ... is required when the apparatus has been damaged in any way such as power supply cord or plug is damaged liquid has been spilled or objects have fallen into the apparatus has been exposed to rain or moisture does not operate normally or has been dropped CAUTION These servicing instructions are for use by qualified service personnel only To reduce the risk of electric shock do not perform any servi...

Page 3: ...eep all people away from the antenna cable during electrical storms Important Safety Precautions Please immediately pull out the AC power plug from adapter if there is an abnormal sound or smell or the LED TV has sound but no picture and contact after sales support The LED TV should be kept free from rain moisture and dust to prevent electrical shock and short circuits Do not cover the ventilation...

Page 4: ...utton performs the channel up function If the OSD menu is active this button functions as up control for the menu 7 VOL This button decreases the TV s volume If the On Screen Display OSD menu is active pressing this button will move the selection to the left 8 VOL This button increases the TV s volume If the OSD menu is active pressing this button will move the selection to the right 9 POWER Turn ...

Page 5: ...n your amplifier home theater SCART Connecting for SCART signal 4 DVB S2 Connected to external SATELLITE 5 6 DVB T2 Connected to external antenna 7 OPTICAL Digital Audio output for Surround Sound amplifiers and other devices 8 HDMI1 Input HDMI in 9 HDMI2 ARC MMMI Input HDMI in 11 MINI YPbPr Connecting for the Y Pb Pr Input in Component mode 10 CI Used to insert the CI card 12 MINI AV Connecting fo...

Page 6: ...ntroller to select SCART DVD or VCR back DVD or VCR HDMI1 HDMI2 ARC MMMI Common lnterface MINI YPbPr IN EARPHONE OUT MINI AV IN OPTICAL DVB T2 DVB S2 SCART L R AUDIO OUT DC 12V USB2 USB1 1 COMPOSITE AV INPUT Audio video input Use the SOURCE button to select AV on the remote control HDMI1 HDMI2 ARC MMMI Common lnterface MINI YPbPr IN EARPHONE OUT MINI AV IN OPTICAL DVB T2 DVB S2 SCART L R AUDIO OUT...

Page 7: ...n Don t mix old or used batteries with 3 Replace the cover Battery Cover 2 x size AAA 1 5V Battery Cover System Connection new ones To use the remote control point it towards the remote sensor at the front of the television The remote control has a range of up to approximately seven meters from the TV at an angle of up to 60 degrees 10 System Connection 5 OPTICAL OUTPUT Allows connection of Digita...

Page 8: ...nge channels up down AUDIO 17 18 ASPECT Press this button to select the aspect ratio of the screen 20 DISPLAY Press to display the source and channel info 25 26 27 28 Use for adjustments in PC mode Delete function button Rename function button Move function button Skip function button R DELETE G RENAME Y MOVE B SKIP 29 FAV Selects favorite channel s 30 TEXT Switch on off of Teletext window 31 32 3...

Page 9: ...he transparency of Teletext window DVD Repeat mode selection REPEAT 40 41 43 44 39 CANCEL Switches the Teletext window to the background only the current page no is visible First Time Installation Language Country Energy Mode English Australia Store Mode Auto Tuning OK Step one It shows OSD Language for you to choose when boot for the first time Step two enter Country menu Step three Enter Energy ...

Page 10: ...nu Press OK key to enter Auto Tuning the following prompt box will appear Press MENU key to show main menu there are six functions under main menu they are CHANNEL PICTURE SOUND TIME SETUP LOCK Press to select these functions Main Menu When Tune Type is DTV ATV press OK key to enter DTV auto searching ...

Page 11: ...er DTV searching When searching if you want to directly exit from searching press EXIT to exit Press to adjust channels when there is signal press OK thenbegin ATV searching Tips After searching the channel manually do press red key to save the channels or after you switch the status the channel you searched won t be saved DTV Manual Tuning Press to adjust channels when there is signal press OK th...

Page 12: ...SKIP When execute CH CH skip this program and this program can t be selected even press the number key Rename Rename function only appear and can be used under ATV program Press GREEN key under ATV the program can be renamed Favorite Press FAV key mark the program the cursor is in as favorite program PVR In CHANNEL menu under PVR File system option Press OK key to enter PVR menu as follows Picture...

Page 13: ...tion 22 23 Time Mode Press button to select Location and then Press button to select then press OK button to confirm Sound Mode Press button to select Location and then Press button to select then press OK button to confirm Sound Time ...

Page 14: ...tion 24 25 Lock Mode Press button to select Location and then Press button to select then press OK button to confirm Lock Mode Press button to select Location and then Press button to select then press OK button to confirm LOCK Option ...

Page 15: ... cursor to exercise different function according to hint In the option of Media Player on MainMenu Press OK to enter the Media Player menu see the picture as follows Press to select Movie Music or Photo Take Movie function for example when there is focus point on Movie function press OK button to enter into File Selector menu On FileSelector menu select film source that needs to be play according ...

Page 16: ... menu move cursor to Music press OK button to enter into FileSelector menu Select the file you want to play press PLAY PAUSE to enter into full screen play Press button to move cursor and operate according to different hint Photo In the same way on Media Player menu move cursor to Photo press OK button to enter into FileSelector menu Select the file you want to play press PLAY PAUSE to enter into ...

Page 17: ...le This player can display DVD subtitle languages if supported by the DVD disc When playing DVD s you can hide the subtitle or choose any of them as the current subtitle language 4 Disc menu DVD Disc menu language selection options 5 PARENTAL This function disables playback of specific DVD s which may be unsuitable for children Some DVDs are encoded with specific rating levels lf the rating level ...

Page 18: ...ation Cont Chapter Title All O Built in DVD Player Operation Cont Title Search DVD Press GOTO then press the number buttons to enter the desired title number Repeat Playback Press REPEAT during playback to activate repeat mode l l l ...

Page 19: ...revious le If the picture appears upside down or sideways press to ip rotate the picture Cleaning and Maintenance WARNING For your personal safety be sure to disconnect the power adaptor before proceeding with any maintenance or cleaning Cleaning the TV screen Do not touch the TV screen with sharp objects Use a clean soft cloth to wipe off any dust and ngerprints from the TV screen surface Wipe in ...

Page 20: ...d in the Marine and RV industry Should you encounter any problems that cannot be easily addressed within this instruction manual please feel free to contact us at these locations Australia Int l Head Office 073 102 3575 New Zealand 09 415 6936 USA 561 459 1900 All other countries please email support majestic global com Feel free to visit our website for more updated specifications or technical su...

Page 21: ...38 Specifications 3 5kg DC12V 4A 35 445 x 311 x 170mm 445 x 275 x 45mm VESA 100 x 100 18 5 L195DA 2 x 5W 1366 H X 768 V 250 cd m DVB C T2 S2 PAL 178 H x 178 V ...

Reviews: