background image

1.   

POWER (DC 12V) input

2.   

Earphone out:

 Output for headphones or head units such as Majestic Head Units with TV input. 

3.   

AV Inputs:

 Composite Video & Audio (A/V) in. In this mode, the Green RCA jack acts

      the Yellow Video input of AV in.

4. 

  PC Audio Input:

 Connect to the audio output jack on a computer. 

5.   

VGA Input:

 Connect to a computer’s VGA output jack.

6.   

HDMI1(MMMI) Input:

 HDMI in.

7.   

HDMI2(ARC) Input:

 HDMI in.

8.   

HDMI3 Input:

 HDMI in.

9.   

COAXIAL Out:

 Digital Audio output for Surround Sound amplifiers and other devices.

10. 

RF Input:

 Connect to an external antenna to receive ATV/DTV TV signals 

      in ATV/DTV mode.

11. 

USB

: USB/Multimedia input.

12

Y/Pb/Pr Input: 

Component Video in. 

Rear Bottom

Rear Side

1

2

3

5

6

4

DC  12V

EARPHONE

OUT

VIDEO


L

R

VGA

HDMI1

(MMMI) 

PC

AUDIO

IN

RF

IN

USB

COAXIAL

OUT

Y

Pr

Pb

12

9

IN

IN

TV Inputs & Outputs

7

HDMI2

(ARC) 

8

HDMI3

11

10

System


Connection

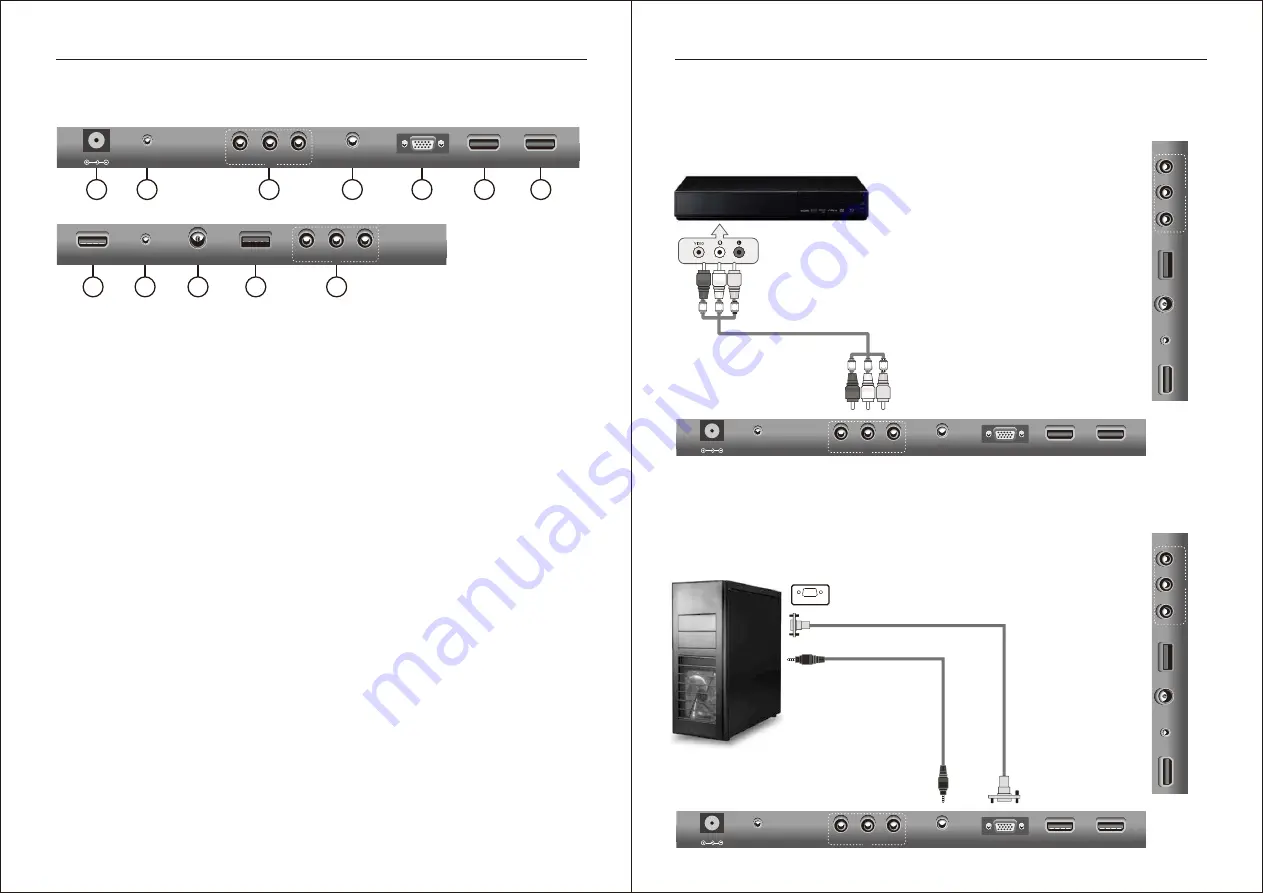
NOTE: Please, make sure the inputs and outputs have firm connections before 

connecting power.
1.  COMPOSITE AV INPUT

Audio/video input: Use the SOURCE button to select  AV on the remote control.

VGA


OUTPUT

PC


AUDIO


OUTPUT

VGA


OUTPUT

2.  PC INPUT

PC input: Use the SOURCE button on the remote control to select PC.

Video Cable Red/White/Yellow (Not supplied)

DC  12V

EARPHONE

OUT

VIDEO


L

R

VGA

HDMI1

(MMMI) 

PC

AUDIO

IN

IN

HDMI2

(ARC) 

R

F IN

U

S

B

C

O

A

X

IA

L

O

U

T

Y

P

r

P

b

IN

H

D

M

I3

DC  12V

EARPHONE

OUT

VIDEO


L

R

VGA

HDMI1

(MMMI) 

PC

AUDIO

IN

IN

HDMI2

(ARC) 

R

F IN

U

S

B

C

O

A

X

IA

L

O

U

T

Y

P

r

P

b

IN

H

D

M

I3

6

7

More information https://www.caravansplus.com.au

Summary of Contents for L194DA

Page 1: ...USER S MANUAL LED TV INSTRUCTION MANUAL Model L194DA More information https www caravansplus com au ...

Page 2: ...pparatus has been damaged in any way such as power supply cord or plug is damaged liquid has been spilled or objects have fallen into the apparatus has been exposed to rain or moisture does not operate normally or has been dropped CAUTION These servicing instructions are for use by qualified service personnel only To reduce the risk of electric shock do not perform any servicing other than that co...

Page 3: ... the antenna cable during electrical storms Important Safety Precautions Please immediately pull out the AC power plug from adapter if there is an abnormal sound or smell or the LED TV has sound but no picture and contact after sales support The LED TV should be kept free from rain moisture and dust to prevent electrical shock and short circuits Do not cover the ventilation openings with table clo...

Page 4: ... this button functions as up control for the menu 7 VOL This button decreases the TV s volume If the On Screen Display OSD menu is active pressing this button will move the selection to the left 8 VOL This button increases the TV s volume If the OSD menu is active pressing this button will move the selection to the right 9 POWER Turn on the TV by pressing the button once Press the button again to ...

Page 5: ...put Component Video in Rear Bottom Rear Side 1 2 3 5 6 4 DC 12V EARPHONE OUT VIDEO L R VGA HDMI1 MMMI PC AUDIO IN RF IN USB COAXIAL OUT Y Pr Pb 12 9 IN IN TV Inputs Outputs 7 HDMI2 ARC 8 HDMI3 11 10 System Connection NOTE Please make sure the inputs and outputs have firm connections before connecting power 1 COMPOSITE AV INPUT Audio video input Use the SOURCE button to select AV on the remote cont...

Page 6: ...B COAXIAL OUT Y Pr Pb IN HDMI3 DC 12V EARPHONE OUT VIDEO L R VGA HDMI1 MMMI PC AUDIO IN IN HDMI2 ARC RF IN USB COAXIAL OUT Y Pr Pb IN HDMI3 System Connection 5 COAXIAL OUTPUT Allows connection of Digital audio systems and Surround Sound 6 USB INPUT Use the SOURCE button on the remote controller to select Media USB memory COAXIAL Cable Not supplied COAXIAL DC 12V EARPHONE OUT VIDEO L R VGA HDMI1 MM...

Page 7: ...sert two 1 5V AAA size batteries using the correct polarity as shown Don t mix old or used batteries with 3 Replace the cover Battery Cover 2 x size AAA 1 5V Battery Cover System Connection new ones To use the remote control point it towards the remote sensor at the front of the television The remote control has a range of up to approximately seven meters from the TV at an angle of up to 60 degree...

Page 8: ...IO 17 18 ASPECT Press this button to select the aspect ratio of the screen 20 DISPLAY Press to display the source and channel info 25 26 27 28 Use for adjustments in PC mode Delete function button Rename function button Move function button Skip function button R DELETE G RENAME Y MOVE B SKIP 29 FAV Selects favorite channel s 30 TEXT Switch on off of Teletext window 31 32 33 34 35 36 SUBTITLE Pres...

Page 9: ...upper Teletext options SUBPAGE MIX Sets the transparency of Teletext window DVD Repeat mode selection REPEAT 40 41 43 44 39 CANCEL Switches the Teletext window to the background only the current page no is visible Press MENU button to display the MAIN OSD MENU Press button to select the MENU you want Press ENTER button or button to enter the sub menu and press button to return back to the previous...

Page 10: ...ss button to select Contrast then press ENTER button or button to enter and press button to adjust Then press MENU button to return back the previous menu directly Sharpness Press button to select Sharpness then press ENTER button or button to enter and press button to adjust Then press MENU button to return back the previous menu directly Colour Press button to select Colour then press ENTER butt...

Page 11: ...on to select Treble then press ENTER or button to enter and press button to adjust Then press MENU button to return back the previous menu directly EQ Press button to select EQ then press ENTER or button to enter and press button to select Available EQ mode EQ100HZ EQ300HZ EQ1KHZ EQ3KHZ EQ8KHZ Then press ENTER or button to enter and press button to adjust Then press MENU button to return back the ...

Page 12: ...nel already lock press RED button again cancel lock Press GREEN button to set the current channel to delete if the current channel already delete press GREEN button again will cancel delete Press YELLOW button to skip the current channel if the current channel already skip press YELLOW button again will cancel skip Press BLUE button to swap the channel position If one of the channel has been incor...

Page 13: ...Channel press RED button to set to Fav1 Press button to select Channel press GREEN button to set to Fav2 Press button to select Channel press YELLOW button to set to Fav3 Press button to select Channel press BLUE button to set to Fav4 If the current channel already be one of your favorite channel press the RED GREEN YELLOW BLUE button again will set it to a normal channel Press MENU button or EXIT...

Page 14: ... to display the main menu Press button to select Feature in the main menu then press ENTER or to enter 1 Press button to select the option that you want to adjust in the Feature menu then press ENTER or button to enter 2 Press button to adjust or press button to select 3 After finishing your adjustment press MENU button to save and return back to the previous menu and press EXIT button to exit the...

Page 15: ...TER or button to confirm Preferred Subtitle Press button to select Preferred Subtitle then press ENTER or button to enter the sub menu then Press button to select then press ENTER or button to confirm Preferred Audio Press button to select Preferred Audio press ENTER or button to enter the sub menu then press button to select then press ENTER or button to confirm Digital Teletext Language Press bu...

Page 16: ...V Setting Press button to select Reset TV Setting and then press ENTER or to enter The password menu will appear when the Child Lock is on Software Upgrade Software upgrade by bin code Put The bin code into the root directory of the media and media plugged into the TV s USB interface press ENTER key to upgrade Don t power off during the upgrading process The system will restarts when the upgrading...

Page 17: ...ou want to view then press ENTER button to view Press button to switch favorite 1 favorite 2 favorite 3 and favorite 4 Subtitle Press subtitle button on the remote control the subtitle menu will appear as follows Press button to OFF then press ENTER button will not display subtitle Press button to ENG then press ENTER button show the subtitle in English Press EXIT to exit EPG ELECTRONIC PROGRAM GU...

Page 18: ...coded channel TEXT Press TT CC button on the remote control to display the text Press TT CC button on the remote control again to stop playing the text Multi Audio Press AUDIO button on the remote control to display the multi audio menu Press button to select the audio format of the language available audio format right stereo left Press button to select different language PVR You can press on the...

Page 19: ...turning on the TV and there are no programs in the TV memory the Auto Installation menu will appear on the screen There are 5 setups as follow Setup 1 Set up Home Setup 2 Set up the Country Setup 3 Set up the Language Setup 4 Set up the Auto Power Off More information https www caravansplus com au ...

Page 20: ... Set up the Auto Search Air Cabler Type Satellite Operations in Setup 6 Satellite type are shown in the following table Option Value DataBase Import Inport default Satellite database Satellite System Enter Satellite System menu for setting More information https www caravansplus com au ...

Page 21: ... in slide show mode Same as PAUSE key on remote to pause the playing file Same as STOP key on remote to stop sliding show and return to the file browser Same as key on remote to play the previous or next file directly To rotate the playing picture 0 º 90 º 180 º 270º To zoom the playing picture Same as INFO key on remote to display the information of the current file To enter Photo Setup menu incl...

Page 22: ... LC HE AAC AC3 AC3 E AC3 MPEG MP1 MP2 MP3 AAC LC HE AAC Read Audio Cook Ogg Vorbis FLAC FLAC Movie Format Supported Type Container Video Decoder MOVIE AVI MPEG 4 ASP H 264 DivX Xvid WMV 9 VC 1 MPEG 4 SP MJPEG MPEG 1 2 MPEG 1 Video MPEG 2 Video MPEG4 MPEG 2 Video MPEG 4 ASP H 264 Xvid MJPEG WMV WMV 9 VC 1 RealMedia RV30 RV40 Flash Sorenson H 263 H 264 QuickTime MPEG 4 ASP H 264 MJPEG Media Operatio...

Page 23: ... ENTER button or button to play press button or EXIT button to stop playing press the button to return back to previous page You can see the information of the current playing media at the first flew seconds or after press INFO button E Book Press button to select E Book Manager in the main menu then press ENTER button to enter Press EXIT button to return back to the previous menu Press to select ...

Page 24: ...44 45 Built in DVD Player Operation Built in DVD Player Operation Cont More information https www caravansplus com au ...

Page 25: ...y the DVD disc When playing DVD s you can hide the subtitle or choose any of them as the current subtitle language 4 Disc menu DVD Disc menu language selection options 5 PARENTAL This function disables playback of specific DVD s which may be unsuitable for children Some DVDs are encoded with specific rating levels lf the rating level of the disc is higher than that preset in this menu playback of ...

Page 26: ...creen NOTES When the desired language is not selected even though the button is pressed the language is not available on the disc If the language is not recorded on the disc only the available language on the disc will be heard When you turn off the power or change the disc you have to select the language again On screen information Press DISPLAY repeatedly to show the disc information available Ti...

Page 27: ...he TV set by wiping the screen and cabinet with a soft clean cloth If necessary wipe the outside of the unit with a clean soft cloth moistened with lukewarm water Do not use benzene thinner or alcohol as these chemicals will smudge the surface nish Maintenance Do not dismantle this product by yourself as this may cause damage There are no user serviceable parts contained in the TV set If your TV s...

Page 28: ...ighest quality standard in the Marine and RV industry Should you encounter any problems that cannot be easily addressed within this instruction manual please feel free to contact us at these locations Australia Int l Head Office 073 102 3575 New Zealand 09 415 6936 USA 561 459 1900 All other countries please email support majestic global com Feel free to visit our website for more updated specific...

Reviews: