background image

24

360 DVS Series Direct Vent Fireplaces

10006326

Glass Cleaning

It is necessary to periodically clean glass. During start-
up, condensation, which is normal, forms on the inside 
of the glass. This condensation causes lint, dust and 
other airborne particles to cling to glass surface.
Also initial paint curing may deposit a slight film on the 
glass. It is therefore recommended glass be cleaned 
two or three times with a non-ammonia based house-
hold cleaner and warm water. The use of fireplace glass 
cleaner is recommended within the first few weeks of 
operation.
After the initial cleaning process the glass should be 
cleaned two or three times during each operating sea-
son depending on the environment in the house.

Clean the glass after the first two weeks of 
operation.
Do not clean the glass when hot.
Do not use an abrasive cleaner.
Do not strike or slam the glass.

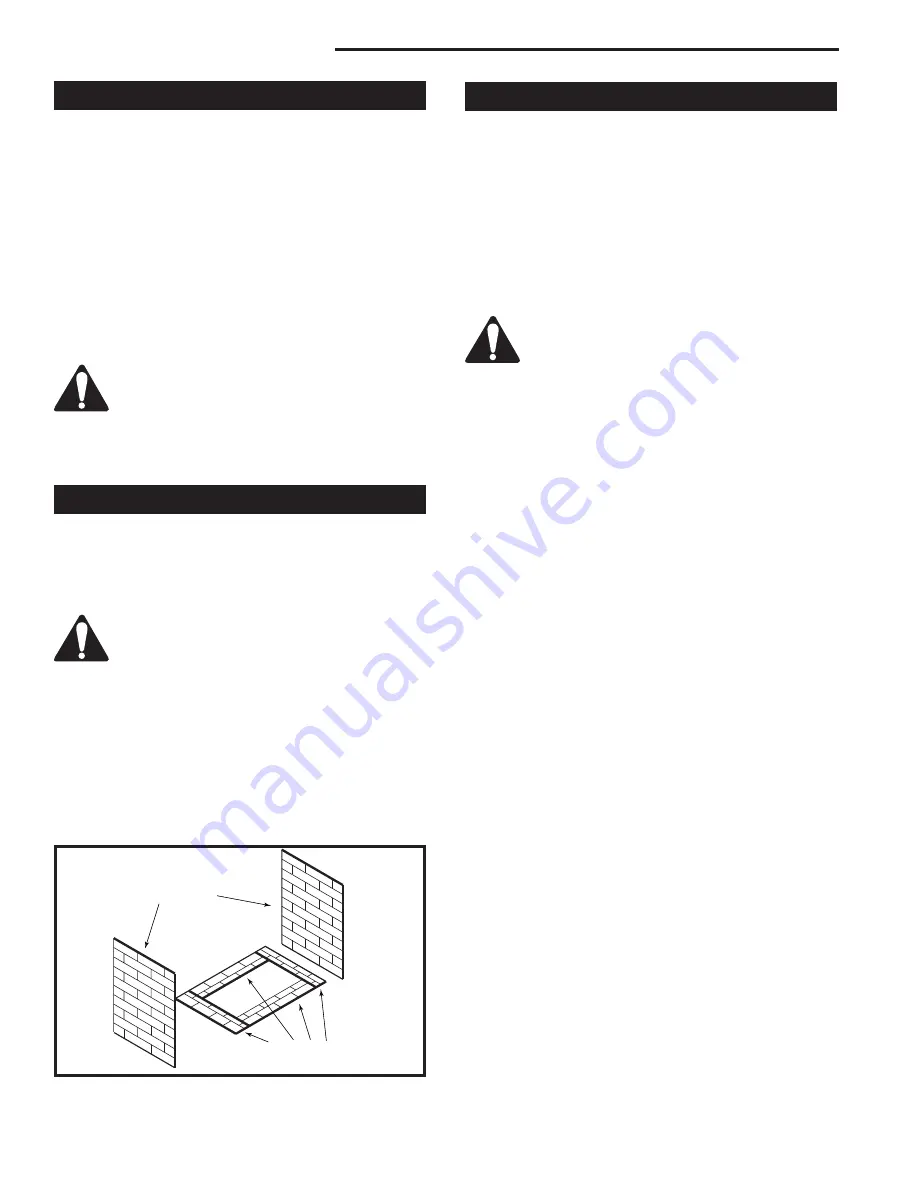
Ceramic Refractory Installation

The vertical refractory panels are installed in the unit 
prior to shipment. For assembly procedures, refer to 
Figure 39.
1.  Unpack the ceramic refractory panels from the car-

ton.

Handle the refractory material carefully, the 
panels are fragile.

2.  Place the two end floor refractory panels on the base 

of the fireplace.

3.  Place both side panels along the side of the base.

NOTE: 

360DVS2 is the only 360DV unit that is fitted 

with two (2) end vertical panels, as shown in Figure 
39. 360DVSL and 360DVSR units are each fitted 
with one end vertical panel and two side vertical 
panel. The 360DVS3 has only one end vertical 
panel.

FP1446

Cer_refract_panels-designer

360DVS

Vertical Panels in 

Place When Shipped

Floor Panels Placed 

During Installation

Fig. 39

  Ceramic panel installation.

FP1446

Log Installation

Refer to Figures 40 and 41 for log location and align-
ment.
Because of the log stack design, these instructions can 
be followed from either side of the fireplace. To follow 
these instructions, identify the logs by the number cast 
into the underside.
For correct operation of the fireplace, the logs must be 
correctly placed in the sequence described below:
1.  Unpack the logs from the shipping carton. The logs 

are fragile; handle them carefully. 

Handle and dispose of plastic bags in 
which logs were shipped in a safe manner. 
As with all plastics, they are not toys and 
should be kept away from infants.

2.  Remove both sides of the window frame assembly 

(where applicable).

3.  Place the 

log rear (B120

) on the grate. The square 

hole located on the underside of the log is to be 
placed over the center of the grate. The inner end 
of the log ensures that the bottom hole is located on 
the pin of the support.

4.  Place the 

log front left (B121)

 on the grate. The 

square hole located on the underside of the log is to 
place over the corner leg of the grate. The inner end 
of the log ensures the bottom holes are located on 
the pin of the support.

5.  Place the 

log front right (B122)

. Once more, the 

square hole fits over the corner leg of the grate. 
The inner end of this log maintains a recess on the 
underside, which locates over the knob on the top of 
the 

log front left (B121)

 to secure the inner end in 

place.

6.  Place the 

log rear left (B123)

. The bottom back of 

the log rests on the grate. The notch at the back of 
the log locates over the knob on the top of the 

log 

rear (B120)

. The bottom of the log rests on top of 

the 

log front left (B121)

.

7.  Place the 

log bottom left (B124)

. The log maintains 

a step on the outer end, which rests against the 
prong of the grate. The alternate end rests on the 
side floor refractory panel.

8.  Place the 

log rear right (B125)

. The log maintains a 

hole on the underside, which rests over the knob on 
the top of the 

log rear (B120)

. The bottom of the log 

rests against the side floor refractory panel, and the 
side rests against the last prong of the grate.

9.  Place the 

log center (B126)

. The log maintains a 

hole on the underside, which rests over the knob on 
the top of the 

log front right (B122)

. The alternate 

end rests against the side floor refractory panel and 
positions between the two (2) prongs of the grate.

Summary of Contents for 360DVS3

Page 1: ...soline or other flammable vapors and liquids in the vicinity of this or any other appliance If you smell gas 1 Open windows 2 Do not touch electrical switches 3 Do not try to light any appliance 4 Extinguish any open flame 5 Do not use any telephone in your building 6 Immediately call your gas supplier from a neighbor s phone 7 Follow your gas supplier s instructions 8 If you cannot reach your gas s...

Page 2: ...olid fuels wood coal paper or cardboard etc be used in this fireplace 10 The flow of combustion and ventilation air must not be obstructed in any way 11 When the fireplace is installed directly on carpeting vinyl tile or any combustible material other than wood it must be installed on a metal or wood panel extending the full width and depth of the fireplace 12 This fireplace requires adequate ventilati...

Page 3: ...as Line Access Electrical Access Gas Line Access J J K J J Fireplace Dimensions 360DVS2 Rear Vent Configuration Top Vent Configuration Fig 2a Fireplace specifications 360DVS2 Ref Rear Vent Configuration Top Vent Configuration A 38 968 mm 38 968 mm B 43 1099 mm 43 1099 mm C 24 610 mm 24 610 mm D 24 610 mm 24 610 mm E 37 949 mm 37 949 mm F 35 911 mm 35 911 mm G 30 775 mm 7 178 mm H 12 305 mm 12 305 mm I ...

Page 4: ... Fireplace Dimensions 360DVS3 306DVSL 360DVSR Rear Vent Configuration Top Vent Configuration Ref Rear Vent Configuration Top Vent Configuration A 38 968 mm 38 968 mm B 40 1032 mm 40 1032 mm C 24 610 mm 24 610 mm D 24 610 mm 24 610 mm E 37 949 mm 37 949 mm F 35 911 mm 35 911 mm G 30 775 mm 7 178 mm H 12 305 mm 12 305 mm I 3 80 mm 3 80 mm J 2 70 mm 2 70 mm K 1 33 mm 1 33 mm Appliance Dimensions Fig 2b F...

Page 5: ...t Configuration CFM121 CFM122 Framing Dimensions Ref Rear Vent Configuration Top Vent Configuration ROD 24 610 mm minus two times finishing material thickness to be even with face of unit ROH 38 981 mm Not to be framed until unit is set in place due to 3 79 mm allowance for flue collar ROW Not to be framed until unit is set in place 43 1111 mm due to 3 79 mm allowance for flue collar Fig 3a Fireplace fr...

Page 6: ...CFM123 CFM124 Framing Dimensions Ref Rear Vent Configuration Top Vent Configuration Model 360DVS3 360DVSL R 360DVS3 360DVSL R ROD See Note 1 See Note 2 See Note 1 See Note 2 ROH 38 981 mm Not to be framed until unit is set in place due to 3 79 mm allowance for flue collar ROW 40 1032 mm minus one time 1x finishing material thickness to be even with face of unit Fig 3b Fireplace framing dimensions 360D...

Page 7: ...ation Clearance to Combustibles A B C D E V W X Y Z CFM146 DV Mantel Chart 7 5 01 sta Louvre Assembly Top Fireplace Top of Combustion Chamber Bottom of Door Trim Mantel Shelf Mantel from Top Ref or Breast Plate Ref of Comb Chamber V 10 254 mm A 19 483 mm W 8 203 mm B 17 432 mm X 6 152 mm C 15 381 mm Y 4 102 mm D 13 330 mm Z 2 51 mm E 11 297 mm Mantel Chart CFM146 Fig 4a Combustible mantel minimum ...

Page 8: ...0DVS3EP Prop 24V Hi Lo 38 000 28 500 360DVSLRN Nat Millivolt 38 000 26 600 360DVSLRP Prop Millivolt 38 000 28 500 360DVSLEN Nat 24V Hi Lo 38 000 26 600 360DVSLEP Prop 24V Hi Lo 38 000 28 500 360DVSRRN Nat Millivolt 38 000 26 600 360DVSRRP Prop Millivolt 38 000 28 500 360DVSREN Nat 24V Hi Lo 38 000 26 600 360DVSREP Prop 24V Hi Lo 38 000 28 500 Gas Specifications 360DVS2 360DVS3 360DVSL 360DVSR CERTI...

Page 9: ...assembly from the EB 1 box 3 Feed the supply line in from the out through the elec trical knockout 4 Connect the ground wire of the supply line to the green screw of the socket assembly 5 Connect the white wire of the power line to the chrome screw of the socket assembly 6 Connect the black wire of the power supply line to the brass screw polarized of the socket assembly 7 Refit the socket assembly...

Page 10: ... purpose NOTE When converting appliance to top vent ensure the insulation material referred to in step 3 is completely removed 4 Remove the 4 screws securing the flue cover plate to the top of the intake box and remove the cover and gasket Fig 11 5 Remove 4 screws securing the flue pipe to back of the intake box and remove pipe and gasket Fig 11 6 Secure the plate and gasket removed in step 4 over t...

Page 11: ... 40VA TRANSFORMER 24 VAC HOT BLACK WHITE WALL SWITCH WHITE OFF 1 2 3 5 6 8 9 MV MV VP PV GRD 24V SENSE SPARK 24V ORANGE RED GREEN BLACK FP1225 Fig 12 Honeywell ignition module Your fireplace is approved to be vented either through the side wall or vertically through the roof Only CFM Corporation venting components specifi cally approved and labeled for this fireplace may be used Venting terminals sha...

Page 12: ...in a height of 15 extended above meter regulator assembly above the meter regulator assembly 5m above the meter regulator assy I Clearance to service regulator vent outlet 3 91cm 3 91cm J Clearance to nonmechanical air supply inlet 6 15cm for appliances 10 000 6 15cm for appliances to building or the combustion air inlet to any Btuh 3kW 12 30cm for 10 000 Btuh 3kW 9 other appliances appliances 10 ...

Page 13: ...allation code USA Installations The venting system must conform with local codes and or current National Fuel Gas Code ANSI Z223 1 NFPA 54 Only venting components manufactured by CFM Corpo ration can be used in Direct Vent systems Twist Lock Pipes When using twist lock pipe it is not necessary to use sealant on the joints The only areas of the venting system that need to be sealed with high temper...

Page 14: ...dewall vent graph showing the relationship between vertical and horizontal dimensions for a Direct Vent flue system Fig 16 Sidewall vent graph Rear Wall Application When installed as a rear vent unit this appliance may be vented directly to a termination located on the rear wall behind the appliance Specific rear vent starter kits must be used in these applications see venting components The appli a...

Page 15: ...do not align with the termination remove and realign the vent ing at the appliance flue collars Attach the termination to the wall as outlined in the instruction sheet supplied with the termination Vertical Sidewall Application It is very important the venting system maintain its bal ance between the combustion air intake and the flue gas exhaust certain limitations concerning vent con figurations mu...

Page 16: ...5 elbows permitted per side wall installation is two 2 These elbows can be installed in either the vertical or horizontal run For each 45 elbow installed in the horizontal run the length of the horizontal run MUST be reduced by 18 45 cm This does not apply if 45 elbows are installed on the vertical part of the vent system The maximum number of elbow degrees in a system is 270 Example shown in Figu...

Page 17: ...ation of the inner and outer elbow again secure joints as described in Connecting Vent Pipes section STEP 5 Measure the horizontal length requirement including a 2 51 mm overlap i e from the elbow to the outside wall face plus 2 51 mm or the distance required if installing a second 90 elbow Fig 27 Always install horizontal venting on a level plane X X FP1441 Fig 27 Horizontal length requirement ST...

Page 18: ... exceeds 24 610 mm 1 Establish vent hole through the wall Fig 24 2 Remove soil to depth of about 16 406 mm below base of snorkel Install window well not supplied Refill hole with 12 305 mm of coarse gravel leav ing a clearance of about 4 102 mm below snorkel Fig 28 3 Install vent system 4 Ensure a watertight seal is made around the vent pipe coming through the wall 5 Apply high temperature sealant ...

Page 19: ...vel the maximum horizontal length must be reduced by 18 457 mm Example Maximum horizontal length Zero elbows 10 3 m 1 x 45 elbows 8 2 6 m 2 x 45 elbows 7 2 1 m A minimum of an 8 ft 2 43 m vertical rise Two 2 sets of 45 elbow offsets may be used within the vertical sections From zero to max 8 ft 2 43 m vent pipe can be used between elbows Fig 30 7DVCS supports offsets Fig 33 This application will r...

Page 20: ...m collar and seal around the pipe 10 Add additional vent lengths for proper height Fig 32 11 Apply high temperature sealant to 4 and 7 collars of vertical vent termination and install CFM110 Typical ceiling roof support 10 90 Typical Roof Sup port Application Typical Ceiling Sup port Application CFM110 Fig 33 Chimney support TWL101a Twist Lock Pipe 2 8 99 djt Sheet Metal Screws 5 3 per joint Seala...

Page 21: ...VSK Sidewall Starter Kit Model 7TDVSKV Vertical Venting for 7TDVSKV A order 1 12 to 6 12 roof pitch for 7TDVSKV B order 7 12 to 12 12 roof pitch for 7TDVSKV F order flat roof Starter Kit Model 7TDVSKS Snorkel Kit Snorkel Termination 7TDVSNORK for Below Grade Installation 45 Elbow 7TDVT45 for Rear Vent to Vertical Vent or Vertical Horizontal Offsets 90 Transition Elbow 7TDVRT90 for Rear Vent to Vert...

Page 22: ...ightly and lift window frame assembly up and away from the fireplace 7 To reinstall the window frame assembly reverse this procedure Front Window Frame Assembly 1 Remove the top and bottom louvre assembly 2 Remove the lower window trim held in place with magnets 3 Remove both lower retaining screws Access to these screws is gained through the holes along the lower edge of the frame behind the trim ...

Page 23: ...logs by the number cast into the underside For correct operation of the fireplace the logs must be correctly placed in the sequence described below 1 Unpack the logs from the shipping carton The logs are fragile handle them carefully Handle and dispose of plastic bags in which logs were shipped in a safe manner As with all plastics they are not toys and should be kept away from infants 2 Remove bot...

Page 24: ...g and separate it into small pieces then scatter it over burner tiles in a random fashion Do not pack down ember material leave it in a fluffy state Lava Rock Pt 10001454 Remove lav rock material from packaging and spread it over ceramic floor panels outside log stack Do not place this lava rock material on burner tiles Flame Temperature Adjustment RN RP Models For units equipped with HI LO valves t...

Page 25: ...tment knob for SIT valve Flame Characteristics It is important to periodically perform a visual check of the pilot and burner flames Compare them to the pictorials illustrated below Figs 45 46 If the flame patterns appear abnormal contact a qualified service provider for service and adjustment 3 8 1 2 10 13mm F584 703 Fig 45 Correct pilot flame appearance LG323 Fig 46 Correct log flame appearance LG322...

Page 26: ...ry it should be performed by a qualified technician 1 Turn off pilot light at gas valve side 2 Let fireplace cool if it has been running 3 Remove window frame assembly Refer to Window Frame Assembly Removal section 4 Remove logs 5 Vacuum burner compartment especially around orifice primary air openings 6 Visually inspect pilot Brush or blow away any dust or lint accumulation 7 Reinstall logs 8 Ignite...

Page 27: ...2 18 24 27 17 2 29 28 22 23 26 21 20 25 19 13 14 3a b 15a b 16a b 6326 360DVS parts 31a b 32 35 33 HI LO 34a b 25 36 37 30 1 1a 1b 1c 1d 1e 1f 1g CFM Corporation reserves the right to make changes in design materials specifications prices and discontinue colors and products at any time without notice 360DVS Series ...

Page 28: ...266 8 Pilot Hood SIT Top Convertible 10002385 10002385 10002385 10002385 Orifice Pilot PSE Nat 10001822 10001822 10001822 10001822 Orifice Pilot PSE Prop 10001823 10001823 10001823 10001823 Orifice Pilot SIT Top convertible Nat 10002268 10002268 10002268 10002268 Orifice Pilot SIT Top conv Prop 10002269 10002269 10002269 10002269 Pilot tube fittings Top convertible 10001296 10001296 10001296 10001296 M...

Page 29: ...6257 Air Inlet Cover Plate Assembly 10006174 10006174 10006174 10006174 Air Inlet Cover Plate Gasket 10006171 10006171 10006174 10006171 Flue Pipe Plate Assembly 10002554 10002554 10002554 10002554 FluePipe Plate Gasket 10002237 10002237 10002237 1000223 Flue Cover Plate 10002298 10002298 10002298 10002298 Flue Cover Plate Gasket 10002233 10002233 10002233 10002233 Relief Plate with gasket 1000242...

Page 30: ...hop Ifuponinspection thedamageisfoundtobethefaultofthemanufacturer repairs will be authorized at no charge to the customer parts and or labor Any part and or component replaced under the provisions of this warranty is covered for six months or the remainder of the original warranty whichever is longest This warranty is limited to the repair of or replacement of part s found to be defective in mate...

Page 31: ...4 65 360DVS3RN 62 4 83 84 65 360DVS3RP 62 4 83 84 65 360DVS3EN 62 4 83 84 65 360DVS3EP 62 4 83 84 65 360DVSLRN 62 4 83 84 65 306DVSLRP 62 4 83 84 65 360DVSLEN 62 4 83 84 65 360DVSLEP 62 4 83 84 65 360DVSRRN 62 4 83 84 65 360DVSRRP 62 4 83 84 65 360DVSREN 62 4 83 84 65 360DVSREP 62 4 83 84 65 2695 Meadowvale Blvd Mississauga Ontario Canada L5N 8A3 800 668 5323 www cfmcorp com CFM Corporation ...

Reviews: