


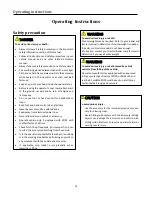


Operating instructions
15
Operating Instructions
Safety precaution
DANGER
To avoid serious injury or death :
•
Always follow all safety precaution in the important
safety information section of this manual.
•
Follow all instructions and safety precautions in your
vehicle manual and any other related accessory
manual.
•
Always follow all safety precaution on all safety decals
•
To avoid being pinned between loader lift arm or 3pts
hitch and vehicle frame, always operate the accessory
while seated in the operator seat with seat belt
fastened
•
Keep any part of your body inside the operator area
•
Before leaving the operator’s seat, lower attachment
to the ground, set park brake, turn off engine and
remove key
•
Do not use foot or hand control for handholds or
steps.
•
Keep foot and hand control clean at all time
•
Never bypass or modify a safety device
•
Keep away from electrical power lines
•
Never allow riders on vehicle or accessory
•
Operate vehicle only if equipped with ROPS with
seatbelt fasten at all time
•
Check hitch fit-up frequently. An improper fit-up can
result in the accessory detaching from the vehicle
•
It is the operator responsibility to make sure nobody
is in the working area before performing any work or
any movement with the vehicle and accessory
•
If applicable stop loader arms gradually when
lowering or lifting
WARNING
To avoid serious injury or death:
Counterweight may be required. Refer to your loader and
tractor manual to determine if counterweight is needed.
If loader and tractor manual do not have enough
information, contact your tractor/loader manufacturer to
determine if you need counterweight
WARNING
To avoid serious injury or death caused by vehicle
overturn from falling of the vehicle:
Operate only with tractor equipped with an approved
rollover-protective structure (ROPS) or ROPS cab and
seat belt. Foldable ROPS must be kept up at all times.
Fasten seatbelt snugly and securely.
CAUTION
To avoid serious injury:
•
Use the accessory for the intended purpose only, use
only for blowing snow.
•
Avoid hitting solid objects with the accessory. Hitting
objects can damage the accessory and vehicle. Also
hitting solid objects can throw the operator forwards
causing severe injury
Summary of Contents for BER3PTSB48R
Page 28: ...Parts breakdown 26 Part list and parts breakdown Principal accessory BER3PTSB48R BER3PTSB48R...
Page 29: ...Parts breakdown 27 BER3PTSB48R BER3PTSB48R...
Page 30: ...Parts breakdown 28 BER3PTSB56R BER3PTSB56R...
Page 31: ...Parts breakdown 29 BER3PTSB56R BER3PTSB56R...
Page 32: ...Parts breakdown 30...
Page 33: ...Parts breakdown 31...
Page 34: ...Parts breakdown 32...
Page 35: ...Parts breakdown 33...
Page 36: ...Parts breakdown 34...
Page 37: ...Parts breakdown 35...
Page 38: ...Parts breakdown 36...
Page 39: ...Parts breakdown 37...
Page 40: ...Parts breakdown 38...
Page 41: ...Parts breakdown 39...


