background image

16

54-610 Thermatel Model TD1/TD2 Flow Level Switch

3.6

Maintenance

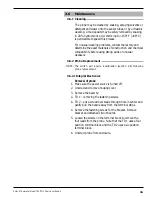
3.6.1 Cleaning

The probe may be cleaned by soaking, spraying solvents or
detergent and water onto the sensor tubes, or by ultrasonic
cleaning. Lime deposits may be safely removed by soaking
in 20% hydrochloric acid. Warming to +150° F (+66° C)
is permissible to speed this process.

For unusual cleaning problems, contact the factory and
determine the exact materials of construction and chemical
compatibility before using strong acids or unusual
cleansers.

3.6.2 Probe Replacement

NOTE: The switch will require recalibration (section 2.6) following

probe replacement.

3.6.2.1 Integral Electronics

Removal of probe

1. Make sure the power source is turned off. 

2. Unscrew and remove housing cover.

3. Remove the bezel by:

a. TD1 – removing the fastening screws.

b. TD2 – put a screwdriver blade through hole in center and

gently pull the handle away from the terminal strips.

4. Remove the fastening screws for the bracket. Remove

bracket and attached circuit boards.

5. Loosen the screws on the terminal block to remove the

four leads from the probe. Note that the TD1 uses a four
position terminal block and the TD2 uses a six position
terminal block.

6. Unscrew probe from enclosure.

Summary of Contents for TD1 Series

Page 1: ...Thermal Dispersion Flow Level Interface Switch Model TD2 with low flow body Model TD2 with spherical probe Model TD1 with twin tip probe Thermatel Model TD1 TD2 Installation and Operating Manual...

Page 2: ...wer supply before touch ing any components Electrical components are sensitive to electrostatic dis charge To prevent equipment damage observe safety procedures when working with electrostatic sensiti...

Page 3: ...HIGH FLOW Detection 11 2 6 3 1 Unable to Change Flow Rate 11 2 6 4 Advanced Calibration Procedure TD2 12 3 0 Reference Information 3 1 Description 13 3 2 Theory of Operation 13 3 3 Fault Detection 14...

Page 4: ...king slip and the purchase order Report any discrepancies to the factory Check and record the serial number for future reference when ordering parts Serial Number 2 2 Electrostatic Discharge ESD Handl...

Page 5: ...T mount designed for easy installation through a threaded connection Optional threaded and flanged connections are also available 1 Apply thread sealant to the sensor and insert the sensor into the th...

Page 6: ...fer to Figure 6 for TD1 or Figure 7 for TD2 electronics 6 Prevent moisture seepage into housing by installing an approved seal drain fitting in the conduit run leading to the unit 7 Installation is co...

Page 7: ...Fail Safe Position Relay Coil Relay Terminal NC to CO NO to CO On High HLFS De energized Closed Open LLFS Energized Open Closed On Low HLFS Energized Open Closed LLFS De energized Closed Open Fail Hig...

Page 8: ...nd screw Refer to Figure 8 NOTE The six conductors must be wired so that each terminal on the sensor terminal block TB4 see Figure 8 is connected to its corresponding terminal on the electronic circui...

Page 9: ...is on Media Gas liquid Select Default is liquid L Use gas G position only for gas flow applications Range Expand sensitivity for water flow applications Switch to E position for water flow application...

Page 10: ...t This represents a safe mode 2 5 3 LED Initialization The TD1 TD2 has an initializing period to allow the sensor to heat up TD1 The red LED will blink slowly during the initial ization period TD2 All...

Page 11: ...der a wet high level condition or if the flow rate has increased above the set point On the TD2 the green and yellow LEDs will be on at low flows or low level indicating a normal condition The number...

Page 12: ...switch down b Turn alarm potentiometer counterclockwise until red LED turns on c Turn alarm potentiometer clockwise until red LED turns off d Repeat steps b and c several times leaving the red LED off...

Page 13: ...witch in the position 2 Place Fail safe in the LL position 3 Reduce the flow rate to the desired alarm point Allow 3 minutes for the sensor to stabilize 4 Rotate alarm potentiometer clockwise until th...

Page 14: ...Alarm a Set fail safe to LL position b Rotate alarm potentiometer counterclockwise until the red LED turns on c Rotate alarm potentiometer clockwise until the red LED goes out d Repeat steps b and c s...

Page 15: ...e between TP1 and TP2 This voltage will change as the set point potentiometer is adjusted Voltage readings will be between 0 and 5 VDC This value may be used for future reference or adjustment of set...

Page 16: ...uous diagnostics to detect a failure of the sensor This is accomplished by continuously monitoring the signal from the sensor which must remain within set levels In the event the switch detects a faul...

Page 17: ...tions Refer to 3 6 2 Probe Replacement for removing bezel and circuit boards Pin Expected Resistance 1 to 3 90 to 180 ohms 275 ohms with high temperature probe 2 to 4 90 to 180 ohms 275 ohms with high...

Page 18: ...ht goes off run HEATER HTR at and FAULT FLT off or run HEATER HTR at Light stays on check resistance to determine if a problem exists with the probe or electronics Refer to Section 3 4 Resistance Valu...

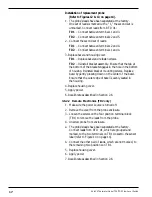
Page 19: ...sers 3 6 2 Probe Replacement NOTE The switch will require recalibration section 2 6 following probe replacement 3 6 2 1 Integral Electronics Removal of probe 1 Make sure the power source is turned off...

Page 20: ...bracket mounting screws Replace bezel by gently pressing down on the center of the bezel Ensure that the outer edge of bezel is evenly seated in the housing 4 Replace housing cover 5 Apply power 6 Re...

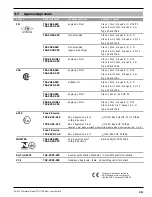
Page 21: ...for Class I Div 2 Groups A B C D TD2 XX0X XXX Class II III Div 2 Groups E F G T4 Type 4X and IP66 TD1 2D00 0X0 Explosion Proof Class I Zone 1 Ex d IIC T6 TD2 XX0X XXX PROBE MODEL Explosion Proof Clas...

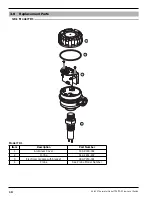
Page 22: ...Flow Level Switch 3 8 Replacement Parts 3 8 1 Model TD1 1 2 3 4 Item Description Part Number 1 Aluminum Cover 004 9193 002 2 O ring 012 2201 237 3 Electronic module with bracket 089 7250 001 4 Probe...

Page 23: ...Module see table below 6 Probe See Probe Model Number Electronic Module 8 amp DPDT relay use with TD2 XX0X X3X and TD2 XX0X XGX Integral Remote AC 089 7250 002 089 7250 004 DC 089 7250 003 089 7250 00...

Page 24: ...onics 40 to 158 F 40 to 70 C Storage Temperature Electronics 58 to 170 F 50 to 76 C Operating Temperature Sensor 100 to 400 F 73 to 200 C High Temperature Sensor 100 to 850 F 73 to 454 C Response Time...

Page 25: ...ing 3 9 2 Probe Probe Materials of Construction Twin Tip All wetted parts of 316 316L stainless steel Hastelloy C or Monel Mini Sensor 316 316L stainless steel Spherical Tip 316 316L stainless steel L...

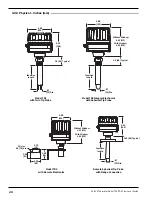
Page 26: ...th 87 22 Dia 2 35 60 Typical Model TD2 with Remote Electronics Remote Spherical Tip Probe with Flange Connection 3 9 3 Physical inches mm Model TD1 with Twin Tip Probe Model TD2 Integral Electronics w...

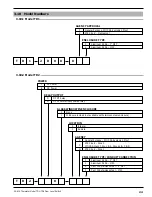
Page 27: ...inless steel enclosure LOCATION 0 Integral 1 Remote AGENCY 3 General Purpose FM CSA Explosion Proof C ATEX Ex d Zone 0 FM CSA Class I Div 1 2 Groups B C D G ATEX Ex d Zone 1 ENCLOSURE TYPE CONDUIT CON...

Page 28: ...600 ANSI RF Flange BA DN 25 PN 16 Form B BB DN 25 PN 25 40 Form B BC DN 25 PN 64 100 Form E CA DN 40 PN 16 Form B CB DN 40 PN 25 40 Form B DIN 2527 FLANGED CONNECTIONS CC DN 40 PN 64 100 Form E DA DN...

Page 29: ...F Flange 44 2 300 ANSI RF Flange 45 2 600 ANSI RF Flange 47 2 900 1500 ANSI RF Flange 48 2 2500 ANSI RF Flange BA DN 25 PN 16 Form B BB DN 25 PN 25 40 Form B BC DN 25 PN 64 100 Form E BG DN 25 PN 250...

Page 30: ...Mini twin tip max 400 F 204 C max 3000 psi 207 bar for standard sensor length max 400 F 204 C max 1850 psi 127 bar for sensors 2 50 mm BODY STYLE M A 0 A 316 316L stainless steel MATERIAL OF CONSTRUC...

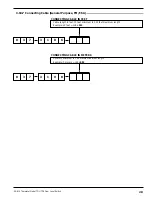
Page 31: ...Cable General Purpose FM CSA Cable length in feet 10 feet minimum to 500 feet maximum length Example 12 feet code 012 CONNECTING CABLE IN FEET 0 3 7 3 1 8 6 3 meters minimum to 152 meters maximum leng...

Page 32: ...ory prior to the material s return This is available through Magnetrol STI s local representative or by con tacting the factory Please supply the following infor mation 1 Company Name 2 Description of...

Reviews: