background image

64

EN

64

EN

INFORMATION ON PLAYBACK

Before you play back DVD, read the following information.

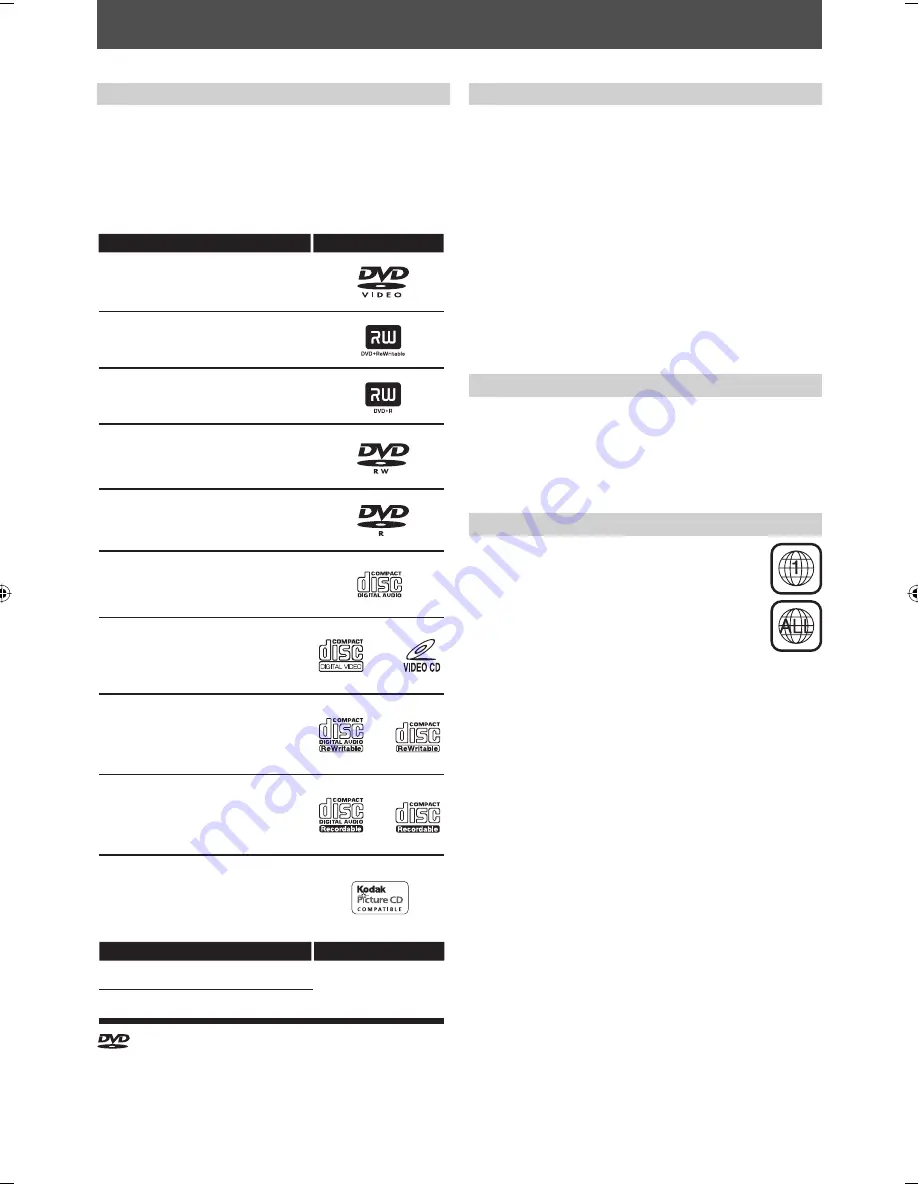
This unit is compatible to play back the following discs.
To play back a DVD, make sure that it meets the 
requirements for region codes and color systems as 
described below. You can play back discs that have the 
following logos will play back on the unit. Other disc 
types are not guaranteed to play back.

Playable Discs and Files

DVD is recorded in different color systems throughout 
the world. The most common color system is NTSC 
(which is used primarily in the United States and Canada).
This unit uses NTSC, so DVD you play back must be 
recorded in the NTSC system. You cannot play back DVD 
recorded in other color systems.

Color Systems

This unit has been designed to play back DVD 
with region 1. DVD must be labeled for ALL 
regions or for region 1 in order to play back on 
the unit. You cannot play back DVD that are 
labeled for other regions. Look for the symbols 
on the right on your DVD. If these region 
symbols do not appear on your DVD, you cannot 
play back the DVD in this unit.
The number inside the globe refers to region of the 
world.
A DVD labeled for a specific region can only play back on 
the unit with the same region code.

Region Codes

Logos

Playable discs

Media

Playable files

MP3

CD-RW/-R

JPEG

CD-DA (audio CD)

video CD

CD-RW 

CD-R 

DVD-video

DVD+RW

DVD+R

DVD-RW
(Finalized video mode discs only)

DVD-R
(Finalized video mode discs only)

Kodak Picture CD

is a trademark of DVD Format/Logo Licensing Corporation.

The following discs will not play back on this unit.
• CD-ROM 

• Compact Disc-Interactive (CD-I) 

• DVD-RAM 

• Video Single Disc (VSD) 

• DVD-ROM 

• DVD-audio

• Unfinalized disc
• DVD or CD contains Windows Media™ Audio/DivX® files
•  DVD-R or DVD-RW recorded in VR mode or non 

compatible recording format

• Blu-ray Disc 

• HD DVD

• Super Video CD

On the following disc, the sound may not be heard.
•  Super audio CD - Only the sound on the CD layer can be 

heard. The sound on the high-density super audio CD 
layer cannot be heard.

Unplayable Discs

E2S00UD_H2160MW9_EN_v1.indd   64

E2S00UD_H2160MW9_EN_v1.indd   64

2008/11/20   12:57:30

2008/11/20   12:57:30

Summary of Contents for H2160MW9 A

Page 1: ...T MAKE USING YOUR MAGNAVOX PRODUCT MORE ENJOYABLE IF YOU HAVE READ YOUR INSTRUCTIONS AND STILL NEED ASSISTANCE YOU MAY ACCESS OUR ONLINE HELP AT HTTP WWW MAGNAVOX COM SUPPORT OR CALL 1 800 605 8610 WHILE WITH YOUR PRODUCT Recording Playback Editing Introduction Connections Basic Setup Function Setup Others Español INSTRUCCIONES EN ESPAÑOL INCLUIDAS H2160MW9 2009 Funai Electric Co Ltd ...

Page 2: ... to select a recording mode Select the appropriate external input channel by pressing SOURCE or CHANNEL Press DTV TV to select analog TV or digital TV then use CHANNEL or the Number buttons and for digital TV channels to select a desired channel to record Press STOP C to stop recording As for DVD recording the title list will appear automatically after writing to a disc completes You will need to ...

Page 3: ...io HDMI IN HDMI cable Component video cable Audio cable Audio cable Video cable S video cable Do not tilt the connector when inserting it into the HDMI jack and make sure the shapes of the jack and the connector are matched HDMI cable not included High Speed HDMI Cable also known as HDMI category 2 cable is recommended for the better compatibility Cables used in this connection are as follows Audi...

Page 4: ...R OR BACK NO USER SERVICEABLE PARTS INSIDE REFER SERVICING TO QUALIFIED SERVICE PERSONNEL CAUTION RISK OF ELECTRIC SHOCK DO NOT OPEN The exclamation point within an equilateral triangle is intended to alert the user to the presence of important operating and maintenance servicing instructions in the literature accompanying the appliance The lightning flash with arrowhead symbol within an equilater...

Page 5: ...isconnecting it from an AC outlet Grasp it by the plug Do not put your fingers or objects into the unit Location and Handling Do not install the unit in direct sunlight near strong magnetic fields or in a place subject to dust or strong vibration Avoid a place with drastic temperature changes Install the unit in a horizontal and stable position Do not place anything directly on top or bottom of th...

Page 6: ...HDD handling HDD is a precision apparatus that is susceptible to vibration strong impact or dirt Depending on the installation environment or handling the unit may become partially damaged or in the worst case recording or replaying may not be available Especially while the HDD is in motion do not subject it to vibration or strong impact or pull out the power plug And if a power failure occurs the...

Page 7: ...lusive property of their respective owners Nothing contained in this manual should be construed as granting by implication or otherwise any license or right to use any of the trademarks displayed herein Misuse of any trademarks or any other content in this manual is strictly prohibited Funai shall aggressively enforce its intellectual property rights to the fullest extent of the law Trademark Info...

Page 8: ...Scan 29 Adding Deleting Channels 30 SETTING THE CLOCK 32 Auto Clock Setting 32 Manual Clock Setting 33 Daylight Saving Time 33 TUNER SETTINGS 34 Switching Analog Mode Digital Mode 34 Channel Selection 34 Selecting TV Audio 35 DTV Closed Caption 37 Closed Caption Style 38 Recording INFORMATION ON RECORDING 40 BEFORE RECORDING 42 Make Recording Compatible 42 Setting for Auto Chapter 42 Recording the...

Page 9: ...ack the Autostart Recording 75 SEARCH 76 Title Chapter Search 76 Track Search 76 Time Search 77 SELECTING THE FORMAT OF AUDIO AND VIDEO 78 Switching Subtitles 78 Switching Audio Soundtrack 78 Switching Virtual Surround System 79 Switching Camera Angles 79 Reducing Block Noise 79 Editing INFORMATION ON EDITING 80 Guide to a Title List 80 Edit Menu 81 How to Access the Edit Menu 81 EDITING 82 Deleti...

Page 10: ...he main menu Alternate recording In the following cases the unit will detect it and automatically record to the HDD even when DVD is selected as the recording media If there is no recordable disc in the unit If the disc does not have enough space to complete the recording If the material is copy once program and prohibited to be recorded on a DVD If the disc is not available because the repairing ...

Page 11: ...rogressive scan system Unlike conventional interlace scanning the progressive scan system provides less flickering and images in higher resolution than that of traditional television signals HDMI High Definition Multimedia Interface You can enjoy clearer audio video output when connecting this unit to a display device with an HDMI compatible port Others Symbols Used in this Owner s Manual To speci...

Page 12: ...back or recording 8 BPLAY button Press to start or resume playback 9 IRECORD button Press once to start a recording Press repeatedly to start one touch timer recording 10 CHANNEL buttons Press to change the channel up and down 11 DV IN jack L3 Use to connect the DV output of external device with a DV cable 12 AUDIO input jacks L2 Use to connect external device with an RCA audio cable 13 VIDEO inpu...

Page 13: ...al input jack with a digital audio coaxial cable 7 S VIDEO OUT jack Use to connect the S video input of a TV monitor AV receiver or other device with an S video cable 8 COMPONENT VIDEO OUTPUT jacks Use to connect a TV monitor with component video inputs with a component video cable 9 AUDIO OUT jacks Use to connect a TV monitor AV receiver or other device with an RCA audio cable 10 S VIDEO IN jack ...

Page 14: ... and bursting Please observe the following Do not mix new and old batteries together Do not use different kinds of batteries together Although they may look similar different batteries may have different voltages Make sure that the and ends of each battery match the indications in the battery compartment Remove batteries from battery compartment that is not going to be used for a month or more Whe...

Page 15: ...playback press to fast reverse the playback When playback is in pause press to slow reverse the playback 13 PLAY B button Press to start playback or resume playback 14 RAPID PLAY button During playback press to play back in a slightly faster slower mode while keeping the sound output 15 D DUBBING button During playback press to start dubbing right away In stop mode press to display Dubbing menu 16...

Page 16: ...xecuted because of some error Appears during recording process Flashes when a recording pauses Appears when a disc is in this unit DB Appears during dubbing HDD Appears when the unit is in HDD mode DVD Appears when the unit is in DVD mode 5 Displays the following Elapsed playback time Current title chapter track file number Recording time remaining time Clock Channel number Remaining time for one ...

Page 17: ...cable from the ANTENNA IN jack before moving the unit If you use an antenna to receive analog TV it should also work for DTV reception Outdoor or attic antennas will be more effective than set top versions ANTENNA OUT jack is for tuner pass through only HDD DVD playback through the RF is not possible Supplied cables used in this connection are as follows RF coaxial cable x 1 Please purchase the re...

Page 18: ...ocal store Connecting to a TV Using Audio Video Jacks IN OUT ANTENNA AUDIOOUT L R VIDEO OUT IN IN OUT VIDEO IN AUDIO IN L1 S VIDEO S VIDEO AUDIOOUT OUT L R VIDEO OUT Y ANTENNA R L COAXIAL RCA video cable RCA audio cable rear of this unit ANT IN VHF UHF antenna cable TV company RF coaxial cable or This connection is for TV loop through only RF coaxial cable AUDIO IN L R VIDEO IN CONNECTION ...

Page 19: ...ntenna cable TV company or ANT IN This connection is for TV loop through only RF coaxial cable RF coaxial cable S VIDEO IN AUDIO IN L R IN IN OUT VIDEO IN AUDIO IN L1 S VIDEO S VIDEO AUDIOOUT OUT L R VIDEO OUT Y ANTENNA R L COAXIAL S VIDEO OUT IN OUT ANTENNA rear of this unit VHF UHF antenna cable TV company or RF coaxial cable RF coaxial cable ANT IN This connection is for TV loop through only IN...

Page 20: ...s via the HDMI connector this unit can be controlled by another device via the HDMI connector The audio signals from the HDMI connector including the sampling frequency the number of channels and bit length may be limited by the device that is connected Among the monitors that support HDMI some do not support audio output for example projectors In connections with device such as this unit audio si...

Page 21: ...ne channel while watching another channel Supplied cables used in this connection are as follows RF coaxial cable x 1 RCA audio cable L R x 1 RCA video cable x 1 Please purchase the rest of the necessary cables at your local store Connecting to a Cable Satellite Box IN VIDEO IN AUDIO IN L1 S VIDEO AUDIOOUT L R VIDEO OUT R L IN VIDEO IN AUDIO IN L1 S VIDEO AUDIOOUT L R VIDEO OUT R L ANT IN ANT OUT ...

Page 22: ... 1 Please purchase the rest of the necessary cables at your local store Connecting to a TV without Audio Video Jacks rear of your RF modulator not supplied IN IN OUT VIDEO IN AUDIO IN L1 S VIDEO S VIDEO AUDIOOUT OUT L R VIDEO OUT Y ANTENNA R L COAXIAL AUDIO IN TO TV ANT IN L R CHANNEL 4 3 VIDEO IN ANT IN Set channel 3 or 4 rear of this unit AUDIOOUT L R VIDEO OUT IN OUT ANTENNA Set channel 3 or 4 ...

Page 23: ...al decoder digital audio coaxial cable digital audio coaxial input jack IN IN OUT VIDEO IN AUDIO IN L1 S VIDEO S VIDEO AUDIOOUT OUT L R VIDEO OUT Y ANTENNA R L COAXIAL COAXIAL HDMI OUT AV receiver amplifier with an HDMI input jack HDMI IN HDMI cable IN IN OUT VIDEO IN AUDIO IN L1 S VIDEO S VIDEO AUDIOOUT OUT L R VIDEO OUT Y ANTENNA R L COAXIAL rear of this unit Dolby Digital PCM Stream PCM Stream ...

Page 24: ...your TV s user manual for details If more than 10 minutes have past since you have turned on the unit you may see the MAGNAVOX screen saver instead of Initial Setup menu MAGNAVOX screen saver 4 Proceed to step 2 in INITIAL SETTING on page 28 Finding the Viewing Channel on Your TV Note Video input selection varies for different brand s models of TVs Consult your TV manufacturer if none of the above...

Page 25: ...the acquired languages are other than English Spanish or French 8 Program rating Note When the program guide is displayed in more than 6 lines use K L to scroll No description provided is displayed when the program guide is not provided 2 59 44 3 31 31 10 42AM 10 10AM 7 10AM CH 10 7 6 5 4 4 4 3 4 2 4 1 1 Starting time of the autostart recording 2 Status of the time autostart recording Live Indicat...

Page 26: ...rker Noise Reduction Zoom Surround 6 Indicates the current title number total number of titles the current chapter number total number of chapters and time lapse of the current title playback total duration of the title 7 Indicates the component in use HDD DVD HDD DVD Information Menu BEFORE YOU START Title Name Information Title Name My Title File Name Information File Name My File Title File Nam...

Page 27: ... HDD to DVD or vice versa Dubbing is available only when a recordable disc is loaded 7 DISC Playback Mode To set up the disc playback setting DISC Playback Mode is available only when an audio CD a video CD a CD RW R with MP3 JPEG Kodak Picture CD files is inserted into the unit General Setting Menu General Setting Playback Display Video Recording Clock Channel HDMI Reset All Parental Lock Disc Au...

Page 28: ...back Mode menu allowing you to select the media you want to play 9 Slide Show JPEG Kodak Picture CD files only Allows you to select the display time of the slide show mode 10 Delete All Titles Allows you to delete all titles including the protected titles in the HDD title list 11 Delete All Unprotected Titles Allows you to delete all unprotected titles in the HDD title list 12 HDD DVD Allows you t...

Page 29: ...D button DVD button HDD button DVD button H2160MW9 Switching HDD DVD Mode BEFORE YOU START 1 Press OPEN CLOSE A to open the disc tray 2 Place the disc on the disc tray with its label side facing up Align the disc to the disc tray guide 3 Press OPEN CLOSE A to close the disc tray It may take a while to load the disc To eject the disc Press OPEN CLOSE A to open the disc tray then remove the disc bef...

Page 30: ...d and memorized Only the receivable channels in the area will be memorized Cable Analog When using basic cable The channels broadcasted in analog CATV are automatically scanned and memorized Cable Analog Digital When using basic cable The channels broadcasted in analog CATV and digital CATV are automatically scanned and memorized Auto Presetting Now CH 1 4 If a PBS public broadcasting station is a...

Page 31: ...e unit will start getting channels available in your area When aerial antenna is connected select Antenna When connected to CATV select Cable Analog or Cable Analog Digital To cancel the auto channel preset during scanning Press RETURN to go the previous screen or SETUP to cancel 5 When scanning is over press SETUP to exit To cycle through only the memorized channels use CHANNEL To select a channe...

Page 32: ...deleting digital TV CATV channels go to DIGITAL to continue Adding Deleting Channels CHANNEL SETTING You may want to add or delete TV channels if your channel lineup changes or if you no longer watch some channels Adding channel is only available for the analog TV channels Make sure You perform Auto Channel Scan before adding or deleting the channels Instructions continue on the next page OPEN CLO...

Page 33: ...continue adding or deleting channels 7 Press SETUP to exit DIGITAL 5 Select the channel number to delete Only the major channel is displayed in Manual Channel Preset menu The channel number displayed in the parenthesis is a virtual channel number Use CHANNEL to cycle through only the memorized channels You cannot use B for the digital TV channel selection Use the Number buttons to select a channel...

Page 34: ...the unit to the standby mode This unit will search for the time only when the power is in the standby mode Leave it in standby for several minutes to give this unit time to set the clock Auto Clock Setting This unit can set the time and date automatically by referring to a PBS station Make sure The antenna cable TV connections are correct Channels are set Refer to page 29 If this unit is connected...

Page 35: ...ly adjust the time in order to fit the daylight saving time ON MAR NOV has been selected as the default 1 Press SETUP and use K L to select General Setting then press OK General Setting menu will appear 2 Use K L to select Clock then press OK Clock menu will appear 3 Use K L to select Clock Setting then press OK 4 Use K L to select calendar or time then press OK Clock Setting JAN 01 2009 THU 12 00...

Page 36: ...lect channels by using CHANNEL or the Number buttons found on remote control CHANNEL Use CHANNEL to change the channel the Number buttons Press the channel number with the Number buttons to select a channel you want to watch Analog TV Channels Enter the channel number with the Number buttons to select a channel you want to watch For 1 digit number e g 2 ch 0 2 2 or 2 leave it for 2 seconds For 2 d...

Page 37: ...atically disappear When you record digital TV broadcasting the audio language you have selected will be recorded Note You cannot change the audio language for the recording of digital TV broadcasting Pressing AUDIO does not control external device audio When there is only one audio channel on the broadcast pressing AUDIO does not display anything TUNER SETTINGS This section describes how to switch...

Page 38: ...m available in second audio or stereo you have to select either Stereo or SAP in General Setting menu beforehand Refer to the following table to check an appropriate setting Selected audio Broadcast audio Disc recording Audio output Stereo STEREO SAP STEREO STEREO STEREO STEREO STEREO MONO SAP MONO MONO MONO MONO MONO SAP STEREO SAP SAP SAP STEREO STEREO STEREO MONO SAP SAP SAP MONO MONO MONO TUNE...

Page 39: ...ODE TIMER DTV TV STANDBY ON CHANNEL OK SETUP 1 Press SETUP and use K L to select General Setting then press OK General Setting menu will appear 2 Use K L to select Display then press OK 3 Use K L to select DTV CC then press OK OSD Language Screen Saver FL Dimmer DTV CC CC Style V Chip 4 Use K L to select Caption Service then press OK DTV CC Caption Service Recording 5 Use K L to the desired DTV cl...

Page 40: ... Font Style Font Opacity Font Color Edge Type Edge Color Back Opacity Back Color 5 Use K L to select ON then press OK User Setting ON OFF TUNER SETTINGS Closed Caption Style Digital TV Digital TV can also change the style of its closed caption such as font color or size etc Instructions continue on the next page OPEN CLOSE SOURCE HDMI ABC GHI PQRS TUV SETUP REPEAT DISPLAY AUDIO DISC MENU RETURN TI...

Page 41: ...tyle3 Style4 Style5 Style6 Style7 Style8 Font Opacity Font opacity of the displayed caption can be switched as below Font Opacity Solid Transparent Translucent Flash Font Color Font color of the displayed caption can be switched as below Font Color White Black Red Green Blue Yellow Magenta Cyan Edge Type Edge type of the displayed caption can be switched as below Edge Type None Raised Depressed Un...

Page 42: ...D R 8x 16x SONY DVD R 4x 8x 16x DVD RW 4x TDK DVD R 4x 8x 16x Performance of any other discs are not guaranteed You can play back DVD RW on most DVD players without finalizing However if you have added or deleted chapters or made chapters hidden you must perform Make Edits Compatible before being able to see those effects on other units Refer to page 97 for more details To play back discs other th...

Page 43: ...actual remaining time for recording may be a little shorter than the remaining time displayed on the TV screen You cannot record copy protected program using this unit Copy protected signal is included in DVD video or some satellite broadcasts You cannot record copy once only program on DVD Recording Mode INFORMATION ON RECORDING HDD is a special device which has high recording density and is suit...

Page 44: ... to select General Setting then press OK General Setting menu will appear 2 Use K L to select Recording then press OK Recording menu will appear 3 Use K L to select Auto Chapter then press OK 4 Use K L to select a desired time option then press OK Auto Chapter OFF 5 minutes 10 minutes 15 minutes 30 minutes 60 minutes 5 Press SETUP to exit Note The interval for auto chapter may be up to two minutes...

Page 45: ...utes If titles have been recorded on the disc the title list is displayed Press STOP C to exit the title list 2 Press REC MODE repeatedly to select a recording mode Refer to Recording Mode on page 41 DVD SP 2Hr 0h58m 3 Select the appropriate external input channel by pressing SOURCE or CHANNEL Press DTV TV to select analog TV or digital TV then use CHANNEL or the Number buttons and for digital TV ...

Page 46: ...lect Yes or if you do not reply in 1 minute Note When you press REC recording starts immediately and continues until the HDD or disc is full record 12 hours to HDD or you stop recording This unit cannot record images as aspect ratio of 16 9 The 16 9 images will be recorded as 4 3 When the unit clock has not been set the space for a date and time of title names will be blank When you record a TV pr...

Page 47: ...earliest recording will be overwritten Note In the autostart recording when you display the DTV program information the information will be recorded as the part of the picture If there is not enough recordable space on HDD to record from the selected point to current point you cannot record the content of autostart recording When you record the content of the autostart recording the recording mode...

Page 48: ... on page 33 before setting a timer programming Use s B to move the cursor to the left and the right in the entry screen for the timer programming You cannot make a program whose recording time exceeds 12 hours Guide to Timer Programming Display Timer Programming 1 1 SP 1 00 FEB 20 09 10 30 AM 69 1 SP Date Start End CH FEB 20 10 30AM 11 30AM DTV69 1 New Program THU FEB 19 11 30AM 1 5 3 4 2 6 1 Titl...

Page 49: ...ct the recording mode Date FEB 20 REC To Mode DVD SP 1h00m Start End CH DTV69 1 11 30AM 10 30AM SP Auto recording mode select When Auto is selected as a recording mode the unit calculates how much time is available on the disc and selects the best recording mode available automatically to complete recording the program Date FEB 20 REC To Mode DVD Auto 1h00m Start End CH DTV69 1 11 30AM 10 30AM Aut...

Page 50: ...ll appear 3 Use K L to select Yes then press OK 3 B To correct the timer program 1 Use K L to select the program you want to correct then press OK 2 Use K L to select Program Change then press OK 3 Correct the timer program by using K L B then press OK 4 Press TIMER to exit Timer Programming Date Start End CH E41 FEB 20 10 30AM 11 30AM DTV69 1 New Program FRI FEB 20 1 00PM Each error number means ...

Page 51: ...ute When the programmed starting and ending time are earlier than the current time the setting will not be accepted and be cleared for redoing If the starting time is earlier and the ending time is later than the current time the recording will start right after you press OK at step 8 on page 47 You cannot change the audio language for the timer recording of digital TV broadcasting Timer recording...

Page 52: ... recording starts The elapsed time counter starts running 8 Press STOP C to stop recording Title name is also overwritten This operation may take a while to be completed You can overwrite the existing title from the selected position 1 Follow the steps 1 2 and 4 on the left 2 Use K L to select Play then press OK Playback will start 3 Press PAUSE F at the point from which you want to start overwrit...

Page 53: ...nger than the existing title overwriting from the beginning of the title overwrite recording A existing title B after overwriting When overwriting in the middle of the title 30 180 seconds will be cut off 30 180 seconds will be cut off overwrite recording A existing title B after overwriting overwrite recording A existing title B existing title C after overwriting title name A title name A title n...

Page 54: ...ing During normal dubbing you can watch the playback picture of the title being dubbed the audio cannot be changed During high speed dubbing however the playback picture will not appear Dubbing of a copy once only program is not possible with this unit If you stop the dubbing halfway the contents will be dubbed up to the point where you stop the dubbing except for the high speed dubbing With high ...

Page 55: ...then press OK 4 Use K L to select desired external input then press OK Video Input L1 Rear L2 Front 5 Use K L to select the input jack type to connect then press OK If you want to use VIDEO IN jack select Video In If you want to use S VIDEO IN jack select S Video In L1 Rear Video In S Video In 6 Press SETUP to exit Connect the external device properly to the unit by using input jacks either L2 and...

Page 56: ...it refer to pages 54 57 You can also select L1 or L2 channel by using the Number buttons e g For L1 press 0 0 1 3 Press REC MODE repeatedly to select a recording mode Refer to Recording Mode on page 41 4 Press IRECORD on the unit to start recording 5 Start playback on the external device to record from 6 Press CSTOP on the unit to stop recording This operation may take a while to be completed Befo...

Page 57: ...e stereo1 and stereo2 4 Indicator of dubbing function When the unit is ready for dubbing Start Rec will appear When the unit is in dubbing Pause Rec will appear 5 Channel position When you select L3 DV IN by using SOURCE or CHANNEL L3 DV IN will appear L3 DV IN AB 1234 0 12 34 1 1 1 1 RW Control DVD DV Audio Stereo1 Start Rec L3 DV IN AB 1234 0 12 34 1 1 1 1 RW DVD SP 2Hr 1h00m DVD SP 2Hr 1h00m 2 ...

Page 58: ...o page 41 3 Press DISPLAY 4 Press OK to display the item selection Use K L to select DV Input then press OK L3 DV IN AB 1234 0 12 34 1 1 1 1 RW DVD DV Input DVD HQ 1Hr 1h00m 5 Press PLAY B to find where you wish to start dubbing Then press STOP C where you wish to start dubbing Before recording from DVC see page 53 for connection instructions OPEN CLOSE SOURCE HDMI ABC GHI PQRS TUV SETUP REPEAT DI...

Page 59: ...cording will be paused and I will flash on the TV screen The recording will resume when the unit detects the video signal again When the DVC is in camera mode refer to Guide to DV and On Screen Display on page 55 Date time and cassette memory data will not be recorded Pictures with a copy guard signal cannot be recorded A DV terminal is a terminal that can use the transmission mode conforming to t...

Page 60: ... OK DVD to HDD Use K L to select DVD HDD then press OK e g HDD DVD HDD DVD DVD HDD Dubbing 4 Use K L to select Add then press OK HDD DVD 1 1 3000 MB Dubbing List Add Delete All Dubbing Start If you have registered any dubbing before they will be listed in the dubbing list DUBBING Instructions continue on the next page OPEN CLOSE SOURCE HDMI ABC GHI PQRS TUV SETUP REPEAT DISPLAY AUDIO DISC MENU RET...

Page 61: ... press OK e g HDD DVD HDD DVD 3000 MB 500 MB Dubbing Titles Please select REC MODE LP EP SLP Auto High HQ SP SPP Confirmation message will appear Depending on the dubbing direction the available recording mode varies When dubbing from HDD to DVD you can select High to perform the high speed dubbing refer to Recording Mode for Dubbing on page 52 for more details 9 Use K L to select Yes then press O...

Page 62: ... to select Yes then press OK Start Dubbing Yes No Dubbing of the selected title will start To stop the dubbing in progress Press CSTOP on the front panel Press STOP C for 2 seconds on the remote control DUBBING This function lets you select one specific title from the title list for dubbing OPEN CLOSE SOURCE HDMI ABC GHI PQRS TUV SETUP REPEAT DISPLAY AUDIO DISC MENU RETURN TITLE WXYZ CLEAR SPACE J...

Page 63: ...d To prevent accidental recording editing or erasing the titles you can protect them from Disc Edit menu Note To cancel the disc protection When you insert a disc protected with this unit Disc Protect ON OFF will appear instead of OFF ON at step 3 Disc Edit Edit Disc Name Erase Disc Make Edits Compatible Disc Protect ON OFF To release the protection for the disc select Disc Protect ON OFF at step ...

Page 64: ...ed 5 Finalizing is completed You will need to finalize DVD R DVD RW or DVD R to play them back on other DVD players Finalizing may take several minutes up to an hour A shorter recording period on the disc will require a longer time period for finalization Do not unplug the power cord during finalization Note Once you have finalized a DVD R DVD R you cannot edit or record anything on that disc Ther...

Page 65: ...ze Disc Full End of Timer Rec 5 Use K L to select ON then press OK e g Disc Full Disc Full ON OFF Your setting will be activated 6 Press SETUP to exit You can finalize discs automatically using this function You can use this function to finalize discs after finishing timer recordings and at the end of the disc space Auto Finalizing OPEN CLOSE SOURCE HDMI ABC GHI PQRS TUV SETUP REPEAT DISPLAY AUDIO...

Page 66: ...are labeled for other regions Look for the symbols on the right on your DVD If these region symbols do not appear on your DVD you cannot play back the DVD in this unit The number inside the globe refers to region of the world A DVD labeled for a specific region can only play back on the unit with the same region code Region Codes Logos Playable discs Media Playable files MP3 CD RW R JPEG CD DA aud...

Page 67: ...atically Some operations cannot be performed while PBC function is on Cancel PBC function temporarily to perform those operations by following the instruction below 1 Press SETUP 2 Use K L to select DISC Playback Mode then press OK DISC Playback Mode menu will appear 3 Use K L to select PBC Video CD only then press OK 4 Use K L to select ON or OFF then press OK Your setting will be activated You c...

Page 68: ...a DVD video or video CD with PBC function a menu may appear Refer to Using the Title Disc Menu on page 70 3 Press STOP C once to stop playback temporarily Refer to Resume Playback on page 71 Note Some discs may start playback automatically You can select images or information on the menu screen by activating PBC playback control function page 65 If you insert a disc when the unit is in HDD mode pl...

Page 69: ...le List 1 6 JAN 1 09 12 00AM CH10 SP 12 00AM 1 00 00 JAN 1 09 CH10 SP 1 4 5 6 2 3 DVD title list 1 SP 2Hr 2 3 NOV 21 09 11 00AM CH12 SP NOV 21 09 0 20 44 NOV 22 09 11 35AM CH13 EP NOV 22 09 0 10 33 EMPTY TITLE 1 37 52 SP 2Hr For video CD when PBC Video CD only in DISC playback Mode menu is set to ON the video CD main menu will appear when inserting a disc In such case select a numbered menu with t...

Page 70: ...erwrite is highlighted e g DVD RW No Disc Name Disc DVD RW Total Titles 3 Disc Space Used 0 30 48 Disc Protect OFF Make Edits Compatible Needed e g DVD R No Disc Name Disc DVD R Total Titles 5 Disc Space Used 1 30 48 Disc Protect OFF Finalize Finalized 1 Disc name Default No Disc Name 2 Disc type DVD RW DVD R DVD RW DVD R 3 Total number of title include EMPTY TITLE 4 Total time of recorded disc sp...

Page 71: ...r track file then press OK e g File list File List DISC NAME 1 2 Folder1 Folder2 JPEG file1 JPEG file2 JPEG file3 JPEG file4 JPEG file5 JPEG file6 When selecting track file Playback will start When selecting the folder Not available for audio CD The files in the folder will appear Use K L to select the file or folder you want to play back then press OK Press PLAY B OK or B to move to any lower hie...

Page 72: ... mode are blurred Refer to page 105 Pause Kodak Picture CD Playing Back an Audio CD and a CD RW R with MP3 JPEG Files cont d The Picture CD is a service to convert photographs taken by a conventional film camera into digital data and write the data on a CD You can enjoy picture images on the TV set by playing back the Picture CDs For details of Kodak Picture CD contact a shop that provides develop...

Page 73: ...ote Forward reverse speed will be indicated with icons as follows forward approx speed 2x 20x 40x reverse approx speed 5x 20x 40x 1 During playback press D or E Every time you press D or E approximate speed will be changed as follows Fast forward or fast reverse playback across titles for HDD DVD or files for MP3 is not possible 20x normal speed playback 2x 20x 5x 40x 40x For video CD approximate ...

Page 74: ... can play back a title being recorded from the beginning while recording continues 1 During recording press PLAY B Playback of the title you are recording will start from the beginning Elapsed playback time will be displayed in the front panel display 2 Press STOP C once to stop the playback The front panel display will switch back to show the elapsed recording time If you press STOP C twice it wi...

Page 75: ...tart This feature allows you to assign a specific point on a title to be called back later 1 During playback press DISPLAY to bring up the display menu If the display menu is already shown skip to step 2 2 Use B to select to display the marker list e g DVD video 1 5 1 5 DVD 0 01 00 1 23 45 Video 3 Use K L to select a desired marker number When it reaches the desired point press OK 1 5 1 5 DVD 1 2 ...

Page 76: ...unction MP3 or JPEG files only The current track or file will be played back repeatedly Group MP3 JPEG files only The current folder will be played back repeatedly You can play back a disc randomly instead of playing back in the original order 1 Press SETUP 2 Use K L to select DISC Playback Mode then press OK DISC Playback Mode menu will appear For MP3 use K L to select Music then press OK For JPE...

Page 77: ... and resume the TV program 1 When watching TV program through this unit s tuner press PAUSE F TV program will be paused and sound will be muted 2 Press PLAY B to resume the TV program you were watching from where you have paused To go back the TV program When watching TV program through this unit s tuner press H E or V REPLAY While playing back the autostart recording pressing H or G skips playbac...

Page 78: ...track file will move forward one at a time To go back to the beginning of the current track file press H Press it repeatedly to go to the previous track file The track file will move backward one at a time For JPEG files press it once to go to the previous file Track Search Note During CD playback you can enter a track number directly using the Number buttons for track search without displaying th...

Page 79: ... DVD Video e g audio CD 1 5 CD 0 00 15 0 05 00 The number next to will be highlighted To move to the number next to press B When time search is not available and time counter are not displayed 3 Use K L B or the Number buttons to enter a desired time to search then press OK After the search playback will start automatically Note Time search is available only in the same track file or title Time se...

Page 80: ...pending on the contents of the disc you are playing back When playing back a DVD video recorded with 2 or more soundtracks these are often in different languages you can switch them during playback When playing back video CD audio CD you can switch L R stereo L left or R right 1 During playback press DISPLAY then proceed to step 2 or press AUDIO then proceed to step 3 If the display menu is alread...

Page 81: ...es Reducing Block Noise Some DVD video have scenes shot from 2 or more angles Angle information should be on the disc case if the disc contains multi angle scenes 1 During playback press DISPLAY 2 Use B to select then press OK e g DVD video 1 5 1 5 DVD 0 01 00 1 23 45 Video Angle icon appears when a switching camera angle is available Angle will switch each time you press OK This function reduces ...

Page 82: ...yed on the second line 9 Recording mode Currently selected recording mode is displayed here 10 Capacity indicator Indicating the position and the amount of each title in the disc The portion for the selected title is highlighted It may not indicate the precise capacity of the disc If the duration of a title is too short it may not be reflected in the capacity indicator 11 Index pictures A cut from...

Page 83: ...05 00 DVD HDD Press DVD first 1 Press TITLE 2 Use K L to select a desired title then press OK 1 2 3 NOV 21 09 11 00AM CH12 SP NOV 21 09 0 20 44 NOV 22 09 11 35AM CH13 EP NOV 22 09 0 10 33 EMPTY TITLE 1 37 52 SP 2Hr SP 2Hr 3 Use K L to select Edit then press OK 1 2 3 NOV 21 09 11 00AM CH12 SP NOV 21 09 0 20 44 Overwrite NOV 22 09 11 35AM CH13 EP NOV 22 09 0 10 33 EMPTY TITLE 1 37 52 SP 2Hr SP 2Hr E...

Page 84: ... L to select Edit then press OK 1 2 3 NOV 21 09 11 00AM CH12 SP NOV 21 09 0 20 44 Overwrite NOV 22 09 11 35AM CH13 EP NOV 22 09 0 10 33 EMPTY TITLE 1 37 52 SP 2Hr SP 2Hr Edit Play Note For DVD RW DVD RW the available disc space will increase only when the last recorded title in the title list is deleted For DVD R DVD R the disc space will not be affected Deleted part of the titles in the capacity ...

Page 85: ...Edit Title Delete Edit Title Name Chapter Mark Index Picture Title Dividing Hide Chapter NOV 21 09 11 00AM CH12 SP 1 1 05 00 Confirmation message will appear 5 Use K L to select Yes then press OK Final confirmation message will appear Select Yes then press OK The title is now deleted Title List 1 1 Title 2 12 00AM 1 00 00 JAN 1 09 CH10 SP 1 4 5 2 3 1 2 3 EMPTY TITLE 0 21 14 SP 2Hr NOV 22 09 11 35A...

Page 86: ...essage will appear 7 Use K L to select Yes then press OK Final confirmation message will appear Select Yes then press OK Titles are now deleted Title List 1 1 Title 1 12 00AM 1 00 00 JAN 1 09 CH10 SP 1 4 2 3 To remove the trash mark from the title Select the title with the trash mark then press OK You can delete titles which you do not need anymore Please be advised that the titles once deleted ca...

Page 87: ...e changed to mode automatically 2 Press to character set will be changed to the previous input mode automatically To delete letters press CLEAR repeatedly Holding CLEAR will delete all letters Use s B to move the cursor to the left and right You can enter up to 30 letters Note Undefined letters in a title name are shown by If you delete them adjoining letters may change to or other Guide to Edit T...

Page 88: ...ou can put chapter marks in each title Once a chapter is marked you can use it for the chapter search feature Note for adding or deleting chapter marks Maximum number of chapter marks in a title is 99 for HDD DVD and the maximum number of chapter marks in total is no limit for HDD 254 for DVD If the number of the chapter marks exceed the limit you cannot add any more chapter marks Only with regard...

Page 89: ...apter 2 3 Edit Chapter Mark 1 05 00 4 Use K L to select Delete then press OK 5 Use K L to select Yes then press OK Edit Chapter Mark Delete No Yes NOV 21 09 11 00AM CH12 SP 1 Chapter 2 3 F 1 05 00 The selected chapter mark is now deleted To delete more chapter marks repeat steps 3 to 5 6 Press RETURN once or repeatedly to go back to the title list For DVD the data will be written onto the disc mom...

Page 90: ...3 F 1 05 00 Final confirmation message will appear Select Yes then press OK All chapter marks are now deleted Chapter 2 3 Edit Chapter Mark NOV 21 09 11 00AM CH12 SP 1 Delete Delete All Add 1 05 00 5 Press RETURN once or repeatedly to go back to the title list Data will be written onto the disc momentarily This operation may take a while to be completed OPEN CLOSE SOURCE HDMI ABC GHI PQRS TUV SETU...

Page 91: ...les are identical and index pictures are reset to the first scene at this point You can divide one title into 2 new titles Note If an internal HDD or a DVD contains the maximum number of titles HDD 600 DVD RW RW 49 you cannot divide any titles With DVD RW RW you cannot divide the titles if the total number of chapters has already reached 254 When you search for a point at step 2 you can also use t...

Page 92: ...highlight automatically moves to End 4 Play back the title up to the point where you want to set an end point then press OK Edit Scene Delete Start End Preview Delete JAN 1 09 12 00AM CH10 LP 1 1 30 00 End point is now set and the highlight automatically moves to Preview The portion for deletion is indicated in red in the progress bar at the bottom of the screen Note When you search for the start ...

Page 93: ...art or End and try setting them again If you are satisfied with the result proceed to step 6 Before editing Edited start point end point 6 Use K L to select Delete then press OK Edit Scene Delete Start End Preview Delete JAN 1 09 12 00AM CH10 LP 1 1 30 00 7 Use K L to select Yes then press OK Edit Scene Delete Yes No JAN 1 09 12 00AM CH10 LP 1 1 30 00 Final confirmation message will appear Select ...

Page 94: ...e title is now protected If the title is already protected ON OFF will appear instead Press OK to release the title from protection The protected title will be marked with icon 4 Press RETURN once or repeatedly to go back to the title list To prevent the accidental editing or erasing of the titles you can protect them in Edit menu OPEN CLOSE SOURCE HDMI ABC GHI PQRS TUV SETUP REPEAT DISPLAY AUDIO ...

Page 95: ...eted If you want hidden chapters to be Visible select the chapter to be shown Then use K L to select Visible at the step 4 on this page Data will be written onto the disc momentarily After that title list is displayed Note Hidden will be displayed in the preview window while previewing the hidden chapter When you make all chapters in the title Hidden Hidden is displayed on an index picture of the ...

Page 96: ...r repeatedly to go back to the title list Data will be written onto the disc momentarily This operation may take a while to be completed Note If the selected picture for an index picture is overwritten the index picture is reset to the first scene of the title When you search for the point at step 2 you can also use the special playback functions such as G D etc You can set your desired scene as a...

Page 97: ...0 30 48 Disc Protect OFF Make Edits Compatible Needed 4 To enter a disc name follow the steps of Guide to Edit Title Name on page 85 When you finish entering a title name press OK 5 Use K L to select Yes then press OK Data will be written onto the disc momentarily This operation may take a while to be completed The disc name is now updated Note You cannot select Disc Edit when finalized DVD R or D...

Page 98: ...ntents in the disc will be erased Are you sure to erase the disc Yes No Data will be written onto the disc momentarily This operation may take a while to be completed The contents of the disc is now deleted You can erase all titles on a disc Note When you select Yes at step 4 all contents of the disc will be erased OPEN CLOSE SOURCE HDMI ABC GHI PQRS TUV SETUP REPEAT DISPLAY AUDIO DISC MENU RETURN...

Page 99: ...e Disc Protect OFF ON 4 Use K L to select Yes then press OK Activate the Make Edits Compatible Yes No Data will be written onto the disc momentarily This operation may take a while to be completed If you have added or deleted chapters or made chapters hidden you must perform Make Edits Compatible to see those effects on other unit OPEN CLOSE SOURCE HDMI ABC GHI PQRS TUV SETUP REPEAT DISPLAY AUDIO ...

Page 100: ...lete All Titles if you want to delete all titles including the ones protected Delete All Titles Delete All Unprotected Titles HDD Menu 4 Use K L to select Yes then press OK Delete entire titles Yes No Final confirmation message will appear Select Yes then press OK Titles are now deleted OPEN CLOSE SOURCE HDMI ABC GHI PQRS TUV SETUP REPEAT DISPLAY AUDIO DISC MENU RETURN TITLE WXYZ CLEAR SPACE JKL M...

Page 101: ...h Spanish Other Set the language for subtitles Angle Icon ON OFF Set whether or not to display the angle icon Still Mode Auto Field Frame Set the type of still image in pausing playback Variable Skip Replay Variable Skip 5 seconds 15 seconds 30 seconds 1 minute 5 minutes Set the amount of skip time when you press V SKIP Variable Replay 5 seconds 15 seconds 30 seconds 1 minute 5 minutes Set the amo...

Page 102: ... Edge Color White Black Red Green Blue Yellow Magenta Cyan Set edge color of the displayed caption Back Opacity Solid Transparent Translucent Flash Set back opacity of the displayed caption Back Color White Black Red Green Blue Yellow Magenta Cyan Set back color of the displayed caption V Chip MPAA Rating X NC 17 R PG 13 PG G NR Set the viewing limitation according to US movie ratings TV Rating TV...

Page 103: ...nutes 10 minutes 15 minutes 30 minutes 60 minutes Insert chapter marks at even time interval Auto Finalize Page 63 Disc Full ON OFF Set the unit to finalize the disc automatically End of Timer Rec ON OFF Make Recording Compatible Page 42 ON OFF Set to prohibiting additional recording OFF or to replace the title list after recording ON Clock Pages 32 33 Clock Setting Set the clock Auto Clock Settin...

Page 104: ...arental Lock Disc Audio Disc Menu Language Audio Language Subtitle Language Angle Icon Still Mode Variable Skip Replay Submenu will appear 4 Refer to 1 to 8 on pages 103 105 and set the selected item 5 When you finish with setting press SETUP to exit Playback OPEN CLOSE SOURCE HDMI ABC GHI PQRS TUV SETUP REPEAT DISPLAY AUDIO DISC MENU RETURN TITLE WXYZ CLEAR SPACE JKL MNO DEF OK DVD HDD D DUBBING ...

Page 105: ...he way that you have set Record the password in case you forget it If there is a DVD in the unit when you set up the parental lock press OPEN CLOSE A to activate the parental lock level A A password has not been set yet Use K L to select Yes Use the Number buttons to enter a new password except for 4737 then press OK Change Password Yes No Password Input Yes Your setting will be activated B A pass...

Page 106: ...tion Even if you select 96kHz the sound will be down sampled at 48kHz C Dolby Digital Default Stream Use K L to select a setting then press OK Dolby Digital PCM Stream Your setting will be activated PCM Converts the Dolby Digital into PCM 2 channel When your amplifier decoder is NOT compatible with Dolby Digital set to PCM Stream Outputs Dolby Digital signals When your amplifier decoder is compati...

Page 107: ...setting then press OK Angle Icon ON OFF Your setting will be activated 7 Still Mode Default Auto DVD only Select Auto usually Use K L to select a setting then press OK Still Mode Auto Field Frame Your setting will be activated Auto Optimum resolution setting Field or Frame will be selected Field Images in the still mode will be stabilized Frame Images in the still mode will be highly defined Note ...

Page 108: ...uage Default English Set the language for the on screen display Use K L to select a setting then press OK OSD Language English Français Español Your setting will be activated 2 Screen Saver Default 10 minutes Set the time to activate the screen saver function on the TV screen Use K L to select a setting then press OK Screen Saver OFF 1 minute 5 minutes 10 minutes 15 minutes Your setting will be ac...

Page 109: ...able Rating Change Password A B C D E F A MPAA Rating B TV Rating C Canadian English Rating D Canadian French Rating You can set the viewing limitation according to MPAA rating US movie ratings TV Rating US TV program ratings Canadian English Rating Canadian English language Ratings Canadian French Rating Canadian French language Ratings 1 Use K L to select the desired rating then press OK repeate...

Page 110: ...downloaded ratings If the broadcasting signal does not have the downloadable rating information the message below will appear Downloadable Rating is currently not available This message will also appear when you try to access Downloadable Rating after you have cleared the downloadable rating information and the new information has not been downloaded since To set the rating Use K L to select Block...

Page 111: ...Use K L to select a desired item then press OK Progressive Scan TV Aspect Video Input 1 2 3 Submenu will appear 4 Refer to 1 to 2 on page 110 and set the selected item For 3 refer to page 53 5 When you finish with setting press SETUP to exit Video OPEN CLOSE SOURCE HDMI ABC GHI PQRS TUV SETUP REPEAT DISPLAY AUDIO DISC MENU RETURN TITLE WXYZ CLEAR SPACE JKL MNO DEF OK DVD HDD D DUBBING V REPLAY V S...

Page 112: ...t video cable commercially available to connect this unit to the TV Refer to pages 17 18 If not use the RCA video cable and set the progressive scan to OFF or press and hold SETUP for more than 3 seconds during HDD DVD playback When selecting No or not pressing any buttons on the unit or remote control within 15 seconds at step 3 progressive scan remains to be OFF interlace scan 2 TV Aspect Defaul...

Page 113: ... to make the dark areas of the HDMI images brighter Use K L to select a setting then press OK Select Enhanced if the black white contrast is not clear This setting is effective only for HDMI RGB output RGB Range Normal Enhanced Your setting will be activated 4 HDMI Control Default OFF HDMI Control ON OFF HDMI control allows integrated system control over HDMI and is part of the HDMI standard When ...

Page 114: ...ure Yes No Your setting in recording will be initialized Reset All SETUPS Note The settings listed below will remain unchanged even after resetting to the factory default OSD language setting Channel setting Clock setting Parental lock setting V chip setting Timer programming information OPEN CLOSE SOURCE HDMI ABC GHI PQRS TUV SETUP REPEAT DISPLAY AUDIO DISC MENU RETURN TITLE WXYZ CLEAR SPACE JKL ...

Page 115: ...V screen Repairing If there is a power failure or unplugging during recording finalizing formatting or editing even after Repairing disappears a repairing process will begin automatically just after turning the unit on again It may take several minutes up to about several hours In a case you intend to cancel the repairing process Repairing Do you want to cancel a repairing process When selecting Y...

Page 116: ... repeatedly Turn on all connected devices Check if the connections are made securely and correctly HDD DVD Recording is impossible It is prohibited to make a recording from 2 minutes before the programmed start time of a timer recording This unit cannot record programs that contain copy protection signal This is not a malfunction The space of the recording media may be used up Try deleting unneces...

Page 117: ...k and start writing data to the DVD This is not a malfunction DVD Playback cannot be performed Check if the playable disc is inserted Check if the disc is loaded correctly with the labeled side facing up Discs made on other devices or on personal computers cannot be played back on this unit unless it is finalized on the device Even if it is finalized the performance of those discs are not guarante...

Page 118: ... or deleted if they are finalized If it is DVD RW undo the finalization by following the steps on page 62 The capacity of the disc doesn t increase even if the recorded program is deleted With DVD RW RW the disc space will increase only when the last title is deleted With DVD R R deleting a title will not increase the disc space Dubbing cannot be executed Check if the disc is compatible for record...

Page 119: ...sc with enough recording space Recording Error You cannot record more than 49 titles on one disc The maximum is 49 You are trying to record onto the disc on which the number of recording titles comes up to the maximum 49 Delete unnecessary titles pages 82 83 Recording Error You cannot record more than 254 chapters on one disc The maximum is 254 You are trying to record onto the DVD RW or DVD RW on...

Page 120: ...akh 5757 Kinyarwanda 6469 Kirghiz 5771 Kirundi 6460 Korean 5761 Kurdish 5767 Laothian 5861 Latin 5847 Latvian Lettish 5868 Lingala 5860 Lithuanian 5866 Macedonian 5957 Malagasy 5953 Malay 5965 Malayalam 5958 Maltese 5966 Maori 5955 Marathi 5964 Moldavian 5961 Mongolian 5960 Nauru 6047 Nepali 6051 Norwegian 6061 Occitan 6149 Oriya 6164 Oromo Afan 6159 Panjabi 6247 Pashto Pushto 6265 Persian 5247 Po...

Page 121: ...he files on this unit MP3 MPEG audio layer 3 MP3 is a method of compressing files You can copy MP3 files on CD RW R from the computer and play back the files on this unit PBC playback control video CD only This function enables you to play back interactive software using a menu screen See also Video CD PCM pulse code modulation The most common system of encoding digital audio found on CD and DAT E...

Page 122: ...uner Tuning system Channel frequency synthesized tuning system Channel coverage ATSC NTSC Terrestrial CATV VHF 2 13 UHF 14 69 2 13 A W W 1 W 94 analog W 1 W 84 A 5 A1 5A Terminals Front Audio input RCA jack x 2 2V rms input impedance more than 22kΩ Video input RCA jack x 1 1Vp p 75Ω S video input Mini DIN 4 pin x 1 Y 1Vp p 75Ω C 286mVp p 75Ω DV input DV input jack 4 pin IEEE 1394 Rear VHF UHF CATV...

Page 123: ...recomiendan para obtener una buena calidad de grabación y han sido comprobados como compatibles con este aparato Sin embargo según sea la condición del medio el equipo podría no leer el disco correctamente Verbatim DVD R 8x DVD RW 4x DVD R 8x DVD RW 2x JVC DVD RW 4x Maxell DVD R 4x 8x 16x DVD R 8x 16x SONY DVD R 4x 8x 16x DVD RW 4x TDK DVD R 4x 8x 16x El comportamiento de cualquier otro disco no e...

Page 124: ...cal IN IN OUT VIDEO IN AUDIO IN L1 S VIDEO S VIDEO AUDIOOUT OUT L R VIDEO OUT Y ANTENNA R L COAXIAL AUDIOOUT L R VIDEO OUT cable RCA de audio cable RCA de vídeo parte trasera de la unidad ANT IN antena de VHF UHF empresa de TV por cable cable coaxial de RF o cable coaxial de RF AUDIO IN L R VIDEO IN Esta conexión es sólo para el procesamiento de cada elemento de la señal de TV IN OUT ANTENNA ...

Page 125: ...ocesamiento de cada elemento de la señal de TV cable coaxial de RF cable coaxial de RF No incline el conector para introducirlo en la toma HDMI y compruebe que el tipo de toma corresponde con el tipo de conector HDMI OUT parte trasera de la unidad IN IN OUT VIDEO IN AUDIO IN L1 S VIDEO S VIDEO AUDIOOUT OUT L R VIDEO OUT Y ANTENNA R L COAXIAL cable HDMI Modo HDMI y señales efectivas de salida Presi...

Page 126: ...l Mode y Channel Selection en la página 34 3 Utilice K L para seleccionar el tipo de señal de emisión y luego presione OK Ajuste inicial Ajuste Auto escaneará los canales terrrestres Esto tarda unos momentos en finalizar Ajuste de Canal Verificar que la antena esté conectada a la toma ANTENNA IN Antena Cable Analógico Cable Analógico Digital El equipo comenzará a obtener los canales disponibles en...

Page 127: ...e OK 9 Utilice K L para seleccionar Sí y luego presione OK El copiado comenzará Para detener el copiado en curso Presione CSTOP en el panel frontal Presione STOP C en el control remoto durant 2 segundos A la hora de realizar una copia del HDD al DVD aparecerá un mensaje de confirmación seleccione Sí Copiado a un toque Con el copiado a un toque usted puede comenzar a copiar de inmediato con sólo un...

Page 128: ...ble con este aparato Para obtener la lista de discos compatibles consulte la página 121 2 Para iniciar una reproducción presione PLAY B 3 Para detener momentáneamente la reproducción presione STOP C una vez Consulte Resume Playback en la página 71 Si usted está reproduciendo los títulos de una unidad de disco rígido presione primero HDD y luego continúe al paso 2 Si usted está reproduciendo los tí...

Page 129: ...Function Setup Others Editing Playback Recording Basic Setup Connections Introduction Español 127 ES MEMO ...

Page 130: ... FLOOR MODELS FUNAI CORP AND ITS REPRESENTATIVES OR AGENTS SHALL IN NO EVENT BE LIABLE FOR ANY GENERAL INDIRECT OR CONSEQUENTIAL DAMAGES ARISING OUT OF OR OCCASIONED BY THE USE OF OR THE INABILITY TO USE THIS PRODUCT THIS WARRANTY IS MADE IN LIEU OF ALL OTHER WARRANTIES EXPRESS OR IMPLIED AND OF ALL OTHER LIABILITIES ON THE PART OF FUNAI ALL OTHER WARRANTIES INCLUDING THE WARRANTY OF MERCHANTABILI...

Page 131: ...STUCES DESTINÉES À SIMPLIFIER L UTILISATION DE VOTRE PRODUIT MAGNAVOX TOUTEFOIS SI VOUS NE PARVENEZ PAS À RÉSOUDRE VOTRE PROBLÈME VOUS POUVEZ ACCÉDER À NOTRE AIDE EN LIGNE À L ADRESSE HTTP WWW MAGNAVOX COM SUPPORT OU FORMEZ LE 1 800 605 8610 VEILLEZ À AVOIR VOTRE PRODUIT À PORTÉE DE MAIN 2009 Funai Electric Co Ltd Enregistrement Lecture Édition Introduction Connexions Configuration de base Réglage...

Page 132: ...pour sélectionner un mode d enregistrement Sélectionnez le canal d entrée externe appropriée en appuyant sur SOURCE ou CHANNEL Appuyez sur DTV TV pour sélectionner la télévision analogique ou la télévision numérique puis utilisez CHANNEL ou les touches numérotées et pour les chaînes de télévision numériques pour sélectionner la chaîne que vous souhaitez enregistrer Appuyez sur REC pour démarrer l ...

Page 133: ...IO IN R L Audio HDMI IN Câble HDMI Câble vidéo composant Câble audio Câble HDMI vendu séparément Le câble High Speed HDMI connu également comme câble HDMI catégorie 2 est recommandé pour une meilleure compatibilité Les câbles utilisés pour cette connexion sont les suivants 1 câble audio G D fourni 1 câble vidéo composant Câble non inclus Les câbles utilisés pour cette connexion sont les suivants 1...

Page 134: ...S ÊTRE EXPOSÉ À DES ÉCLABOUSSURES OU DES PROJECTIONS D EAU ET AUCUN RÉCIPIENT REMPLI DE LIQUIDE TEL QU UN VASE NE DEVRAIT ÊTRE POSÉ SUR L APPAREIL ATTENTION AFIN DE RÉDUIRE LE RISQUE D ÉLECTROCUTION NE PAS ENLEVER LE COUVERCLE ARRIÈRE DU BOÎTIER DE CET APPAREIL IL NE CONTIENT PAS DE PIÈCES RÉPARABLES PAR L UTILISTEUR CONFIER LA RÉPARATION À UN TECHNICIEN QUALIFIÉ CAUTION RISK OF ELECTRIC SHOCK DO ...

Page 135: ...nsérer vos doigts ou des objets à l intérieur de l appareil Emplacement et manipulation N installez pas l appareil sous les rayons solaires directs à proximité de champs magnétiques puissants ou à un endroit exposé à la poussière ou à de fortes vibrations Évitez un endroit exposé à des changements brusques de température Installez l appareil en position horizontale et de façon stable Ne placez rie...

Page 136: ...acez l appareil sans le soumettre à un fort impact ou à des vibrations importantes Vérification du signal IR Si la télécommande ne fonctionne pas correctement vous pouvez utiliser une radio AM ou un appareil photo numérique y compris un téléphone portable avec un appareil photo intégré pour vérifi er si elle émet un signal infrarouge Avec une radio AM Réglez la radio AM sur une fréquence non émétr...

Page 137: ...e licence ou d un droit quelconque à utiliser l une de marques commerciales présentées ci dessus L usage abusif de toute marque commerciale ou de tout autre contenu du présent manuel est strictement interdit Funai fera appliquer avec détermination ses droits de propriété intellectuelle dans toute l étendue des lois Est une marque de commerce de Eastman kodak company Fabriqué sous licence de Dolby ...

Page 138: ...DE L HORLOGE 32 Réglage auto de l horloge 32 Réglage manuel de l horloge 33 Heure d été 33 RÉGLAGES DU TUNER 34 Commutation entre les modes analogiques et numériques 34 Sélection d un chaîne 34 Sélection du l audio de TV 35 Sous titres DTV 37 Style des sous titres 38 Enregistrement INFORMATIONS SUR L ENREGISTREMENT DE DVD 40 AVANT L ENREGISTREMENT 42 Rendre un enregistrement compatible 42 Réglage ...

Page 139: ...echerche chronologique 77 SÉLECTION DES FORMATS AUDIO ET VIDÉO 78 Commutation des sous titres 78 Commutation de la piste audio 78 Commutation du système d ambiance virtuelle 79 Commutation des angles de caméra 79 Réduction du bruit des blocs 79 Édition INFORMATIONS SUR L ÉDITION 80 Guide de la liste des titres 80 Menu édition 81 Comment accéder au menu d édition 81 ÉDITION 82 Suppression d un titr...

Page 140: ...ique des disques à la fin de tous les enregistrements programmés ou à la fin de chaque espace disque Autre possibilité d enregistrement Dans les cas ci dessous l appareil détecte la condition et enregistre automatiquement sur le DD même quand DVD est sélectionné comme support d enregistrement Aucun disque enregistrable n est présent dans l appareil Le disque dans l appareil ne dispose pas d un esp...

Page 141: ...rable sur cet appareil sauf si vous effacez tout son contenu voir page 96 Un DVD R enregistré dans un mode autre que VR n est pas enregistrable sur cet appareil Symbole Pour la lecture seulement Description La description se réfère au DVD RW La description se réfère au DVD R La description se réfère au CD audio La description se réfère au CD vidéo avec fonction PBC La description se réfère au CD v...

Page 142: ...r ou reprendre la lecture 9 Touche IRECORD Appuyez une fois sur cette touche pour commencer un enregistrement Appuyez plusieurs fois pour démarrer un enregistrement express 10 Touches CHANNEL Appuyez sur cette touche pour incrémenter ou décrémenter les chaînes 11 Prise DV IN L3 Elle sert à brancher la sortie DV d un appareil externe avec un câble DV 12 Prises d entrée AUDIO L2 Elles servent à conn...

Page 143: ... Elle sert à connecter l entrée S vidéo d un moniteur TV d un récepteur AV ou d un autre appareil avec un câble S vidéo 8 Prises COMPONENT VIDEO OUTPUT Elles servent à connecter un moniteur de télévision sur les entrées composantes vidéo avec un câble de composantes vidéo 9 Prises AUDIO OUT Elles servent à connecter un moniteur de télévision un récepteur AV ou un autre appareil avec un câble audio...

Page 144: ... piles ensemble Bien qu ils puissent sembler identiques les tensions des différentes piles peuvent ne pas être égales Assurez vous que les extrémités et de chaque pile correspondent aux indications du compartiment des piles Retirez les piles du compartiment des piles en cas d inutilisation dépassant un mois Pour jeter les piles usagées respectez les réglementations gouvernementales ou les règles d...

Page 145: ...e touche pour démarrer ou reprendre la lecture 14 Touche RAPID PLAY Pendant la lecture appuyez sur cette touche pour lire légèrement plus rapidement lentement tout en conservant la restitution audio 15 Touche D DUBBING Pendant la lecture appuyez sur cette touche pour démarrer immédiatement la copie En mode arrêt appuyez sur cette touche pour afficher le menu Doublage 16 Touche TIMER Appuyez sur ce...

Page 146: ... Apparaît lorsqu un disque est dans cet appareil DB Apparaît pendant la copie HDD Apparaît lorsque l appareil est en mode DD DVD Apparaît lorsque l appareil est en mode DVD 5 Affiche les indications suivantes Durée de lecture écoulée Numéro de titre chapitre piste fichier courant Durée d enregistrement durée restante Horloge Numéro de chaîne Durée restante pour l enregistrement express Mode de la ...

Page 147: ...sez une antenne de réception de la télévision analogique elle doit également fonctionner pour la réception DTV Les antennes extérieures ou de grenier seront plus efficaces que les versions posées sur les appareils La sortie d antenne sert uniquement à la transmission au tuner La lecture de DD DVD n est pas possible par RF Les câbles fournis utilisés dans cette connexion sont les suivants 1 câble c...

Page 148: ...à un téléviseur à l aide des prises audio vidéo IN OUT ANTENNA AUDIOOUT L R VIDEO OUT IN IN OUT VIDEO IN AUDIO IN L1 S VIDEO S VIDEO AUDIOOUT OUT L R VIDEO OUT Y ANTENNA R L COAXIAL câble vidéo RCA câble audio RCA arrière de l appareil ANT IN antenne VHF UHF société de TV par câble câble coaxial RF ou Cette connexion sert uniquement à la boucle de télévision câble coaxial RF AUDIO IN L R VIDEO IN ...

Page 149: ... antenne VHF UHF société de TV par câble ou ANT IN Cette connexion sert uniquement à la boucle de télévision câble coaxial RF câble coaxial RF S VIDEO IN AUDIO IN L R IN IN OUT VIDEO IN AUDIO IN L1 S VIDEO S VIDEO AUDIOOUT OUT L R VIDEO OUT Y ANTENNA R L COAXIAL S VIDEO OUT IN OUT ANTENNA arrière de l appareil antenne VHF UHF société de TV par câble ou câble coaxial RF câble coaxial RF ANT IN Cett...

Page 150: ...DMI certains peuvent commander d autres appareils via le connecteur HDMI cependant cet appareil ne peut pas être commandé par un autre appareil via le connecteur HDMI Les signaux audio du connecteur HDMI y compris la fréquence d échantillonnage le nombre de canaux et la longueur de bits peut être limité par l appareil connecté Parmi les moniteurs qui acceptent le HDMI certains ne prennent pas en c...

Page 151: ...soit en marche Vous ne pouvez pas enregistrer une chaîne tout en en regardant une autre Les câbles fournis utilisés dans cette connexion sont les suivants 1 câble coaxial RF 1 câble audio RCA L R 1 câble vidéo RCA Achetez les autres câbles nécessaires dans un magasin local Raccordement à un décodeur diffusion par câble ou satellite IN VIDEO IN AUDIO IN L1 S VIDEO AUDIOOUT L R VIDEO OUT R L IN VIDE...

Page 152: ...les autres câbles nécessaires dans un magasin local Raccordement à un téléviseur sans prises audio vidéo arrière de votre modulateur RF non fourni IN IN OUT VIDEO IN AUDIO IN L1 S VIDEO S VIDEO AUDIOOUT OUT L R VIDEO OUT Y ANTENNA R L COAXIAL AUDIO IN TO TV ANT IN L R CHANNEL 4 3 VIDEO IN ANT IN Réglez le canal 3 ou 4 arrière de l appareil AUDIOOUT L R VIDEO OUT IN OUT ANTENNA Réglez le canal 3 ou...

Page 153: ... et 111 COAXIAL arrière de l appareil Décodeur Dolby Digital câble audio numérique coaxial prise d entrée audio numérique coaxiales IN IN OUT VIDEO IN AUDIO IN L1 S VIDEO S VIDEO AUDIOOUT OUT L R VIDEO OUT Y ANTENNA R L COAXIAL COAXIAL HDMI OUT Récepteur amplificateur AV avec prise d entrée HDMI HDMI IN câble HDMI IN IN OUT VIDEO IN AUDIO IN L1 S VIDEO S VIDEO AUDIOOUT OUT L R VIDEO OUT Y ANTENNA ...

Page 154: ...de d emploi de votre téléviseur pour plus d informations Si vous avez allumé l appareil depuis plus de 10 minutes vous pouvez voir l écran de veille MAGNAVOX au lieu du menu Initial Setup Écran de veille MAGNAVOX 4 Passez à l étape 2 de RÉGLAGES INITIAUX en page 28 Recherche de la chaîne de visionnement sur votre téléviseur Remarques La sélection de l entrée vidéo varie selon les différents modèle...

Page 155: ...s est affiché sur plus de 6 lignes utilisez K L pour le faire défiler Aucune description fournie est affiché quand le guide des programmes n est pas fourni 2 59 44 3 31 31 10 42AM 10 10AM 7 10AM CH 10 7 6 5 4 4 4 3 4 2 4 1 1 Heure de début de l enregistrement automatique 2 État de l enregistrement automatique Live Indique que les programmes sont regardés en direct B Indique que l enregistrement au...

Page 156: ...erche Audio Sous titre Angle Lecture répétée Marque Réduction du bruit Zoom Surround 6 Indique le numéro de titre courant le nombre total de titres le numéro de chapitre courant le nombre total de chapitres et la durée de lecture du titre courant la durée totale du titre 7 Indique le composant utilisé DD DVD Informations Menu DD DVD Information sur le nom du titre Nom du Titre Mon titre Informatio...

Page 157: ... audio un CD vidéo un CD RW R contenant des fichiers MP3 JPEG kodak Picture CD est inséré dans l appareil Réglage Programmation Liste titres Edition d un disque Menu HDD Réglage général Doublage Mode lecture disque 1 1 2 2 3 3 4 4 4 5 4 6 4 7 Menu Réglage général Réglage général Lecture Affichage Vidéo Enregist Horloge Canal HDMI RAZ Blocage parental Disque audio Langue du menu disque Langue audio...

Page 158: ... disque permettant de sélectionner le type de contenu à lire 9 Panorama fichiers JPEG kodak Picture CD seulement Vous permet de sélectionner la durée d affichage du mode panorama 10 Suppr tous titres Vous permet de supprimer tous les titres de la liste des titres du DD y compris les titres protégés 11 Suppr titres non protégés Vous permet de supprimer tous les titres non protégés de la liste des t...

Page 159: ...t prendre quelques instants Pour éjecter le disque Appuyez sur OPEN CLOSE A pour ouvrir le tiroir du disque puis retirez le avant de placer l appareil en mode veille Lors de l insertion d un DVD RW DVD RW vierge l appareil démarre automatiquement son formatage Si le disque contient déjà des titres la liste des titres est affichée Appuyez sur STOP C pour sortir de la liste des Comment insérer un di...

Page 160: ... et mémorisées Seules les chaînes recevables dans la zone seront mémorisées Câble Analogique Lors de l utilisation du câble de base Les chaînes diffusées en CATV analogique sont automatiquement balayées et mémorisées Câble Analogique Numérique Lors de l utilisation du câble de base Les chaînes diffusées en CATV analogique et CATV numérique sont automatiquement balayées et mémorisées Prér auto inst...

Page 161: ...us utilisez une antenne aérienne sélectionnez Antenne Si vous êtes connecté à la CATV sélectionnez Câble Analogique ou Câble Analogique Numérique Pour annuler le préréglage auto des chaînes pendant le balayage Appuyez sur RETURN pour revenir à l écran précédent ou sur SETUP pour annuler 5 Une fois le balayage terminé appuyez sur SETUP pour quitter Pour ne parcourir que les chaînes mémorisées utili...

Page 162: ... vous supprimez des chaînes TV CATV numériques allez à NUMÉRIQUE pour continuer Ajout suppression de chaînes RÉGLAGE DES CHAÎNES Vous pouvez ajouter ou supprimer des chaînes de télévision si votre éventail de chaînes change ou si vous ne regardez plus certaines chaînes L ajout de chaînes n est possible que pour les chaînes de télévision analogiques N oubliez pas Vous exécutez le Balayage auto des ...

Page 163: ...ÉRIQUE 5 Sélectionnez le numéro de chaîne à supprimer Seule la chaîne principale est affichée dans le menu Préréglage manuel des canaux Le numéro de chaîne affiché entre parenthèses est un numéro de chaîne virtuelle Utilisez CHANNEL pour ne parcourir que les chaînes mémorisées Vous ne pouvez pas utiliser B pour la sélection d une chaîne TV numérique Utilisez les touches numérotées pour sélectionne...

Page 164: ...Appuyez sur STANDBY ON y y pour placer l appareil en mode veille L appareil recherche l heure uniquement lorsqu il est en mode veille Laissez l appareil en veille pendant quelques minutes pour lui donner le temps de régler l heure Réglage auto de l horloge Cet appareil peut régler automatiquement l heure et la date en se référant à une station PBS N oubliez pas Les connexions d antenne de télévisi...

Page 165: ...utilisez K L pour sélectionner Réglage général puis appuyez sur OK Le menu Réglage général apparaît 2 Utilisez K L pour sélectionner Horloge puis appuyez sur OK Le menu Horloge apparaît 3 Utilisez K L pour sélectionner Réglage horloge puis appuyez sur OK 4 Utilisez K L pour sélectionner le calendrier ou l heure puis appuyez sur OK Réglage horloge JAN 01 2009 JEU 12 00 AM 5 Utilisez B pour sélectio...

Page 166: ...condaire 1 6 Si vous saisissez 1 chiffre pour la chaîne principale et le laissez pendant 2 secondes il sera pris comme chaîne principale et sa première chaîne secondaire sera affichée Si aucune chaîne secondaire n est saisie la première chaîne secondaire de la chaîne principale sera affichée Remarques Cela peut prendre de 5 à 7 secondes pour commuter les chaînes TV numériques En diffusion TV numér...

Page 167: ... audio que vous avez sélectionnée est enregistrée Remarques Vous ne pouvez pas changer la langue audio de l enregistrement programmé de la diffusion de télévision numérique Une pression sur AUDIO ne commande pas l audio d un appareil externe Si la diffusion ne contient qu une seule chaîne audio une pression sur AUDIO ne déclenche aucun affichage Sélection du l audio de TV TV numérique Cette sectio...

Page 168: ...nalogique Quand vous enregistrez un programme de TV analogique disponible en audio secondaire ou stéréo vous devez préalablement sélectionner Stéréo ou SAP dans le menu Réglage général Consultez le tableau suivant pour vérifier la validité du réglage Audio sélectionné Audio diffusé Enregistrement de disques Sortie audio Stéréo STÉRÉO SAP STÉRÉO STÉRÉO STÉRÉO STÉRÉO STÉRÉO MONO SAP MONO MONO MONO M...

Page 169: ...s DTV de votre choix puis appuyez sur OK Serv sous titres HF Service1 Service2 Service3 Service4 Service5 Service6 HF Sélectionnez cette option si vous ne voulez pas de ST DTV C est l option par défaut Service 1 à Service 6 Sélectionnez l une de ces options avant de modifier tout autre élément du menu des sous titres Choisissez en général Service 1 6 Appuyez sur SETUP pour quitter RÉGLAGES DU TUNE...

Page 170: ...e Police Style Police Opacité Police Couleur Police Type Bord Couleur Bord Opacité Arrière Couleur Arrière 5 Utilisez K L pour sélectionner EF puis appuyez sur OK Param Utilis EF HF RÉGLAGES DU TUNER Style des sous titres TV numérique La TV numérique peut également modifier le style de ses sous titres y compris le caractère la couleur ou la taille etc Les instructions continuent à la page suivante...

Page 171: ... Opacité Police L opacité des caractères des sous titres affichés peut être choisie comme suit Opacité Police Plein Transparent Translucide Clignotement Couleur Police La couleur des caractères des sous titres affichés peut être choisie comme suit Couleur Police Blanc Noir Rouge Vert Bleu Jaune Magenta Cyan Type Bord Le type de bord des sous titres affichés peut être choisi comme suit Type Bord Au...

Page 172: ...16x SONY DVD R 4x 8x 16x DVD RW 4x TDK DVD R 4x 8x 16x Les performances ne sont pas garanties sur d autres disques Vous pouvez lire un DVD RW sur la plupart des lecteurs de DVD sans le finaliser Cependant si vous avez ajouté ou supprimé des chapitres ou créé des chapitres cachés vous devez exécuter Rendre les éditions compatibles avant de voir ces effets sur d autres appareils Consultez la page 97...

Page 173: ...rogramme protégé contre la copie avec cet appareil Un signal de protection contre la copie est inclus dans les DVD vidéo et certaines diffusions par satellite Vous ne pouvez pas enregistrer un programme à copie unique sur DVD Mode d enregistrement Le DD est un appareil spécial qui dispose d une haute densité d enregistrement et qui convient à l enregistrement de longue durée ou à la recherche à gr...

Page 174: ...onner Réglage général puis appuyez sur OK Le menu Réglage général apparaît 2 Utilisez K L pour sélectionner Enregist puis appuyez sur OK Le menu Enregist apparaît 3 Utilisez K L pour sélectionner Chapitre Auto puis appuyez sur OK 4 Utilisez K L pour sélectionner l option de durée choisie puis appuyez sur OK Chapitre Auto HF 5 minutes 10 minutes 15 minutes 30 minutes 60 minutes 5 Appuyez sur SETUP ...

Page 175: ...arre dans les 15 minutes Si le disque contient des titres déjà enregistrés leur liste est affichée Appuyez sur STOP C pour quitter la liste des titres 2 Appuyez plusieurs fois sur REC MODE pour sélectionner un mode d enregistrement Consultez Mode d enregistrement en page 41 DVD SP 2Hr 0h58m 3 Sélectionnez le canal d entrée externe appropriée en appuyant sur SOURCE ou CHANNEL Appuyez sur DTV TV pou...

Page 176: ...t d un programme de télévision vous devez sélectionner préalablement l audio de chaîne de télévision Seul le canal audio sélectionné sera enregistré Consultez Sélection du l audio de TV aux pages 35 36 pour plus d informations Cet appareil ne peut pas enregistrer en stéréo et en SAP programme audio secondaire de même durée Vous ne pouvez pas modifier le mode d enregistrement pendant la suspension ...

Page 177: ...de 6 heures les nouvelles données effacent les anciennes Remarques Lors d un enregistrement automatique si vous affichez les informations du programme DTV les informations sont enregistrées en tant que partie de l image S il n y a pas assez d espace libre sur le DD pour enregistrer à partir du point sélectionné jusqu au point courant vous ne pouvez pas enregistrer le contenu de l enregistrement au...

Page 178: ...Date Début Fin CH FÉV 20 10 30AM 11 30AM DTV69 1 Nouv prog FÉV 20 09 10 30 AM 69 1 SP 1 5 3 4 2 6 1 Titre d un programme différé Contient la date la durée la chaîne le mode d enregistrement du programme 2 Date et heure actuelles 3 Mode d enregistrement et durée de l enregistrement 4 Liste des programmes différés 5 Nombre total de pages et page actuelle 6 pages au maximum 6 Support d enregistrement...

Page 179: ...lectionnez le mode d enregistrement Date FÉV 20 ENR sur Mode DVD SP Début Fin CH 1h00m DTV69 1 11 30AM 10 30AM SP Sélection automatique du mode d enregistrement Lorsque Auto est sélectionné comme mode d enregistrement l appareil calcule la durée disponible sur le disque et sélectionne le meilleur mode d enregistrement disponible automatiquement pour enregistrer complètement le programme Date FÉV 2...

Page 180: ...hés Un programme avec numéro d erreur est grisé dans la liste de programmation en différé Le programme différé présentant un numéro d erreur est effacé lorsque l écran d entrée du programme est affiché 1 PCA est un espace réservé sur le disque pour tester l enregistrement Sélection d un numéro de chaîne pour l enregistrement programmé TV analogique Pour les numéros de chaîne 2 6 appuyez sur B ou a...

Page 181: ... Deux minutes avant l heure de début pendant un enregistrement standard ou express l enregistrement en cours est arrêté La lecture d un DVD CD est impossible 2 minutes avant l heure de début programmée si le support d enregistrement est un DVD 2 minutes avant l heure de début programmée la lecture d un DVD est arrêtée La programmation différée dont l heure de début échoit d abord est placée en pre...

Page 182: ...ar l enregistrement démarre Le compteur de durée écoulée démarre 8 Appuyez sur STOP C pour arrêter l enregistrement Le nom du titre est également écrasé Cette opération peut prendre quelques minutes Vous pouvez écraser le titre existant à partir de la position sélectionnée 1 Suivez les étapes 1 2 et 4 sur la gauche 2 Appuyez sur K L pour sélectionner Lecture puis appuyez sur OK La lecture démarre ...

Page 183: ...xistant écrasement à partir du début du titre enregistrement d écrasement A titre existant B après écrasement Lors de l écrasement au milieu du titre Entre 30 et 180 secondes seront coupées Entre 30 et 180 secondes seront coupées titre existant B après écrasement enregistrement d écrasement A titre existant B titre existant C après écrasement nom du titre A nom du titre A nom du titre B nom du tit...

Page 184: ...ment disponible sur le disque est trop limité Remarque sur la copie Lors d une copie normale vous pouvez visionner l image lue du titre copié l audio ne peut pas être modifié Cependant lors de la copie à grande vitesse l image lue n apparaît La copie d un programme à copie unique n est pas possible avec cet appareil Si vous arrêtez la copie à mi chemin le contenu sera copié jusqu au moment où vous...

Page 185: ... IN AUDIO IN L1 S VIDEO S VIDEO AUDIOOUT OUT L R VIDEO OUT Y ANTENNA R L COAXIAL AUDIO OUT L R VIDEO OUT S VIDEO OUT AUDIO OUT DV OUT L R VIDEO OUT S VIDEO OUT avant de l appareil arrière de l appareil VIDEO IN AUDIO IN L1 S VIDEO S VIDEO AUDIOOUT COMPONENT VIDEO OUT IN OUT L R L R Y PB CB PR CR VIDEO OUT VIDEO IN AUDIO IN L1 S VIDEO IN L R appareil externe caméscope VCR etc câble S vidéo câble S ...

Page 186: ...us pouvez également sélectionner la chaîne L1 ou L2 avec les touches numérotées p ex Pour L1 appuyez sur 0 0 1 3 Appuyez plusieurs fois sur REC MODE pour sélectionner le mode d enregistrement Consultez Mode d enregistrement en page 41 4 Appuyez sur IRECORD sur l appareil afin de démarrer l enregistrement 5 Démarrez la lecture sur l appareil externe que vous voulez enregistrer 6 Appuyez sur CSTOP s...

Page 187: ...ommander cet appareil Sélectionnez DVC pour commander votre DVC 3 Enregistrement en mode audio Un autre appareil le DVC est en mode arrêt Audio DV peut être sélectionné Appuyez sur OK pour afficher la sélection des éléments puis utilisez K L pour sélectionner l audio que vous souhaitez envoyer Appuyez à nouveau sur OK pour l activer Sélectionnez Stéréo1 pour repiquer un son stéréo Sélectionnez Sté...

Page 188: ...uyez sur OK pour afficher la sélection des éléments Utilisez K L pour sélectionner Entrée DV puis appuyez sur OK L3 DV ENTRÉE AB 1234 0 12 34 1 1 1 1 RW DVD HQ 1Hr 1h00m DVD DV Input 5 Appuyez sur PLAY B pour trouver l endroit où vous souhaitez commencer la copie Puis appuyez sur STOP C à l endroit où vous souhaitez commencer la copie Avant l enregistrement d un DVC consultez les instructions de b...

Page 189: ...écran du téléviseur L enregistrement reprend quand l appareil détecte à nouveau le signal vidéo Quand le DVC est en mode caméra consultez le Guide de la DV et de l affichage à l écran en page 55 La date l heure et les données de la mémoire de la cassette ne seront pas enregistrées Les images comportant un signal de protection contre la copie ne peuvent pas être enregistrées Une borne DV est une bo...

Page 190: ... DVD vers DD Utilisez K L pour sélectionner DVD HDD puis appuyez sur OK p ex DD DVD HDD DVD DVD HDD Doublage 4 Utilisez K L pour sélectionner Ajouter puis appuyez sur OK HDD DVD 1 1 3000 MB Liste doubl Ajouter Suppr tout Début montage Si vous avez enregistré des copies précédentes elles seront répertoriées dans la liste des titres copiés COPIE OPEN CLOSE SOURCE HDMI ABC GHI PQRS TUV SETUP REPEAT D...

Page 191: ...ntage dans le menu de copie puis appuyez sur OK 8 Utilisez s B pour sélectionner le mode d enregistrement de votre choix puis appuyez sur OK p ex DD DVD HDD DVD 3000 MB 500 MB Copie titres Choisir REC MODE LP EP SLP Auto Haut HQ SP SPP Le message de confirmation apparaît Le mode d enregistrement disponible change en fonction du sens de la copie Lors de la copie de DD vers DVD vous pouvez sélection...

Page 192: ... Utilisez K L pour sélectionner Oui puis appuyez sur OK Démarrer copie Oui Non La copie du titre sélectionné démarre Pour arrêter la copie en cours Appuyez sur CSTOP en façade Appuyez sur la touche STOP C de la télécommande pendant 2 secondes COPIE Cette fonction vous permet de sélectionner un titre donné dans la liste des titres en vue de sa copie OPEN CLOSE SOURCE HDMI ABC GHI PQRS TUV SETUP REP...

Page 193: ...elques minutes Pour éviter un enregistrement une édition ou un effacement des titres accidentels vous pouvez les protégez dans le menu Edition d un disque Remarques Pour annuler la protection du disque Quand vous insérez un disque protégé avec cet appareil Protection de disque EF HF apparaît à la place de HF EF dans l étape 3 Edition d un disque Nom du disque édité Disque effacé Permet édit Compat...

Page 194: ...ut prendre quelques minutes 5 La finalisation est achevée Vous devrez finaliser les DVD R DVD RW et DVD R pour les lire sur d autres lecteurs de DVD La finalisation peut prendre de plusieurs minutes jusqu à une heure Une durée d enregistrement courte sur le disque demandera une durée de finalisation plus longue Ne débranchez pas le cordon secteur pendant la finalisation Remarques Lorsque vous avez...

Page 195: ...n Fin enr x minut 5 Utilisez K L pour sélectionner EF puis appuyez sur OK p ex Disque plein Disque plein EF HF Votre réglage sera activé 6 Appuyez sur SETUP pour quitter Vous pouvez finaliser automatiquement les disques avec cette fonction Vous pouvez utiliser cette fonction pour finaliser les disques à la fin d un enregistrement programmé ou lorsque la fin de l espace disque est atteinte Finalisa...

Page 196: ...es de couleur Cet appareil a été conçu pour lire les DVD de la zone 1 Un DVD doit être étiqueté pour ALL les zones ou pour la zone 1 afin de pouvoir être lu par ce lecteur de DVD Il est impossible de lire les DVD étiquetés pour d autres zones Repérez sur votre DVD les symboles présentés à droite Si ces symboles de zone n apparaissent pas sur le DVD il est impossible de le lire dans cet appareil Le...

Page 197: ...ne peuvent pas être effectuées si la fonction PBC est active Annulez temporairement la fonction PBC pour effectuer ces opérations en suivant les instructions ci dessous 1 Appuyez sur SETUP 2 Utilisez K L pour sélectionner Mode lecture disque puis appuyez sur OK Le menu Mode lecture disque apparaît 3 Utilisez K L pour sélectionner PBC CD vidéo uniquement puis appuyez sur OK 4 Utilisez K L pour séle...

Page 198: ...nction PBC un menu peut apparaître Consultez Utilisation du menu titre disque en page 70 3 Appuyez une fois sur STOP C pour interrompre momentanément la lecture Consultez Reprise de la lecture en page 71 Remarques Certains disques peuvent démarrer la lecture automatiquement Vous pouvez sélectionner les images ou les informations dans le menu à l écran en activant la fonction PBC playback control c...

Page 199: ...ENU Pour quitter la liste des titres appuyez sur STOP C Pour rappeler la liste des titres appuyez sur TITLE 3 Utilisez K L s B pour sélectionner le titre de votre choix puis appuyez sur OK Liste des titres du DD Liste titres 1 6 JAN 1 09 12 00AM CH10 SP 12 00AM 1 00 00 JAN 1 09 CH10 SP 1 4 5 6 2 3 Liste des titres d un DVD 1 SP 2Hr 2 3 NOV 21 09 11 00AM CH12 SP NOV 21 09 0 20 44 NOV 22 09 11 35AM ...

Page 200: ...es TITRE VIDE 4 Durée totale de l espace enregistré sur le disque 5 État de la protection du disque EF indique un disque protégé 6 Rendre les éditions compatibles finaliser Quand un DVD RW est inséré Si le disque a besoin de Rendre les éditions compatibles Nécessaire est affiché Sinon Rendre les éditions compatibles Consultez la page 97 Quand un DVD R DVD RW ou DVD R est inséré Si la Fermeture est...

Page 201: ...nner le dossier ou pistes fichier de votre choix puis appuyez sur OK p ex Liste des fichiers Liste des fichiers NOM DU DISQUE 1 2 Dossier 1 Dossier 2 Fichier JPEG 1 Fichier JPEG 2 Fichier JPEG 3 Fichier JPEG 4 Fichier JPEG 5 Fichier JPEG 6 Lors de la sélection d un pistes fichier La lecture démarre Lors de la sélection du dossier Non disponible pour un CD audio Les fichiers du dossier apparaissent...

Page 202: ...illées en mode pause Consultez la page 105 Pause Kodak Picture CD Lecture d un CD audio et CD RW R avec des fichiers MP3 JPEG suite Le Picture CD est un service permettant de convertir en données numériques des photos prises avec un appareil argentique classique et de graver ces données sur un CD Vous pouvez visionner les photos sur le téléviseur en lisant les disques Picture CD Pour plus d inform...

Page 203: ...ers MP3 20x 2x 20x 5x 40x 40x Lecture à vitesse normale Pour un CD vidéo les vitesses avant arrière approximatives sont 2x 8x 16x Pour un CD audio les fichiers MP3 la vitesse approximative est fixée à 8x avec le son signalé par 2 Appuyez sur PLAY B pour reprendre la lecture normale Lecture rapide en avant en arrière La fonction de lecture rapide n est disponible que pendant la lecture Cette foncti...

Page 204: ...dant l enregistrement appuyez sur PLAY B La lecture du titre que vous enregistrez démarre au début La durée de lecture écoulée est affichée en façade 2 Appuyez une fois sur STOP C pour arrêter la lecture L affichage en façade affiche à nouveau la durée d enregistrement écoulée Si vous appuyez deux fois sur STOP C l enregistrement s arrête Lecture avec décalage temporel pendant un enregistrement Re...

Page 205: ... permet d affecter un point spécifique sur un titre afin de le rappeler ultérieurement 1 Appuyez sur DISPLAY pour accéder au menu d affichage pendant la lecture Si le menu d affichage est déjà ouvert passez à l étape 2 2 Utilisez B pour sélectionner puis appuyez sur OK pour afficher le menu de sélection p ex DVD vidéo 1 5 1 5 DVD 0 01 00 1 23 45 Video 3 Utilisez K L pour sélectionner le numéro de ...

Page 206: ...dre d origine 1 Appuyez sur SETUP 2 Utilisez K L pour sélectionner le Mode lecture disque puis appuyez sur OK Le menu Mode lecture disque apparaît Pour le format MP3 utilisez K L pour sélectionner Music puis appuyez sur OK Pour le format JPEG utilisez K L pour sélectionner Photo puis appuyez sur OK 3 Utilisez K L pour sélectionner Lecture au hasard puis appuyez sur OK La lecture aléatoire démarre ...

Page 207: ...ardez un programme de télévision en utilisant le tuner de cet appareil appuyez sur PAUSE F Le programme passe en pause et le son est mis en sourdine 2 Appuyez sur PLAY B pour reprendre le programme que vous regardiez à l endroit où vous l avez mis en pause Pour retourner au programme de télévision Lorsque vous regardez un programme de télévision en utilisant le tuner de cet appareil appuyez sur H ...

Page 208: ...erche titre chapitre heure est indiqué en tant que dénominateur 1 5 1 5 0 01 00 1 23 45 DVD Video nombre total de titres nombre total de chapitres durée totale de titre Recherche de titre de chapitre Utilisation de H G 1 Pendant la lecture appuyez sur G pour sauter les pistes fichiers courant et pour passer au suivant Les pistes fichiers sont parcourus en séquence Pour revenir au début de la piste...

Page 209: ... 05 00 Le numéro à côté de est sélectionné Pour passer au numéro en regard de appuyez sur B Si la recherche chronologique n est pas disponible et la durée ne sont pas affichés 3 Utilisez K L B ou les touches numérotées pour saisir l instant de votre choix à rechercher puis appuyez sur OK Après la recherche la lecture démarre automatiquement Remarques La recherche chronologique n est possible qu à ...

Page 210: ...s le menu des sous titres consultez CODE DE LANGUE en page 118 Si le DVD vidéo lu est enregistré avec au moins 2 pistes sonores elles sont souvent de langues différentes vous pouvez les parcourir pendant la lecture Lors de la lecture d un CD vidéo CD audio vous pouvez choisir L R stéréo L gauche ou R droite 1 Pendant la lecture appuyez sur DISPLAY puis passez à l étape 2 ou appuyez sur AUDIO et pa...

Page 211: ...ent être sur le boîtier du disque s il contient des scènes à plusieurs points de vue 1 Pendant la lecture appuyez sur DISPLAY Si le menu d affichage est déjà ouvert passez à l étape 2 2 Utilisez B pour sélectionner puis appuyez sur OK p ex DVD vidéo 1 5 1 5 DVD 0 01 00 1 23 45 Video L icône des angles apparaît si la commutation des angles de prise de vue est possible L angle change à chaque pressi...

Page 212: ...a seconde ligne 9 Mode d enregistrement Le mode d enregistrement actuellement sélectionné est affiché ici 10 Indicateur de capacité Il indique la position et le volume de chaque titre sur le disque L emplacement du titre sélectionné est mis en valeur Il peut ne pas indiquer la capacité précise du disque Si la durée d un titre est trop courte l indicateur de capacité peut ne pas le montrer 11 Image...

Page 213: ...r DVD 1 Appuyez sur TITLE 2 Utilisez K L pour sélectionner le titre désiré puis appuyez sur OK 1 2 3 NOV 21 09 11 00AM CH12 SP NOV 21 09 0 20 44 NOV 22 09 11 35AM CH13 EP NOV 22 09 0 10 33 TITRE VIDE 1 37 52 SP 2Hr SP 2Hr 3 Utilisez K L pour sélectionner Edition puis appuyez sur OK 1 2 3 NOV 21 09 11 00AM CH12 SP NOV 21 09 0 20 44 Recou écri NOV 22 09 11 35AM CH13 EP NOV 22 09 0 10 33 TITRE VIDE 1...

Page 214: ...2Hr Edition Lecture Vous pouvez supprimer un titre dont vous n avez plus besoin Sachez que les titres supprimés ne peuvent pas être restaurés sur le disque Remarques Sur un DVD RW DVD RW l espace disponible de disque augmente seulement lorsque le dernier titre enregistré de la liste des titres est supprimé Sur un DVD R DVD R l espace disque n est pas affecté La partie supprimée des titres change d...

Page 215: ...tion Effacer titre Editer titre Repère chapitre Indexer image Div titres Cach chap NOV 21 09 11 00AM CH12 SP 1 1 05 00 Le message de confirmation apparaît 5 Utilisez K L pour sélectioner Oui puis appuyez sur OK Le message final de confirmation apparaît Sélectionnez Oui puis appuyez sur OK Le titre est maintenant supprimé Liste titres 1 1 Titre 2 12 00AM 1 00 00 JAN 1 09 CH10 SP 1 4 5 2 3 1 2 3 TIT...

Page 216: ... apparaît 7 Utilisez K L pour sélectioner Oui puis appuyez sur OK Le message final de confirmation apparaît Sélectionnez Oui puis appuyez sur OK Les titres sont à présent supprimés Liste titres 1 1 Titre 1 12 00AM 1 00 00 JAN 1 09 CH10 SP 1 4 2 3 Pour enlever le symbole de corbeille du titre Sélectionnez le titre avec le symbole de corbeille puis appuyez sur OK Vous pouvez supprimer un titre dont ...

Page 217: ... en mode 2 Appuyez sur à le jeu de caractère passera automatiquement au mode d entrée précédent Pour supprimer des lettres appuyez plusieurs fois sur CLEAR Toutes les lettres sont effacées si vous maintenez CLEAR enfoncé Utilisez s B pour déplacer le curseur vers la gauche ou la droite Vous pouvez saisir jusqu à 30 lettres Remarques Les lettres non définies dans un nom de titre sont représentées p...

Page 218: ...elques minutes Vous pouvez mettre des marqueurs de chapitre dans chaque titre Lorsqu un chapitre est marqué vous pouvez l utiliser avec la fonction de recherche de chapitre Remarque sur l ajout ou la suppression des repères de chapitre Un titre peut contenir au maximum 99 repères de chapitres sur un DD DVD et le nombre maximum de repères de chapitres est illimité sur le DD 254 sur un DVD Si le nom...

Page 219: ... 3 Edition Repère chapitre 1 05 00 4 Utilisez K L pour sélectionner Effacer puis appuyez sur OK 5 Utilisez K L pour sélectionner Oui puis appuyez sur OK Edition Repère chapitre Effacer Non Oui NOV 21 09 11 00AM CH12 SP 1 Chapitre 2 3 F 1 05 00 Le repère de chapitre sélectionné est à présent supprimé Pour supprimer d autres repères de chapitre répétez les étapes 3 à 5 6 Appuyez une fois ou plusieur...

Page 220: ...CH12 SP 1 Chapitre 2 3 F 1 05 00 Le message final de confirmation apparaît Sélectionnez Oui puis appuyez sur OK Tous les repères de chapitre sont à présent supprimés Chapitre 2 3 Edition Repère chapitre NOV 21 09 11 00AM CH12 SP 1 Effacer Suppres tot Ajouter 1 05 00 5 Appuyez une fois ou plusieurs fois sur RETURN pour revenir à la liste des titres Les données sont écrites temporairement sur le dis...

Page 221: ... identiques et les images d index sont réinitialisées à la première scène de ce point Vous pouvez diviser un titre en 2 nouveaux titres Remarques Si un DD interne ou un DVD contient le nombre de titres maximum DD 600 DVD RW RW 49 vous ne pouvez plus diviser les titres Sur un DVD RW RW vous ne pouvez pas diviser les titres si le nombre total de chapitres atteint déjà 254 Lorsque vous recherchez un ...

Page 222: ...lection passe automatiquement à Fin 4 Lisez le titre jusqu où vous voulez définir le point final puis appuyez sur OK Edition Effacer scène Début Fin Aperçu Effacer JAN 1 09 12 00AM CH10 LP 1 1 30 00 Le point final est à présent défini et la sélection passe automatiquement à Aperçu La partie à supprimer est indiquée en rouge dans la barre de progression au bas de l écran Remarques Lorsque vous rech...

Page 223: ...finition Si le résultat vous satisfait passez à l étape 6 Avant l édition Édité point de départ point final 6 Utilisez K L pour sélectionner Effacer puis appuyez sur OK Edition Effacer scène Début Fin Aperçu Effacer JAN 1 09 12 00AM CH10 LP 1 1 30 00 7 Utilisez K L pour sélectionner Oui puis appuyez sur OK Edition Effacer scène Oui Non JAN 1 09 12 00AM CH10 LP 1 1 30 00 Le message final de confirm...

Page 224: ...e est maintenant protégé Si le titre est déjà protégé EF HF apparaît à la place Appuyez sur OK pour supprimer la protection du titre Le titre protégé sera identifié par l icône 4 Appuyez une fois ou plusieurs fois sur RETURN pour revenir à la liste des titres Afin d éviter une édition accidentelle ou l effacement de titres vous pouvez définir une protection dans le menu Edition ÉDITION OPEN CLOSE ...

Page 225: ...endre quelques minutes Si vous voulez régler des chapitres cachés sur Visible sélectionnez le chapitre à afficher Utilisez alors K L pour sélectionner Visible à l étape 4 dans la présente page Les données seront écrites momentanément sur le disque La liste des titres est alors affichée Remarques Caché sera affiché dans la fenêtre précédente pendant l aperçu du chapitre masqué Lorsque vous rendez t...

Page 226: ...z une fois ou plusieurs fois sur RETURN pour revenir à la liste des titres Les données sont écrites temporairement sur le disque Cette opération peut prendre quelques minutes Vous pouvez définir la scène de votre choix comme image d index pour chaque titre Remarques Si l image sélectionnée pour une image d index est écrasée l image d index est réinitialisée à la première scène du titre Lorsque vou...

Page 227: ...0 30 48 Protection de disque HF Permet édit Compatib Nécessaire 4 Pour saisir un nom de titre suivez les étapes du Guide de l édition des noms des titres en page 85 Lorsque vous avez terminé la saisie du nom d un titre appuyez sur OK 5 Utilisez K L pour sélectioner Oui puis appuyez sur OK Les données seront écrites momentanément sur le disque Cette opération peut prendre quelques minutes Le nom du...

Page 228: ...ur OK Lorsque vous appuyez sur Oui tous les contenus du disque seront effacés Etes vous certain d effacer le disque Oui Non Les données seront écrites momentanément sur le disque Cette opération peut prendre quelques minutes Le contenu du disque est à présent supprimé Vous pouvez effacer tous les titres d un disque Remarques Si vous sélectionnez Oui à l étape 4 tout le contenu du disque est effacé...

Page 229: ...acé Permet édit Compatib Protection de disque HF EF 4 Utilisez K L pour sélectioner Oui puis appuyez sur OK Activer Permet édit Compatib Oui Non Les données seront écrites momentanément sur le disque Cette opération peut prendre quelques minutes Si vous avez ajouté ou supprimé des chapitres ou créé des chapitres cachés vous devez exécuter Permet édit Compatib avant de voir ces effets sur un autre ...

Page 230: ...onnez Suppr tous titres si vous voulez supprimer tous les titres y compris ceux qui sont protégés Suppr tous titres Suppr titres non protégés Menu HDD 4 Utilisez K L pour sélectioner Oui puis appuyez sur OK Suppr titres entiers Oui Non Le message final de confirmation apparaît Sélectionnez Oui puis appuyez sur OK Les titres sont à présent supprimés ÉDITION OPEN CLOSE SOURCE HDMI ABC GHI PQRS TUV S...

Page 231: ...angue des sous titres Icône de L angle EF HF Choisit d afficher ou non l icône de l angle Arrêt Sur Image Auto Trame Image Définit le type d image fixe lors de la suspension de la lecture Saut Répet variable Saut variable 5 secondes 15 secondes 30 secondes 1 min 5 minutes Définit la durée du saut lorsque vous appuyez sur V SKIP Relect variable 5 secondes 15 secondes 30 secondes 1 min 5 minutes Déf...

Page 232: ...enta Cyan Définit la couleur de bord des sous titres affichés Opacité Arrière Plein Transparent Translucide Clignotement Définit l opacité du fond des sous titres affichés Couleur Arrière Blanc Noir Rouge Vert Bleu Jaune Magenta Cyan Définit la couleur du fond des sous titres affichés V Chip Cote MPAA X NC 17 R PG 13 PG G NR Règle le contrôle de visionnage en fonction de la classification américai...

Page 233: ...e Auto Page 42 HF 5 minutes 10 minutes 15 minutes 30 minutes 60 minutes Insère les marqueurs de chapitres à intervalles réguliers Final auto Page 63 Disque plein EF HF Règle l appareil pour finaliser automatiquement le disque Fin enr x minut EF HF Enr Compatible Page 42 EF HF Interdit un enregistrement complémentaire HF ou remplace la liste de titres après l enregistrement EF Horloge Pages 32 33 R...

Page 234: ... 7 8 Blocage parental Disque audio Langue du menu disque Langue audio Langue sous titre Icône de L angle Arrêt Sur Image Saut Répet variable Le sous menu apparaît 4 Consultez 1 à 8 aux pages 103 105 et réglez l élément sélectionné 5 Une fois les réglages terminés appuyez sur SETUP pour quitter Lecture RÉGLAGES OPEN CLOSE SOURCE HDMI ABC GHI PQRS TUV SETUP REPEAT DISPLAY AUDIO DISC MENU RETURN TITL...

Page 235: ...nregistrez le mot de passe en cas d oubli Si un DVD est dans l appareil quand vous configurez le contrôle parental appuyez sur OPEN CLOSE A pour activer le niveau de contrôle parental A Vous n avez pas encore défini de mot de passe Utilisez K L pour sélectionner Oui Utilisez les touches numérotées pour entrer un nouveau mot de passe à l exception de 4737 puis appuyez sur OK Changer MP Oui Non Sais...

Page 236: ...ême si vous sélectionnez 96kHz le son est échantillonné à 48 kHz RÉGLAGES Lecture suite C Dolby Digital Par défaut Flux Utilisez K L pour sélectionner un réglage puis appuyez sur OK Dolby Digital PCM Flux Votre réglage sera activé PCM Convertit le Dolby Digital en PCM 2 canaux Si votre amplificateur décodeur n est PAS compatible avec le Dolby Digital choisissez PCM Flux Envoie les signaux Dolby Di...

Page 237: ... K L pour sélectionner un réglage puis appuyez sur OK Icône de L angle EF HF Votre réglage sera activé 7 Arrêt Sur Image Par défaut Auto DVD seulement Sélectionnez généralement Auto Utilisez K L pour sélectionner un réglage puis appuyez sur OK Arrêt Sur Image Auto Trame Image Votre réglage sera activé Auto Le réglage de résolution optimale Trame ou Image sera sélectionné Trame Les images en arrêt ...

Page 238: ...r quitter RÉGLAGES Affichage OPEN CLOSE SOURCE HDMI ABC GHI PQRS TUV SETUP REPEAT DISPLAY AUDIO DISC MENU RETURN TITLE WXYZ CLEAR SPACE JKL MNO DEF OK DVD HDD D DUBBING V REPLAY V SKIP RAPID PLAY REC REC MODE TIMER DTV TV STANDBY ON CHANNEL OK SETUP ABC GHI PQRS TUV WXYZ SPACE JKL MNO DEF 1 Langue ASE Par défaut English Définit la langue de l affichage à l écran Utilisez K L pour sélectionner un r...

Page 239: ...nt EN CA D Classement FR CA Vous pouvez définir le contrôle de visionnage en vous basant sur Cote MPAA applicable aux films aux États Unis Cote TV applicable aux programmes TV aux États Unis Canadian EN CA système canadien de classification des émissions en langue anglaise Canadian FR CA système canadien de classification des émissions en langue française 1 À l aide des touches K L sélectionnez le...

Page 240: ...s les informations de cotes téléchargeables le message ci dessous apparaît La cote téléchargée n est actuellement pas disponible Ce message apparaîtra également si vous tentez d accéder aux cote tèlèchargèe après avoir effacé les informations des cotes téléchargées et si aucune nouvelle information n a été téléchargée depuis Activation de l évaluation Utilisez K L pour sélectionner Réglage du bloc...

Page 241: ... sur OK 3 Utilisez K L pour sélectionner l élément désiré puis appuyez sur OK Balayage progressif Aspect TV Entrée vidéo 1 2 3 Le menu de sélection apparaît 4 Consultez 1 à 2 en page 110 et réglez l élément sélectionné Pour 3 consultez la page 53 5 Une fois les réglages terminés appuyez sur SETUP pour quitter OPEN CLOSE SOURCE HDMI ABC GHI PQRS TUV SETUP REPEAT DISPLAY AUDIO DISC MENU RETURN TITLE...

Page 242: ...omposantes vidéo disponible dans le commerce pour connecter cet appareil à la TV Refer to pages 17 18 Sinon utilisez le câble vidéo RCA et réglez le balayage progressif sur HF ou enfoncez et maintenez SETUP pendant plus de 3 secondes pendant la lecture DD DVD Si vous sélectionnez Non ou que vous n appuyez sur aucune touche de l appareil dans les 15 secondes à l étape 3 l exploration progressive re...

Page 243: ... plage RVB afin d éclaircir les zones foncées des images HDMI Utilisez K L pour sélectionner un réglage puis appuyez sur OK Sélectionnez Ehance si le contraste noir blanc n est pas net Ce réglage est efficace seulement pour la sortie HDMI RVB Plage RVB Normal Ehance Votre réglage sera activé 4 Commande HDMI Réglé sur HF par défaut Commande HDMI EF HF La commande HDMI permet au système de commander...

Page 244: ...r OK Etes vous sur Oui Non Vos réglages d enregistrement seront initialisés RAZ Remarques Les réglages répertoriés ci dessous ne seront pas modifiés même après la réinitialisation des valeurs d usine par défaut Réglage de la langue de l OSD Réglage des chaînes Réglage de l horloge Réglage du blocage parental Réglage du V Chip Informations de programmation en différé OPEN CLOSE SOURCE HDMI ABC GHI ...

Page 245: ... de courant ou de débranchement pendant l enregistrement la finalisation le formatage ou l édition même après la disparition de Réparation un processus de réparation démarre automatiquement immédiatement après une nouvelle mise sous tension de l appareil Il peut prendre de plusieurs minutes à plusieurs heures Si vous avez l intention d abandonner le processus de réparation Réparation Voulez vous a...

Page 246: ...ur SOURCE Allumez tous les appareils connectés Contrôlez que toutes les connexions sont correctes et fermes DD DVD L enregistrement est impossible Il est impossible d effectuer un enregistrement 2 minutes avant l heure de début d un enregistrement programmé Cet appareil ne peut pas enregistrer les programmes contenant un signal de protection contre la copie Il ne s agit pas d un défaut de fonction...

Page 247: ...la lecture sur DD et démarre l écriture des données sur le DVD Il ne s agit pas d un défaut de fonctionnement DVD La lecture est impossible Vérifiez que le disque inséré est lisible Vérifiez que le disque est chargé correctement avec son étiquette sur le dessus Les disques créés sur d autres appareils ou sur des PC ne peuvent pas être lus sur cet appareil s ils ne sont pas finalisés sur l appareil...

Page 248: ...nt finalisés S il s agit d un DVD RW annulez la finalisation en exécutant les étapes de la page 62 La capacité du disque n augmente pas même si le programme enregistré est supprimé Avec un DVD RW DVD RW l espace disque n augmente que lorsque le dernier titre est supprimé Avec les disques DVD R DVD R la suppression d un titre n augmente pas l espace disponible La copie est impossible Vérifiez que l...

Page 249: ...e qui n a pas d espace pour un enregistrement Insérez un disque enregistrable comportant un espace enregistrable suffisant Erreur d enregistrement Vous ne pouvez enregistrer plus de 49 titres sur un disque Le maximum est 49 Vous essayez d enregistrer sur un disque comportant le nombre maximal de titres 49 Effacez les titres inutiles pages 82 83 Erreur d enregistrement Vous ne pouvez enregistrer pl...

Page 250: ...66 Japonais 5647 Javanais 5669 Kachméré 5765 Kannara 5760 Kazakh 5757 Kinyarwanda 6469 Kirghiz 5771 Kiroundi 6460 Kurde 5767 Laotien 5861 Latin 5847 Latvien Letton 5868 Lingalais 5860 Lituanien 5866 Macédonien 5957 Malais 5965 Malayalam 5958 Malgache 5953 Maltais 5966 Maori 5955 Marathi 5964 Moldave 5961 Mongol 5960 Nauru 6047 Népalais 6051 Norvégien 6061 Occitan 6149 Oromo Afan 6159 Ouolof 6961 O...

Page 251: ...est élevé meilleure est la qualité de l image HDMI interface multimédia à haute définition C est une interface numérique vers la source audio et vidéo Elle peut transmettre la vidéo composite l audio et un signal de contrôle sur une seule connexion par câble JPEG joint photographic experts group Le JPEG est une méthode de compression des fichiers d images fixes Vous pouvez copier des fichiers JPEG...

Page 252: ...kHz Dolby Digital Syntoniseur Système de syntonisation Système de syntonisation par synthétiseur de fréquence Couverture des chaînes ATSC NTSC Terrestre CATV VHF 2 13 UHF 14 69 2 13 A W W 1 W 94 analogue W 1 W 84 A 5 A1 5A Bornes Arrière Entrée audio Prise RCA x 2 2 V eff impédance d entrée supérieure à 22 kΩ Entrée vidéo Prise RCA x 1 1 Vp p 75 Ω Entrée S vidéo 4 miniprises DIN x 1 Y 1 Vp p 75 Ω ...

Page 253: ...121 121 FR Enregistrement Lecture Édition Introduction Connexions Configuration de base Réglage des fonctions Autres MÉMO ...

Page 254: ...122 122 FR MÉMO ...

Page 255: ...123 123 FR Enregistrement Lecture Édition Introduction Connexions Configuration de base Réglage des fonctions Autres MÉMO ...

Page 256: ...NSTRATION OU LES MODÈLES EN MONTRE FUNAI CORP ET SES REPRÉSENTANTS OU AGENTS NE SERONT DANS AUCUN CAS RESPONSABLES POUR TOUS DOMMAGES GÉNÉRAUX INDIRECTS OU CONSÉQUENTIELS SUITE À L UTILISATION OU À L ABSENCE D UTILISATION DE CE PRODUIT CETTE GARANTIE EST TENANT LIEU DE TOUTES AUTRES GARANTIES EXPRÈSSES OU TACITES ET DE TOUTES AUTRES RESPONSABILITÉS DE LA PART DE FUNAI CORP TOUTES AUTRES GARANTIES ...

Reviews: