


1
Insert a cassette
tape into this unit.
2
To start playback
3
To stop playback
4
To eject the
cassette tape
Printed in China
E8E63UD
1VMN26473
★★★★★
VCR Playback
Remote Control
8
Before:
Turn on the TV.
Quick Use Guide
STANDBY-ON
OPEN/CLOSE
DISPLAY
VCR
DVD
MODE
TRACKING
PLAY
STOP
RECORD
NEXT
PREV
PAUSE
DISC MENU
TITLE
SEARCH
AUDIO
SETUP
ZOOM
ANGLE
SUBTITLE
OK
REPEAT
A-B
SPEED
TIMER SET
1
2
3
4
5
6
7
8
9
0
+10
RETURN
CLEAR
INPUT
6
VCR
VCR
DVD/CD Playback
7
Before:
Turn on the TV, amplifier and any other
components which are connected to
this unit. Make sure the TV and audio
receiver (not supplied) are set to the
correct channel.
DV
DVD
1
2
Insert a disc with
label facing up.
3
To start playback
4
To stop playback
PLAY
STOP
STANDBY-ON
OPEN/CLOSE
PLAY
STOP
OPEN/CLOSE
cut here
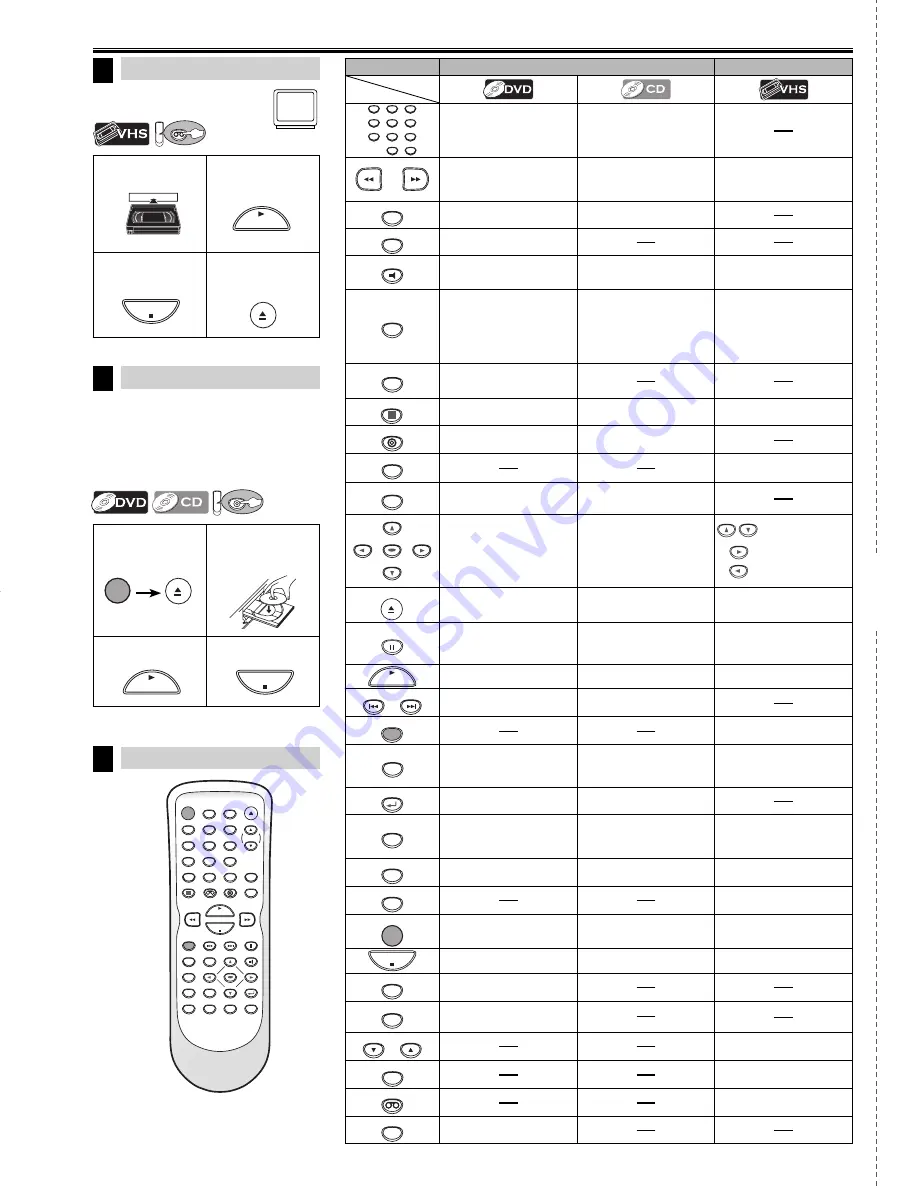
DVD mode
VCR mode
1
2
3
4
5
6
7
8
9
0
+10
• To select chapter or title
directly.
• To select track directly.
• To search forward/backward
through a disc.
• To begin slow forward/reverse
playback in the pause mode.
• To search forward/backward
through a disc.
• To forward/backward a tape.
• To begin slow forward
playback in the pause mode.
A-B
• To repeat between your chosen
point of A and B.
• To repeat between your
chosen point of A and B.
ANGLE
• To select camera angles on a
disc.
AUDIO
• To select audio languages on a
disc.
• To select “STEREO”, “L-ch” or
“R-ch”.
• To select “HIFI” or “MONO”
mode during playback.
(Hi-Fi tapes only)
CLEAR
• To clear the markers.
• To clear numbers entered
incorrectly.
• To cancel the point for A-B
repeat.
• To clear the markers.
• To remove status number in
program input.
• To clear numbers entered
incorrectly.
• To cancel the point for A-B
repeat.
• To exit the VCR menu.
• To reset the tape counter.
DISC MENU
• To call up the disc menu on a
disc.
DISPLAY
• To display the current disc
mode.
• To display the current disc
mode.
• To display the current time,
tape counter, and L1 or L2.
DVD
• To select DVD output mode.
• To activate DVD mode.
• To select the DVD output mode.
• To activate DVD mode.
INPUT
• To select input “L1” or “L2”.
MODE
• To set black level on/off.
• To set virtual surround on/off.
• To arrange the playing order or
play randomly.
• To set virtual surround on/off.
OK
• To move the cursor and deter-
mine its position.
• To move the cursor and deter-
mine its position.
• To select an item on
the VCR menu.
• To advance to the
next VCR menu.
• To go back one step
during clock and
timer programming.
OPEN/CLOSE
• To open or close the disc tray.
• To open or close the disc tray.
• To eject the cassette tape from
the cassette compartment.
PAUSE
• To pause disc playback.
• To advance playback one frame
at a time.
• To pause disc playback.
• To pause tape playback or
recording.
• To advance playback one frame
at a time.
PLAY
• To begin disc playback.
• To begin disc playback.
• To begin tape playback.
NEXT
PREV
• To skip chapters or titles.
• To skip tracks.
RECORD
• To start recording or one-touch
timer recording (OTR).
REPEAT
• To play back a chapter or title
repeatedly.
• To play back a track or disc
repeatedly.
• To select the repeat mode on/
off.
RETURN
• To return to the previous
operation in menu.
• To return to the previous
operation in menu.
SEARCH
• To search chapter, title or time.
• To set or search the markers.
• To search track.
• To search time.
• To set or search the markers.
• To call up the index or time
search menu.
SETUP
• To call up the DVD setup menu. • To call up the DVD setup menu. • To call up the VCR menu.
SPEED
• To select the recording speed.
STANDBY-ON
• To turn the unit on/off.
• To turn the unit on/off.
• To turn the unit on/off.
STOP
• To stop playback.
• To stop playback.
• To stop playback or recording.
SUBTITLE
• To select subtitles on a disc.
TITLE
• To call up the top menu on a
disc.
TRACKING
TRACKING
• To adjust the tracking manually
during playback.
TIMER SET
• To put the VCR into standby
mode for a timer recording.
VCR
• To select the VCR output mode.
• To activate VCR mode.
ZOOM
• To magnify part of a picture.
(2x/4x)
Button
(Alphabetical order)
Media
E8E63UD_GDV228MG9_EN_v1.indd 28
E8E63UD_GDV228MG9_EN_v1.indd 28
2008/08/19 10:05:48
2008/08/19 10:05:48


