background image

20

M

any times while watching movies from a
DVD player the image is shown in “letter

box” format. This is the format that is shown in
movie theaters. When shown on a TV screen,
the image will have areas of black on top and
bottom of the screen.  
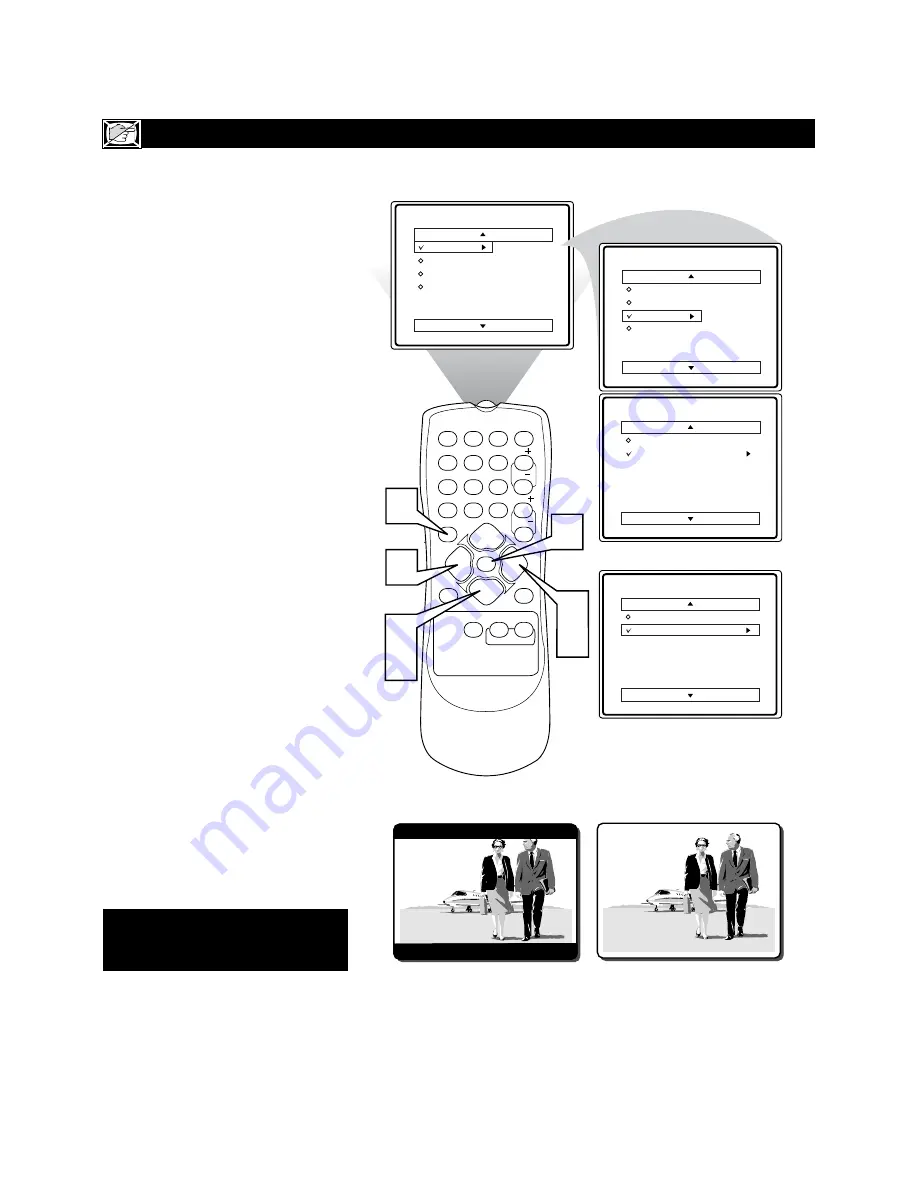
1

Press the MENU button 

on the

remote to display the on-screen menu.

2

Press the CURSOR DOWN 

button 

until the word 

FEATURES

is highlighted. 

3

Press the CURSOR RIGHT 

button

to display the 

FEATURES

menu options (SmartLock or Format).

4

Press the CURSOR DOWN 

button 

until the word 

FORMAT

is

highlighted.

5

Press the CURSOR RIGHT 

or

CURSOR LEFT 

buttons 

to

select one of the two options 4:3 or
Expand 4:3.

4:3 -

Standard format for the TV.

Expand 4:3 -

Enlarges the picture to

fill out the entire screen area, eliminat-
ing the “letter box” effect.

6

When finished, press the STA-

TUS/EXIT button

to remove the

menu from the TV’s screen.

Note:

The Expand 4:3 format can also be

activated using the 

CURSOR UP 

or

DOWN 

▼  

buttons

when the onscreen

menu is not being displayed. Pressing these
buttons will toggle the standard 4:3 format
and the Expand 4:3 format.

H

OW TO

U

SE THE

F

ORMAT

C

ONTROL

(E

XPAND

4:3)

Main

Picture

Sound

Features

Install

Brightness

Color

Picture

Sharpness

Tint

More...

Main

Picture

Sound

Features

Install

SmartLock

Format

Features

SmartLock

Format

4:3

Features

SmartLock

Format

Expand 4:3

OR

4:3

Expand 4:3

VOL

1

2

3

POWER

CH

CH

VOL

VOL

STATUS

EXIT

SLEEP

MUTE

SMART

PICTURE

SOUND

SURF

A/CH

4

5

6

7

8

9

0

CC

MENU

MAGNAVOX

6

5

3
5

1

2
4

Some models refer to SmartLock as

AutoLock, your TV may show AutoLock

instead of SmartLock in the on-screen

menu. These features are the same.

Summary of Contents for 27MS3404R

Page 1: ...OUT YOUR NEW PRODUCT WE CAN GUIDE YOU THROUGH CONNECTIONS FIRST TIME SETUP AND ANY OF THE FEATURES WE WANT YOU TO START ENJOYING YOUR NEW PRODUCT RIGHT AWAY CALL US BEFORE YOU CONSIDER RETURNING THE P...

Page 2: ...of saying welcome and thanks for investing in a MAGNAVOX product P S Remember to get the most from your MAGNAVOX product you must return your Warranty Registration Card within 10 days So please mail i...

Page 3: ...or exhibits a marked change in performance or E The appliance has been dropped or the enclosure damaged 17 Tilt Stability All televisions must comply with recommended international global safety stand...

Page 4: ...or Spanish show helpful messages for setting of TV controls Sleeptimer automatically turns the TV OFF at preset times SmartLock feature allows you to block the viewing of cer tain channels or external...

Page 5: ...of the remote 6 Place the batteries 2 AA in the remote Be sure the and ends of the batteries line up correctly inside of case is marked 7 Reattach the battery lid BASIC TV AND REMOTE CONTROL OPERATIO...

Page 6: ...P Button Press to set the TV to turn itself off within a certain time Details are on page 29 Note This button is dedicated to SmartSurf features within certain TV models This TV does not contain the S...

Page 7: ...t s where the antenna goes 1 If your antenna has a round cable 75 ohm on the end then you re ready to connect it to the TV If your antenna has a flat twin lead wire 300 ohm you first need to attach th...

Page 8: ...the Cable Box 2 Using a separate round coaxial cable connect one end to the OUT put TO TV plug on the back of the Cable Box 3 Connect the other end of the round coaxial cable to the 75 input on the ba...

Page 9: ...nd white cables to the AUDIO left and right AV1 IN or AV2 in jacks on the rear of the TV 3 Connect the VIDEO yellow cable to the VIDEO OUT jack on the back of the VCR either one or two or accessory de...

Page 10: ...o the AV2 in AUDIO L and R left and right jacks on the rear of the TV 2 Connect other end of the S VIDEO CABLE to the S VIDEO OUT jack on the back of the VCR Then connect the other ends of the AUDIO r...

Page 11: ...press the PLAY button on the DVD Player L Mono Monitor out VIDEO S VIDEO AV1 in Y Pb Pr AV2 in AUDIO R COMPONENT VIDEO INPUT S VIDEO OUT OUT OUT L R AUDIO VIDEO COMP VIDEO Y Pb Pr CVI 2 1 3 5 1 2 3 PO...

Page 12: ...plug Connect the other end to the VIDEO IN plug on the second VCR 4 Connect one end of the red and white Audio cable from the Monitor out AUDIO L and R plugs on the TV to the AUDIO IN plugs on the VCR...

Page 13: ...the tele vision 3 Turn the TV and the accessory device ON 4 Press the CH or CH buttons to set theTV to its Front channel Go to your lowest channel for example channel 1 then change channels down to fi...

Page 14: ...repeatedly to select ENG LISH or ESPA OL Spanish 6 When finished press the STA TUS EXIT button to remove the menu from the TV s screen HOW TO USE THE LANGUAGE CONTROL The Language control only makes t...

Page 15: ...ither ANTENNA CABLE or AUTO mode 6 When finished press the STA TUS EXIT button to remove the on screen menu from the TV s screen HOW TO USE THE TUNER MODE CONTROL When CABLE is selected channels 1 125...

Page 16: ...to Programming will store all available channels in the TV s memory then tune to the lowest available channel when done 6 When finished press the STA TUS EXIT button to remove the menu from the TV s s...

Page 17: ...the TV s memory 7 Using the CURSOR DOWN button scroll the menu to highlight the word SKIPPED 8 Now use the CURSOR RIGHT button to toggle between ON or OFF If ON is selected the channel is skipped whe...

Page 18: ...Brightness Color Picture Sharpness Tint Color Temp 50 Picture Brightness Color Picture Sharpness Tint Color Temp 50 Picture Brightness Color Picture Sharpness Tint Color Temp 0 Picture Brightness Col...

Page 19: ...Bass Boost Balance AVL Sound Sound Treble Boost Bass Boost Balance AVL Sound On Sound Treble Boost Bass Boost Balance AVL Sound 50 Sound Treble Boost Bass Boost Balance AVL Sound On Sound Treble Boost...

Page 20: ...fill out the entire screen area eliminat ing the letter box effect 6 When finished press the STA TUS EXIT button to remove the menu from the TV s screen Note The Expand 4 3 format can also be activat...

Page 21: ...e or more of the following intense violence intense sexual situations strong coarse language or intensely suggestive dialogue NC 17 No one under the age of 17 will be admitted This type of program min...

Page 22: ...Lock Format Confirm Code XXXX Features SmartLock Format New Code Features SmartLock Format Access Code XX Features SmartLock Format Access Code XXXX Features SmartLock Format Access Code Main Picture...

Page 23: ...CHANNELS Features SmartLock Format Access Code XXXX Features SmartLock Format Access Code Main Picture Sound Features Install Brightness Color Picture Sharpness Tint More Main Picture Sound Features...

Page 24: ...martLock Block Channel Setup Code ClearAll BlockAll Movie Rating TV Rating OffStop Time Channel Activate Display Channel 12 Blocked By SmartLock Channel Blocking Access Code SmartLock Block Channel Se...

Page 25: ...SAME TIME Features SmartLock Format Access Code XXXX Features SmartLock Format Access Code Main Picture Sound Features Install Brightness Color Picture Sharpness Tint More Main Picture Sound Features...

Page 26: ...urn the rating option ON or OFF BLOCKING PROGRAMS BASED ON MOVIE RATINGS Features SmartLock Format Access Code XXXX Features SmartLock Format Access Code Main Picture Sound Features Install Brightness...

Page 27: ...3 5 TV Y All children This program is designed to be appropriate for all children Designed for a very young audience including children ages 2 6 This type of programming is not expected to frighten yo...

Page 28: ...ode ClearAll BlockAll Movie Rating TV Rating OffStop Time Channel Activate Display SmartLock Setup Code ClearAll BlockAll Movie Rating TV Rating BlockingOptions Blocking Options Blocking Unrated No Ra...

Page 29: ...l appear on the screen 2 Press the SLEEP button repeatedly to pick the amount of time 15 30 45 60 90 120 180 or 240 minutes before the TV will turn itself off An on screen count down will appear durin...

Page 30: ...ss the STATUS EXIT button to remove the menu from the TV s screen or let the option time out and disappear from the TV screen HOW TO USE THE CLOSED CAPTIONING CONTROL CC Off CC 1 CC 2 CC Mute 1 2 3 PO...

Page 31: ...ither PER SONAL MOVIES SPORTS WEAK SIGNAL or MULTIMEDIA picture set tings Note The PERSONAL setting is the set ting that you setup using the PICTURE options within the on screen menu This is the only...

Page 32: ...in the middle of the screen 2 Press the SMART SOUND button repeatedly to toggle between the four settings Note Only the PERSONAL control can be changed by the viewer This changes the set tings in the...

Page 33: ...once and flip between the two channels with the touch of only one button After entering the two channels numbers so that one is the last viewed channel and the other is the current channel follow the...

Page 34: ...remote control If you re attempting to hook up auxiliary equipment check the audio jack connections located on the front of the TV Remote Does Not Work Check the batteries If necessary replace them w...

Page 35: ...neven aging of the picture tube Stock market tickers presented at the bottom of the TV screen Shopping channel logos and pricing displays bright and shown constantly or repeatedly in the same location...

Page 36: ...ustment programming etc Menu An on screen listing of feature controls shown on the Television screen that are made available for user adjustments Remote Sensor Window A window or opening found on the...

Page 37: ...Service Information 38 39 Format Expand 4 3 Control 20 Glossary of Terms 36 Index 37 Language Control 14 Picture Control 18 Remote Control Buttons 6 Remote Control Operation Basic 5 S Video Inputs 10...

Page 38: ...ide en una de nuestras zonas para sucursales Philips de servicio al de f brica ver directorio m s abajo Ud puede comunicarse con la sucursal de servicio m s cercana para obtener una reparaci n oportun...

Page 39: ...NECESITADOS DE REPARACIONES COMUNICARSE CON EL CENTRO DE SERVICIO DE FABRICA MAS CERCANO PARA ESTOS LUGARES DENTRO DE UN RADIO DE 80 A 120 KM 50 A 75 MILLAS DEL CENTRO DE SERVICIO LOCAL ATLANTA Phili...

Page 40: ...the local Magnavox service organization will attempt to provide service although there may be a delay if the appropriate spare parts and technical manual s are not readily available MAKE SUREYOU KEEP...

Reviews: