


10
The Audio jack of AV IN is shared between Video
(CVBS) and S-Video signals. If Audio and Video is
connected to S-Video input, you can still hear sound if
you select Video via Source select, even there appears
no image on screen.
H
ELPFUL
H
INT
11
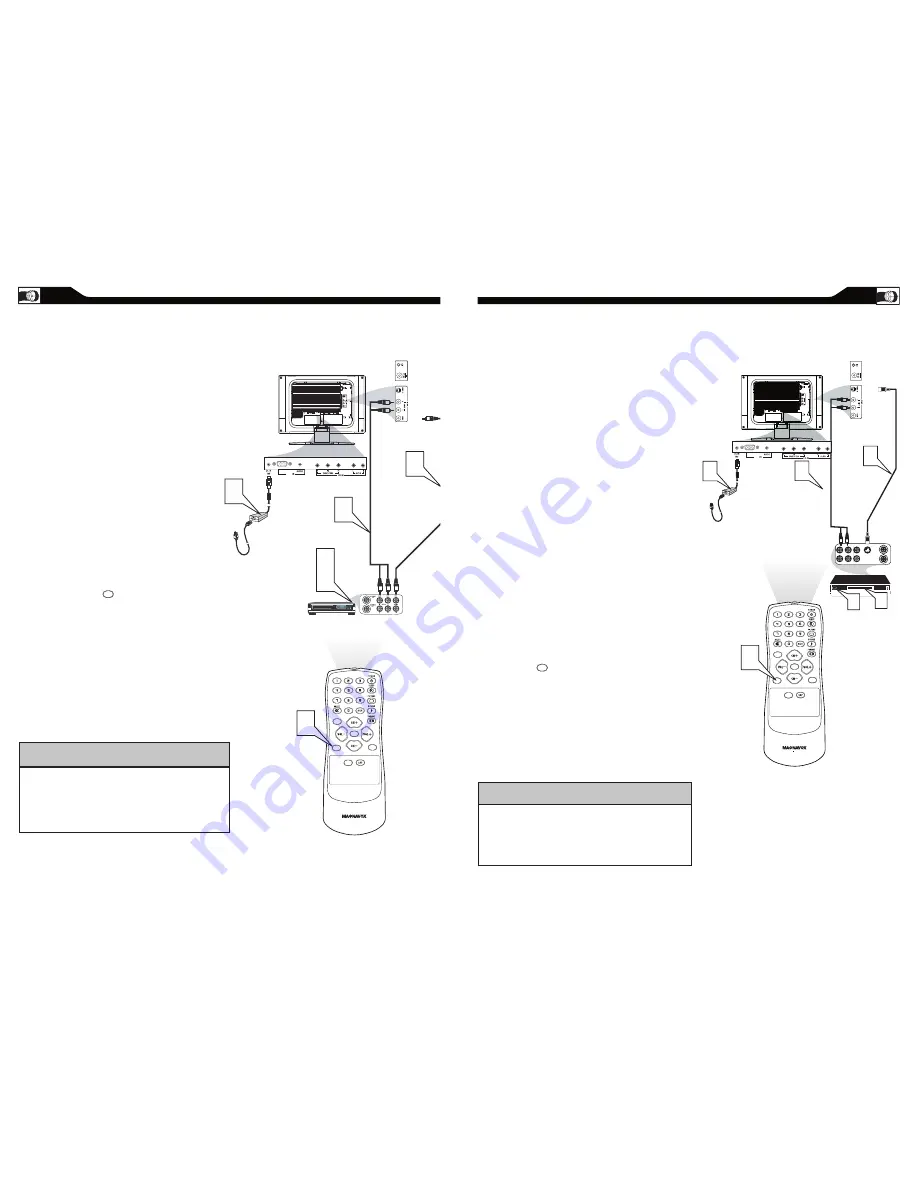
A
UDIO
/V
IDEO
I
NPUT
C
ONNECTIONS
T
he AUDIO and VIDEO In jacks on the
rear of the LCD TV enable quick
connections of other equipment. Connect a VCR,
DVD Player, Video Game, Camcorder, etc., to
these jacks. To view the material playing on the
other equipment, set the LCD TV to its AV Mode.
Connect a RCA-style video cable
(usually yellow
or marked CVBS
) to the
VIDEO OUT jacks of the other
equipment (DVD Player, Camcorder, etc.) and
to the yellow VIDEO jack on the side of the
LCD TV.
Connect RCA-style audio cables (usually red
and white) to the AUDIO OUT (left and right)
jacks on the other equipment. Connect the
other end of the cables to the AUDIO jack on
the side of the LCD TV.
Plug the DC Adapter into the DC IN 16V jack
on the TV. Plug the power cable into an outlet.
Turn on the TV and other equipment.
Press the Source button to set the TV to
AV Mode.
Press PLAY on the other equipment to
view its material on the TV.
1
2
3
4
5
C C
SOURCE
P I P
M E N U
OK
���
VIDEO
�
�
�
�
���������������
���� ���� ������
�����������
������������
�
�
�� ��������
�
S - VIDEO
AUDIO
VGA
PC
SOURCE
S-V
IDEO
C
ONNECTIONS
T
he S-Video connection on the rear of the
LCD TV can provide you with better
picture detail and clarity for the playback of
accessory sources such as DBS (digital broadcast
satellite), DVD (digital video discs), video games, and
VHS VCR (video cassette recorder) tapes than the
normal antenna picture connections.
Note: The accessory device must have an S-VIDEO OUT
(put) jack in order for you to complete the connection
on this page.
Connect an S-Video cable to the S-VIDEO jack of
the other equipment (DVD Player, Camcorder, etc.)
and to the S-VIDEO jack on the rear of the LCD TV.
Connect RCA-style audio cables (usually red and
white) to the AUDIO OUT (left and right) jacks on
the other equipment. Connect the other end of the
cables to the AUDIO jack on the side of the LCD
TV.
Plug the DC Adapter into the DC IN 16V
jack on the LCD TV. Plug the power cable into an
outlet. Turn on the LCD TV and other
equipment.
Press the Source button to set
the LCD TV to its S-VIDEO mode.
Press PLAY on the other equipment to
view its material on the LCD TV.
1
2
3
4
5
C C
SOURCE
P I P
M E N U
OK
��� � ���
���
��� � ���
��
� ��� �
�����
��
��
���
���
�
�
� �� �� ���
�
�
�
�
��������� �����
�� ����������
�� �����
�����
����� �����
��� �� ��������
��������� ������
����� �������
�������
�
VIDEO
�
�
�� �� �����
S - VIDEO
AUDIO
VGA
PC
SOURCE
The Audio jack of AV IN is shared
between Video (CVBS) and S-Video signals. If Audio
and Video is connected to Video (CVBS) input, you
can still hear sound if you select S-Video via Source
select, even there appears no image on screen.
H
ELPFUL
H
INT


