background image


 Page 8 


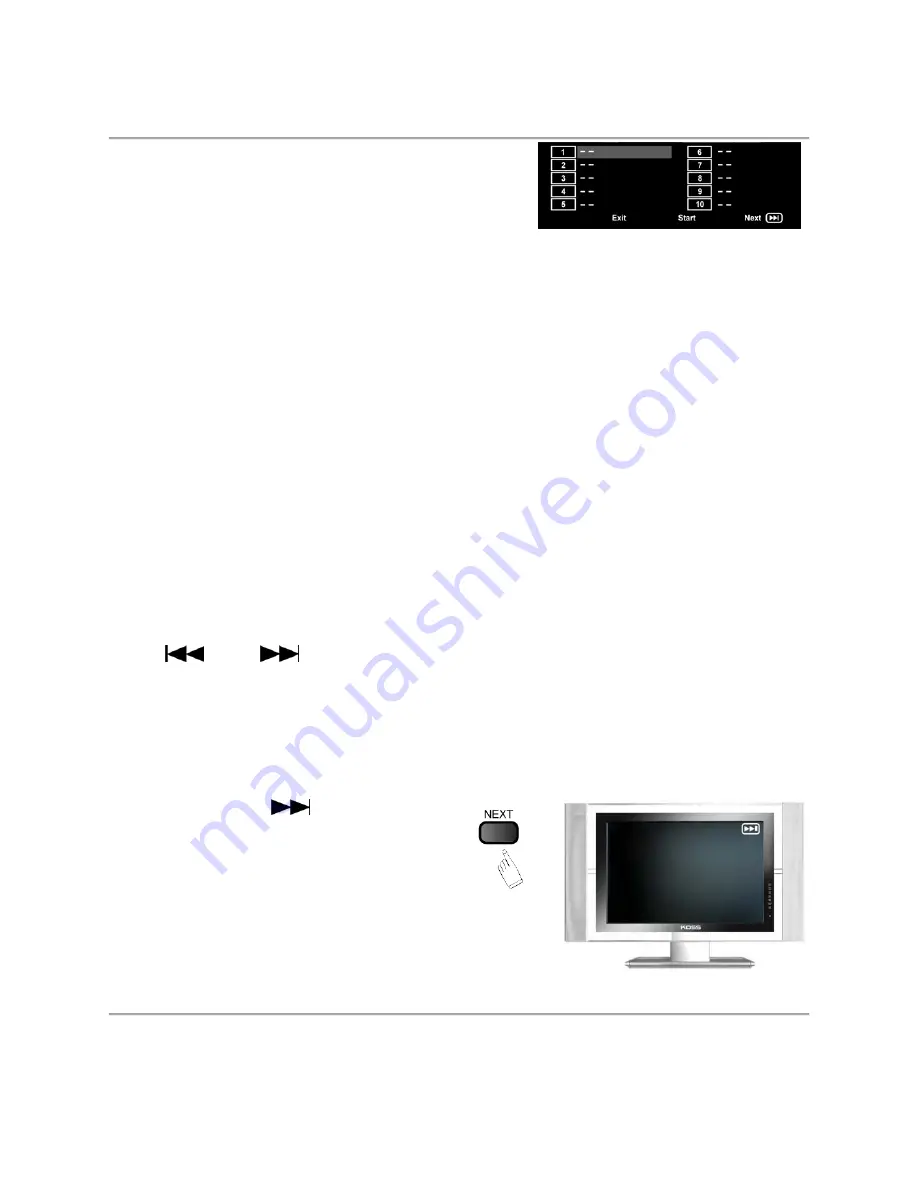
  The programmed playback menu for SVCD/VCD/CD 

discs looks like the screen image to the right. Note 
that only the track number needs to be entered for the 
entry to be valid. 


- If PBC function is on, this operation will turn PBC function off while the chapters/tracks are 
played back in a programmed order. 

 Using 

the 


►▲▼


buttons, highlight a memory location. Press the NUMERICAL buttons to 

enter the chapter/track numbers in the order you want them to play. Then, press  


►▲▼


buttons to highlight START, located at the bottom of the screen. The chapters/tracks will be 
played back in the programmed order. 

  During Programmed playback, if the PROGRAM button is pressed, the programmed playback 

menu appears showing the chapters/tracks in the order you have programmed them in. You 
can press STOP to stop programmed playback and resume normal playback. 

 Notes 

- To clear the programmed order, use 


►▲▼


buttons to highlight “STOP” at the bottom of 

the menu screen. 
- To modify the programmed order, use 


►▲▼


buttons to highlight the item you would like 

to modify and then enter the new chapters/tracks you want to program using the NUMERICAL 
buttons. 


4. SELECTING TRACKS 

  When playing a DVD disc, press NUMERICAL buttons in menu or title page to select a menu 

or title item directly. During DVD playback, you can input desired title number directly by 
pressing NUMERICAL buttons. 

  When playing a SVCD or VCD disc, during sequence playback, press NUMERICAL buttons to 

select tracks. (when programmed playback and PBC function is on, you can only press PREV 

 / NEXT 

 button to select a track). 

  As for MP3 / JPEG discs, press NUMERICAL buttons to select different tracks on current track 

list. 

 Note 

To select tracks from 1-9, press corresponding NUMERICAL buttons (1-9). 
To select track 10 and above, press 10+ button, then press 1-9 buttons. 


5. SKIPPING TRACKS 

 Press NEXT 


 to skip to the 

beginning of the next title/chapter/track on 
a disc. 


Summary of Contents for DVD830

Page 1: ...refully before using this Magnasonic product to ensure proper use After reading this manual please keep it in a safe place and refer to it when necessary For additional information on this product or...

Page 2: ...e scan function 4 10 Bit digital video converter 500 lines of resolution 5 24 Bit 96Khz digital audio converter provides high quality sound 6 Component S Video Composite and Coaxial outputs 7 Compatib...

Page 3: ...at Playback Modes 9 9 Using the OSD Feature 10 11 10 Using the Search Feature 12 11 Changing the Audio Language 12 12 Subtitles 12 13 Changing the Camera Angle 12 14 Changing the TV System 13 15 Mutin...

Page 4: ...y Button 4 Play Pause Button 5 Stop Playback Button 6 Remote Control Sensor BACK PANEL OVERVIEW 1 Audio Output Left Channel 2 Component Video Outputs 3 Power Cord 4 Audio Output Right Channel 5 Digita...

Page 5: ...3 Goto 22 Repeat 4 Up 23 A B 5 Title 24 PBC 6 Enter 25 Program 7 Right 26 Subtitle 8 Down 27 Audio 9 Menu 28 Reset 10 Prev 29 Slow 11 Next 30 Stop 12 Play Pause 31 REV 13 Step 32 FWD 14 Volume 33 Zoo...

Page 6: ...here should be no large obstacles in between the remote control and the player itself 2 CONNECTING THE PLAYER When establishing a connection between the player and external components make sure that a...

Page 7: ...tray label facing up and press OPEN CLOSE button CLOSE appears on the TV screen and the disc tray closes Now the player will proceed to read the disc automatically 3 PLAYING A DISC The contents of ea...

Page 8: ...playback press TITLE button to display the DVD title content b Press the buttons to highlight the title you want to select and press ENTER button to confirm your choice You can also press NUMERICAL b...

Page 9: ...tes To clear the programmed order use buttons to highlight STOP at the bottom of the menu screen To modify the programmed order use buttons to highlight the item you would like to modify and then ente...

Page 10: ...utton to resume normal playback 8 REPEAT PLAYBACK MODES During disc playback press the REPEAT button repeatedly to access one of the various repeat playback modes The repeat mode you have accessed wil...

Page 11: ...umber of Titles Chapter Number Total Number of Chapters Total Time remaining for this title on the Disc Press the OSD button a third time and the following information is displayed on the TV screen Ti...

Page 12: ...V screen Track Number Total Number of Titles Total Time lasts for that track Press the OSD button a third time and the following information is displayed on the TV screen Track Number Total Number of...

Page 13: ...nguage availability depends entirely on the disc content and not on the player See DVD disc sleeve for details on the included languages 12 SUBTITLES COMPATIBLE WITH DVD OR SVCD DISCS ONLY Press the S...

Page 14: ...DIO OUTPUT Press the MUTE button once to mute audio output Press the MUTE button again to resume previous audio output volume level 16 ZOOMING FEATURE Press ZOOM button to activate this function Press...

Page 15: ...insert a JPEG disc the player will automatically go to the first directory of JPEG files Press buttons to highlight a JPEG and press PLAY ENTER button to start slideshow To view a particular JPEG sele...

Page 16: ...icon The VIDEO options page is displayed on the screen Press the button to enter the VIDEO options page C Press the button repeatedly to highlight the option you want to adjust Press ENTER or button...

Page 17: ...selected this setting but you don t have a wide screen TV the images on the screen may appear distorted due to vertical compression z ANGLE MARK Choose ANGLE MARK as ON whenever the movie is recorded...

Page 18: ...activate the screen saver OFF Choose this setting to cancel the screen saver The default setting is ON z HDCD High Definition CD When you are listening to a HDCD choose the right option to decode the...

Page 19: ...the coaxial output jack C DOLBY SETUP You could only benefit from changing the settings in this Dolby setup as long as you have a digital connection to your Dolby digital amplifier receiver The DOLBY...

Page 20: ...emote control to restore all the settings to the pre factory settings CVBS z TV MODE P Scan Choose this setting when your DVD player is connected to your TV via the COMPONENT output YUV or RGB and you...

Page 21: ...the picture from 20 to 20 Select a lower number for a darker picture Select a higher number for a brighter picture You could press the or buttons to adjust the BRIGHTNESS level z CONTRAST You could a...

Page 22: ...player is connected to a PAL TV z AUDIO Highlight the AUDIO LANG option and press ENTER button to access the AUDIO options menu Press or buttons to choose the audio language you prefer Press ENTER to...

Page 23: ...Adult Select level 8 to cancel the rating limit The default setting is 8 Notes If the password option is locked you cannot set the rating limit The rating limit does not work when the password option...

Page 24: ...nd then press ENTER to confirm the password To change the password you will be prompted for the old password and then you will be prompted to enter a new one Enter a new 4 digit number This will now b...

Page 25: ...Ensure the disc label is facing up Clean the disc Check if the disc is defective by trying another disc Check to see if the disc is defective badly scratched or damaged e g not flat Picture poor No s...

Page 26: ...4Hz 44KHz 1dB Audio S N Ratio 90dB Dynamic Range 90dB Distortion 0 01 D A Converter 192KHz 24 Bit Output Characteristic Video Output 1Vp p 75 S Video Output Y 1Vp p 75 C 0 3Vp p 75 Audio Output 2 0V...

Page 27: ...nnecting cables cassette tapes compact discs This warranty shall in addition not apply to damages due to handling transportation unpacking set up installation customer adjustments that are covered in...

Reviews: