


28
29
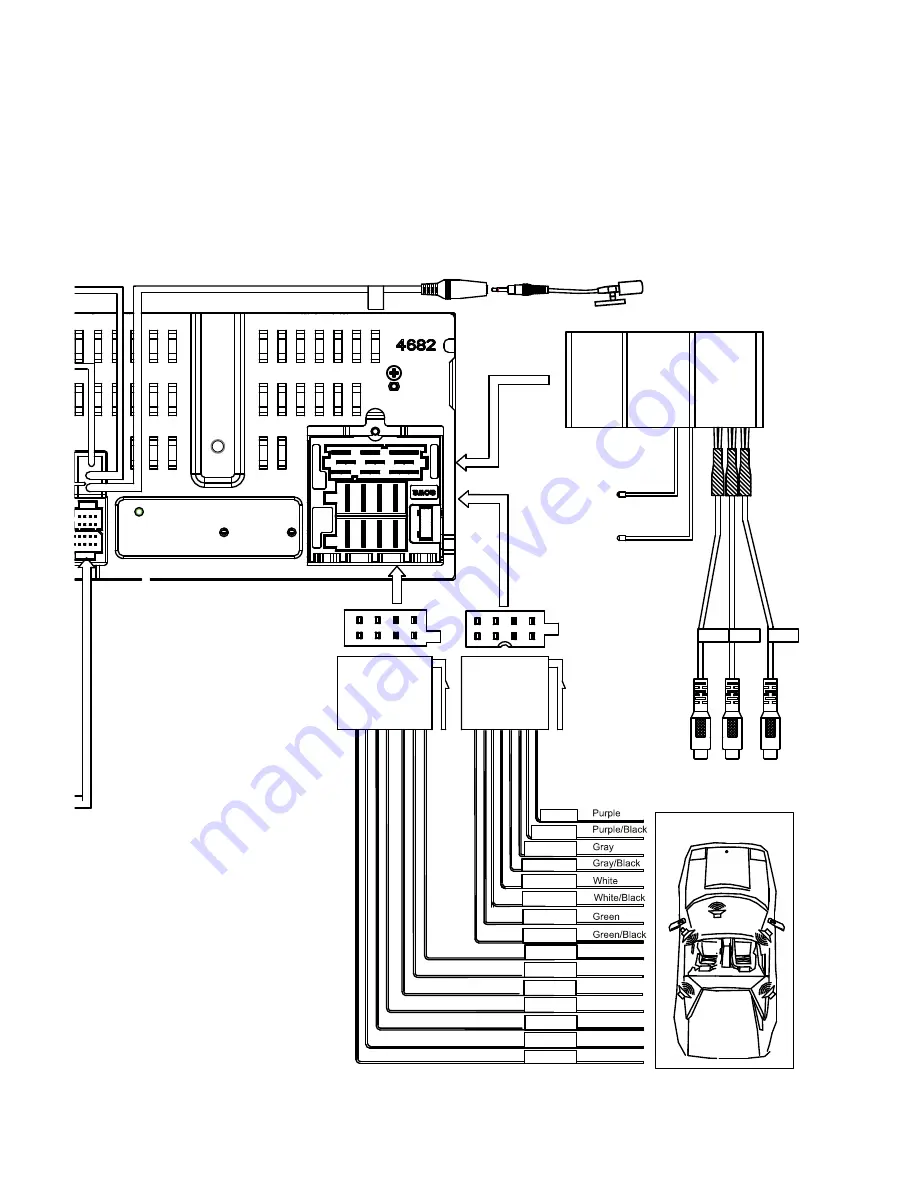
Device Connections
Wiring Diagram
Troubleshooting
The following
checklist can help
you solve the problems
which
you may encounter
when
using
the
unit. Before consulting it, check the connections and follow the instructions in the user manual.
Problem
Possible cause
Solution
General
The
un
it wil
l not
swit
ch
on
.
Car ignition is not on.
Cable is not properly
connected.
Fuse is burnt.
Turn your car key in the ignition.
Check cable connection.
Replace fuse with a new fuse of the
same capacity.
No sound
Volume is set at minimum or
the mute function is on.
Check the volume or switch the mute
function off.
The unit or screen does
not function normally.
The unit system is unstable.
Press the RESET button.
Remote control
The remote control is not
working or does not work
properly
The battery is low or empty.
Change the batteries.
DVD mode
The
applian
ce
wi
ll not
play
discs.
The disc is inserted incorrectly.
The disc is dirty or damaged.
Disc must be inserted with the label
side facing up. Clean the disc and
check for damage. Try another disc.
Sound skips due to
vibration.
Mounting angle is over 30˚.
Mounting is unstable.
Adjust mounting angle to less than
30˚.
Mount the unit securely with the
supplied parts.
TUNER mode
Unab
le
to rec
eiv
e
stat
ions
. The antenna is not connected
properly.
Connect the antenna properly.
Poor quality reception of
radio station.
The antenna is not fully
extended or it is broken.
Fully extend the antenna and if
broken, replace it with a new one.
Preset stations are lost.
The battery cable is not
properly connected.
Con
nec
t the
perman
ent
live on
the unit
to the permanent live on the vehicle.
USB mode
Unable to insert USB
device.
The USB device has been
inserted the wrong way round.
Insert USB the other way around.
The USBdevice cannot be
read.
NTFS format is not supported.
is in FAT or FAT32 format. Due to
dif
fer
ent
for
mat
s,
s
ome
mode
ls
of
US
B
storage devices or MP3 players may
not be read.
Zone
B Right +
Zone
B Right
-
Zone
A Left
+
Zone
A Left
-
ACC
Zone
A Right +
Zone
A Right
-
Zone
B Left
+
Zone
B Left -
GPS
Antenna
BLUE
BT ANT
(Do Not Connect)
Optical Audio
Input
External Mic (Optional)
PWR / Ground
C
Speakers
A & B
Speakers
Safety Cameras
(Optional)
BATT+
GND
Optional Amplifier
BROWN
YELLOW
WHITE
RED
WHITE
RED
YELLOW
WHITE
RED
YELLOW
RED
BLACK
Zone C Left +
Blue
Blue/Black
Brown
Brown/Black
Zone C Left -
Zone C Right +
Zone C Right-
MIC
RADIO ANT
WIFI
Siriusxm
SiriusXM
Tuner
Input
(Optional)
TV
Automotive
AM/FM
Antenna
B3
B1
B2
WIFI
AUX_IN_R
VIDEO_IN
AUX_IN_L
VIDEO OUT
FRONT L
SUB OUT
REAR L
R
R
A
E
R
FRONT R
YELLOW GREEN
Remote Amp Turn On (+)
Blue/White
Parking Brake Input (-)
Green/White
28
29
Device Connections
Wiring Diagram
Troubleshooting
The following checklist can help you solve the problems which you may encounter when using the
unit. Before consulting it, check the connections and follow the instructions in the user manual.
Problem
Possible cause
Solution
General
The unit will not switch on.
Car ignition is not on.
Cable is not properly
connected.
Fuse is burnt.
Turn your car key in the ignition.
Check cable connection.
Replace fuse with a new fuse of the
same capacity.
No sound
Volume is set at minimum or
the mute function is on.
Check the volume or switch the mute
function off.
The unit or screen does
not function normally.
The unit system is unstable.
Press the RESET button.
Remote control
The remote control is not
working or does not work
properly
The battery is low or empty.
Change the batteries.
DVD mode
The appliance will not play
discs.
The disc is inserted incorrectly.
The disc is dirty or damaged.
Disc must be inserted with the label
side facing up. Clean the disc and
check for damage. Try another disc.
Sound skips due to
vibration.
Mounting angle is over 30˚.
Mounting is unstable.
Adjust mounting angle to less than
30˚.
Mount the unit securely with the
supplied parts.
TUNER mode
Unable to receive stations. The antenna is not connected
properly.
Connect the antenna properly.
Poor quality reception of
radio station.
The antenna is not fully
extended or it is broken.
Fully extend the antenna and if
broken, replace it with a new one.
Preset stations are lost.
The battery cable is not
properly connected.
Connect the permanent live on the unit
to the permanent live on the vehicle.
USB mode
Unable to insert USB
device.
The USB device has been
inserted the wrong way round. Insert USB the other way around.
The USBdevice cannot be
read.
NTFS format is not supported.
is in FAT or FAT32 format. Due to
different formats, some models of USB
storage devices or MP3 players may
not be read.
Zone
B Right +
Zone
B Right
-
Zone
A Left
+
Zone
A Left
-
ACC
Zone
A Right +
Zone
A Right
-
Zone
B Left
+
Zone
B Left
-
GPS Antenna
BLUE
BT ANT
(Do Not Connect)
Optical Audio
Input
External Mic (Optional)
PW
R
/ G
roun
d
C
Speakers
A &
B
Speakers
Safety Cameras
(Optional)
BA
TT+
GND
Optional Amplifier
BROWN
YELLOW
WHITE
RED
WHITE
RED
YELLOW
WHITE
RED
YELLOW
RED
BLACK
Zone C Left +
Blue
Blue/Black
Brown
Brown/Black
Zone C
Left
-
Zone C
Right
+
Zone C Right-
MIC
RADIO ANT
WIFI
Siriusxm
SiriusXM Tuner
Input
(Optional)
TV
Automotive
AM/FM Antenna
B3
B1
B2
WIFI
AUX_IN_R
VIDEO_IN
AUX_IN_L
VIDEO OUT
FRONT
L
SUB
OUT
REAR L
R R
A
ER
FRONT
R
YELLOW
GREEN
Remote Amp Turn On (+) Blue/White
Parking Brake Input (-) Green/White
Summary of Contents for M10
Page 2: ......
Page 36: ...CLASS 1 LASER PRODUCT P N 127075007179 M10_UM_Rev A 8 12 16...


