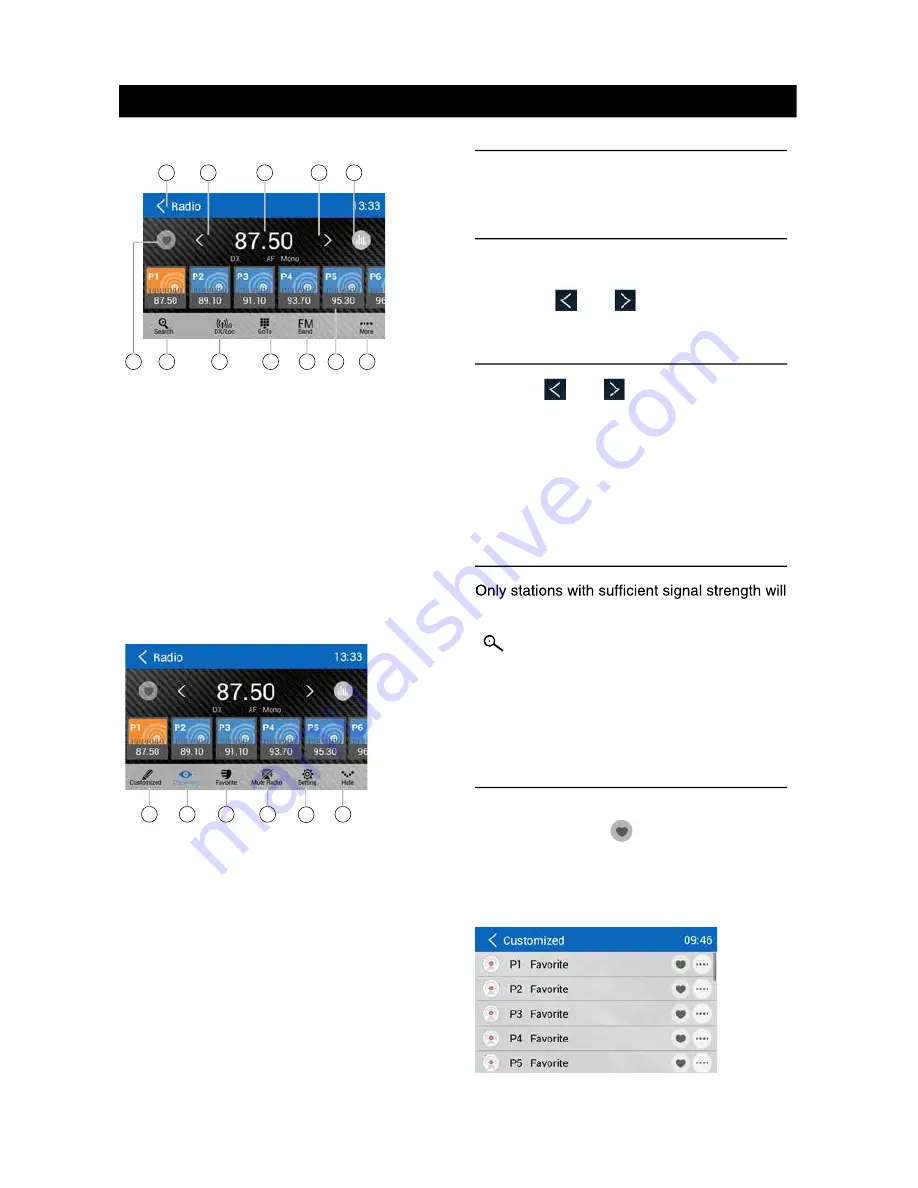
background image

10

11

Radio Operations

Select [Radio] on the main menu to enter 

radio mode.

1

2

4

5

3

7

6

1

1

2

1

0

1

9

8

1. Return to home menu

2. Tune backward

Auto tune backward. (long press)

3. Current frequency

4. Tune forward

Auto tune forward. (long press)

5. Enter EQ menu

6. Enter favorite list

7.  Search and store preset stations

automatically

8. To receive local / distant radio stations

9. Goto station by inputting frequency

10. Band switch

11. Stations list

12. Show more control buttons

13

14

15

16

17

13. Enter customized list

14.  Show discovery stations

15. Show favorite stations

16. Mute radio

17. Hide the second line of control buttons

18. Show RDS options

Select One Radio Band

Touch the [ Band ] button to select one radio 

band among FM and AM.

Manual Tuning

During manual tuning, the frequency will be 

changed in steps.

Touch the [   ] or [   ] button on the 

operation bar to tune in a lower/higher station.

Auto Tuning

Hold the [   ] or [   ] button on the 

operation bar for more than 2 seconds to seek 

a lower/higher station.

To stop searching, repeat the operation above 

or press other buttons having radio functions.

Note:

When a station is received, searching stops 

and the station is played.

Auto Store

be detected and stored in the memory.

To start automatic station search, touch the  

[   ] button on the operation bar.

To stop auto store, repeat the operation above 

or press other buttons having radio functions.

Note:

After auto store, the previous stored stations 

will be overwritten.

Manual store 

1.  When one expected radio station has been

detected, touch [ 

 ] to show customized

station store list.

2.  Touch to select an item on the list to store

the current station in the memory.

3. Touch top left of the screen to exit.

Radio Operations

Recall the Stored Stations

Method 1:

1.  Touch [ 

 ] button on the screen to show 

the preset stations.

2. Select a band

3.  On the middle of the screen, drag the list

left/right to scroll, touch a station on the list

to listen to.

Method 2:

1.  Touch [ 

 ] button on the screen to show 

the favorite stations.

2. Select a band

3.  On the middle of the screen, drag the list

left/right to scroll, touch a station on the list

to listen to.

4. Touch top left of the screen to exit.

Local Seeking

When LOCAL seeking is on, only radio 

stations with strong radio signal will be be 

received.

To open LOCAL function, touch [ 

 ] button 

on the operation bar, then touch the [   ] 

button to select “Loc” or “DX”.

 Note

The number of radio stations that can be 

received will decrease after the Loc seeking 

mode is on.

Key Search

Touch [   ] button on the operation bar to 

show key search menu.

Touch the keypad to input the frequency, 

touch [ OK ] to goto the station directly.

To cancel an input number, touch [ 

 ].

RDS Basics

Radio Data System (RDS) enables traffic 

reports to be received and provides many 

facilities, including enabling the radio station 

name to be displayed on the radio display.

Adjust RDS Settings

1. In Radio menu, touch [   ].

The option menu is displayed.

2. Touch on the selected option to change the

setting.

[TA]: To turn on or off “TA” function.

[AF]: To turn on or off “AF” function.

[REG]: To turn on or off “REG” function.

[CT]: To turn on or off “Clock Time”

synchronization function.

[PTY]: To show PTY list.

TA

Press the TA ON/OFF button to switch the 

AF

The receiver can automatically switche to an 

alternative frequency (AF) of the same station 

if the reception becomes poor. Press the OFF/

ON touch-point to turn the automatic scanning 

for alternative frequencies of an RDS broad-

cast station off and on.

CT (Clock Time)

Some stations broadcast the time and date 

within  the  encoded  RDS  signal.  The  clock 

time is automatically adjusted when ‘CT’ is set 

to ‘ON’.

18

Summary of Contents for M10

Page 1: ...SD MAP VOL MUTE SELECT HOME BACK AUX IN USB M10 DVD MULTIMEDIA INTERNET RECEIVER WITH 10 1 LCD SCREEN BUILT IN NAVIGATION BLUETOOTH...

Page 2: ......

Page 3: ...fely is compromised MUTE OK MUTE OK Never use the video display while the car is in motion The use of video playback MUTE OK MUTE OK MUTE OK MUTE OK Thank you for your purchase of the M10 entertainmen...

Page 4: ...ying interference use only the included components Caution of disc using 1 DO NOT use irregular shaped disc 2 Disc Cleaning Use a dry soft cloth to wipe the disc from center to edge only neutral deter...

Page 5: ...to turn radio off When sound is playing press and release to mute the sound When sound is muted press and release to un mute sound Increase or decrease the audio volume by rotating the ring Note Rotat...

Page 6: ...3 Move the cursor up down left right Up down Manual tuning 14 Numeric keys 15 Mute the volume 16 Unit power 17 Select DVD subtitle language 18 Select DVD angle 19 Return to previous display 20 Main me...

Page 7: ...ns If the remote control doesn t work change the battery 5 Use button shaped lithium battery CR2025 3V only 6 DO NOT recharge disassemble heat or expose the battery to fire 7 Insert the battery in pro...

Page 8: ...on and the parking brake is Off the unit will play the video from a DVD USB or SD card to an external monitor The sound will still be provided by the unit and speakers connected to it Ma Ma Tou sou 1...

Page 9: ...disc into the slot and the unit will change to disc mode automatically Notes Please confirm whether there is a disc in the unit before you insert another one The unit will exit current playing source...

Page 10: ...nu 10 Hide the second line of control buttons Mixed Disc Playback When inserting a mixed disc the unit will read the disc and show the files list For some discs you need to choose Music Video Photo to...

Page 11: ...minutes the unit will turn into standby mode Sequential Track Playback for CD VCD MP3 WMA Only You can play all the tracks in random order 1 During playback press button on the screen to select random...

Page 12: ...ouch the or button on the operation bar to tune in a lower higher station Auto Tuning Hold the or button on the operation bar for more than 2 seconds to seek a lower higher station To stop searching r...

Page 13: ...show key search menu Touch the keypad to input the frequency touch OK to goto the station directly To cancel an input number touch RDS Basics Radio Data System RDS enables traffic reports to be receiv...

Page 14: ...nto the corresponding slot the unit will load the files automatically 2 To remove the card you should first select another source in order to avoid damaging the card press the card slightly and take o...

Page 15: ...ouch Albums on the left of the screen 2 Touch an album shown on the list 3 Select a song to play Select Music by Song Name 1 Touch Songs on the left of the screen 2 Select a song to play Playlists Add...

Page 16: ...t in use Use an optional cable to connect the USB audio player USB memory as any device connected directly to the unit will protrude out from the unit and may be dangerous Do not use unauthorized prod...

Page 17: ...uring the telephone call Touch on the main menu to enter Bluetooth Phone mode 1 If the Bluetooth function of the unit is off the unit will ask you to turn it on Default setting is on 2 Turn on Bluetoo...

Page 18: ...your nearest dealer for more information on the product of wireless audio streaming transmitter offered CAUTION Please avoid operating your connected mobile phone while audio streaming as this may ca...

Page 19: ...a track Track up Touch the button to move to the beginning of the next track Track down 1 Touch the button to move back to the beginning of the current track 2 Touch the button twice to move back to t...

Page 20: ...menu 3 Press to switch year month day hour minute second option 4 Press or to switch the current option 5 After setup long press 5 seconds to exit time setting menu PAL NTSC SWITCH Press to stop reco...

Page 21: ...tects that the tuner has received the activation message your radio will display Subscription Updated Once subscribed you can tune to channels in your sub scription plan Note the activation process us...

Page 22: ...igher channel touch the icon and to scroll through the higher channels touch and hold the icon To tune to the next lower channel touch the icon and to scroll through the lower channels touch and hold...

Page 23: ...ry item A channel list screen appears 4 Touch a channel to tune to that channel Scroll up or down the list Locking Individual SXM Channels A user can lock individual channels When locked a channel has...

Page 24: ...n the main menu to view a website Touch the dialog box on the upper side of the screen to show keypad Input the website address and touch Go to visit it Drag the web page to scroll E mail Select Email...

Page 25: ...t EQ on the menu to enter sound setting mode Touch to select a preset EQ on upper side of the screen from Flat Pop User Rock Techno Classic Jazz and Optimal When listening to music at low volumes this...

Page 26: ...se screen blackout off 15s or 30s Fast boot Choose fast boot off 1 day 3 days or 5 days Beep On Turn on the beep sound Each time you press a button the unit beeps Off Turn off the beep sound Adjust Vi...

Page 27: ...d parents to restrict viewing for children under 17 R Restricted re parental guidance is advised for children under the age of 17 NC17 Unsuitable for children under age 17 ADULT Acceptable for adults...

Page 28: ...rough the installation hole into the engine compartment and connect to the car battery Otherwise a high possibility of serious short circuit to the electrical system may occur If you need to replace t...

Page 29: ...27 ing tery lled e is able hing tion and ical h an and ted wer Parking Brake Cable Connections Device Connections Green White Wire...

Page 30: ...ne A Left Zone A Left ACC Zone A Right Zone A Right Zone B Left Zone B Left GPS Antenna BLUE BT ANT Do Not Connect Optical Audio Input External Mic Optional PWR Ground C Speakers A B Speakers Safety C...

Page 31: ...ent live on the vehicle USB mode Unable to insert USB device The USB device has been inserted the wrong way round Insert USB the other way around The USBdevice cannot be read NTFS format is not suppor...

Page 32: ...fore consulting it check the connections and follow the instructions in the user manual Problem Possible cause Solution General The unit will not switch on Car ignition is not on Cable is not properly...

Page 33: ...his equipment generates uses and can radiate radio frequency energy and if not installed and used in accordance with the instructions may causeharmful interference to radio communications However ther...

Page 34: ...he instructions may causeharmful interference to radio communications However there is noguarantee that interference will not occur in a particular installation If this equipment does cause harmful in...

Page 35: ...not cover the cabinet appearance items or accessories used in connection with this product or any damage to recording or recording tape or any damage to the products resulting from improper installat...

Page 36: ...CLASS 1 LASER PRODUCT P N 127075007179 M10_UM_Rev A 8 12 16...

Reviews: