background image

2

Tour of Magic TV™

17

2

Tour of Magic TV™

16

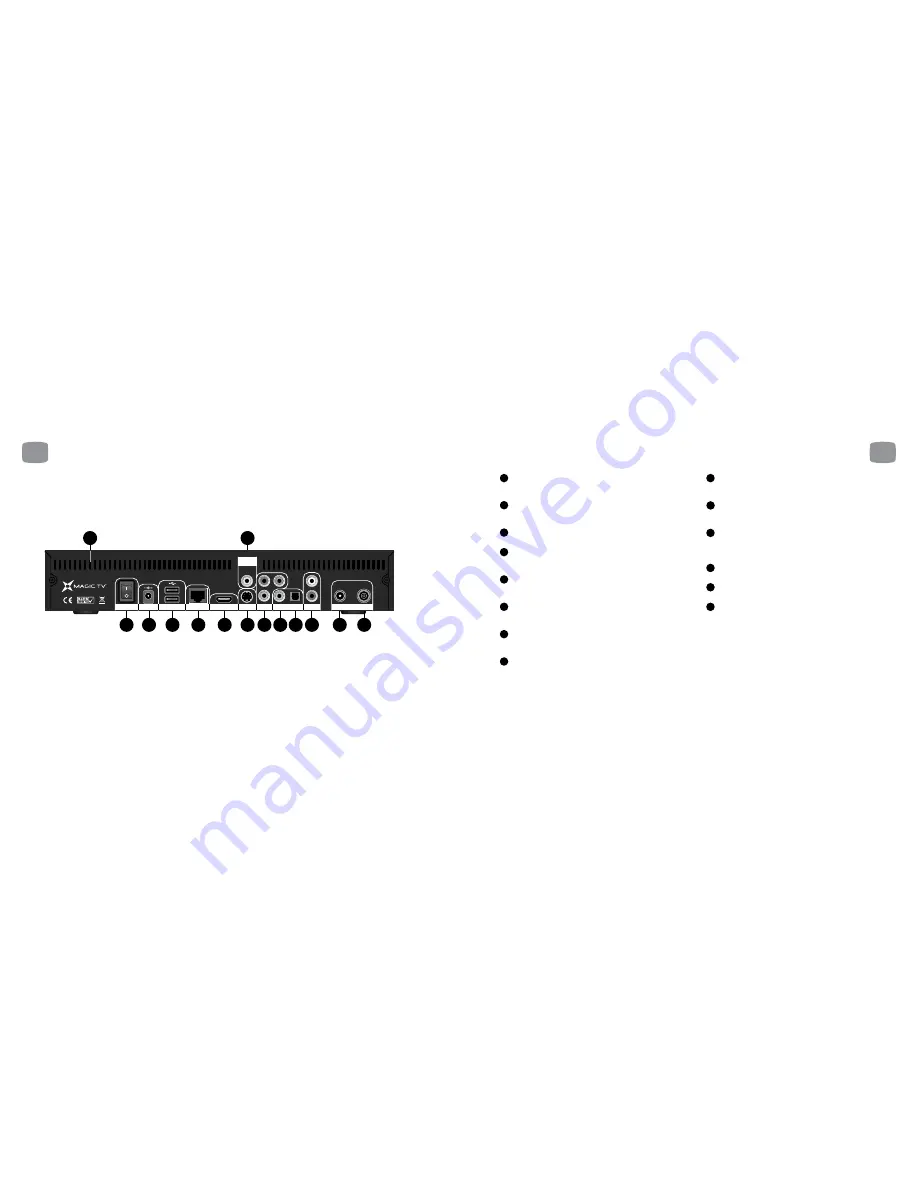
  Power On/Off Switch. Turn Magic TV™ on using this switch.  

Magic TV™ consumes very little power on Standby. It is therefore 
unnecessary to turn Magic TV™ off with this switch during normal operation.

  DC Power In. The included 100-240V AC auto-ranging power  

adapter should be attached here. Please see “Safety Information”  
before proceeding.

  Ventilation holes. It is important that all the ventilation holes in  

Magic TV™ are kept clear, in order for hot air to escape.

  HDMI. (Connects to a TV, AV receiver or home theatre system.) HDMI 

provides a pure digital connection for high definition video and audio  
all in one cable.

  Composite Video. (Connects to a TV, AV receiver, VCR, DVD recorder 

or home theatre system.) Composite is the most basic of video connections 
and is Standard Definition only.

  S-Video. (Connects to a TV, AV receiver, VCR, DVD recorder or home 

theatre system.) S-Video offers a higher quality signal than Composite for 
compatible equipment but is Standard Definition only.

  Component Video (YPbPr). (Connects to a TV, AV receiver or home 

theatre system.) Component provides an excellent quality HD and SD 
analogue video connection. 

  Coaxial Digital Audio. (Connects to an AV receiver or home cinema 

system.) If you are not using the audio over HDMI, then this connection 
will provide multi-channel digital audio to your surround sound system.

  Optical Digital Audio. (Connects to an AV receiver or home cinema 

system.) If you are not using the audio over HDMI, then this connection 
will provide multi-channel digital audio to your surround sound system.

  Analogue Stereo Audio. (Connects to a TV, VCR or DVD  

recorder.) Connect the left and right audio cables (included) for  
analogue stereo sound.


USB x2. 

USB devices can be attached and used for expanding  

storage space (see 

section 3.5

), importing and exporting recordings  

(see 

section 6.8

) and also for Magic TV™ firmware upgrades  

(see 

section 9.2

).

  Ethernet Network. Use this connection to link Magic TV™ to your 

home network. This may be needed for some of the Interactive Services.

  Antenna In. A coaxial RF cable needs to be connected to this input to 

allow Magic TV™ to receive the new DTT signals.

  Loop Out (Antenna Out). Connect the included Aerial/Antenna 

extension cable from this output to another device if you wish to retain 
analogue TV reception (on your TV for example).

14

13

12

11

10

9

8

7

6

5

4

3

2

1

2.2

 Rear Panel

S-Video

HDTV Tuner

Ant.

In

Loop

Out

Network

USB

HDMI

YPbPr

Audio

Digital Audio

L

R

Composite

Video

Pb

Pr

Y

12V DC

ON/OFF

2

1

6

5

7 8 9 10

11

12

13

14

3

4

Summary of Contents for HDTV Receiver

Page 1: ...apparatus 12 Only use attachments accessories specified by the manufacturer 13 Unplug this apparatus during lightning storms or when unused for long periods of time 14 Refer all servicing to qualified...

Page 2: ...ansformers motors To prevent fire or electrical shock do not expose the unit to rain or water Do not force connection wires When moving the unit first disconnect the power plug and the wires connected...

Page 3: ...Setup 69 8 7 Guided Setup 70 8 8 Parental Control 71 8 9 System 71 9 System Operations 73 9 1 Network Setup 74 9 2 Firmware Upgrade 75 10 Troubleshooting 77 10 1 Common Problems 78 10 2 Setting the Ou...

Page 4: ...benefits include Ghost free reception Widescreen 16 9 pictures Standard Definition television SDTV and HDTV programmes High quality audio and surround sound Multi channel programming Closed captioning...

Page 5: ...eceive updates for the software that controls it Normally these updates will occur automatically Over The Air OTA Firmware update can also be achieved via USB and over the internet These updates may p...

Page 6: ...s Press either for Samsung for Hitachi for Sharp for Panasonic for Sony for LG for Philips for Toshiba for Pioneer for JVC Then go to step 6 For other TVs Step 3 Press the button you want programmed f...

Page 7: ...gic TV unit needs to be told which remote to listen to in Settings System Advanced Settings Remote Control Selection For example if you wish to use two Magic TV units in the same room then each unit w...

Page 8: ...al Digital Audio Connects to an AV receiver or home cinema system If you are not using the audio over HDMI then this connection will provide multi channel digital audio to your surround sound system O...

Page 9: ...ndicator Lights if Magic TV is currently recording Scheduled Recording indicator Lights when Magic TV has been set to record a future programme Playback Indicator Lights when a Recorded Programme is b...

Page 10: ...Tuner Ant In Loop Out Network USB HDMI YPbPr Audio Digital Audio L R Composite Video Pb Pr Y 12V DC ON OFF S Video HDTV Tuner Ant In Loop Out Network USB HDMI YPbPr Audio Digital Audio L R Composite...

Page 11: ...o L R Composite Video Pb Pr Y 12V DC ON OFF S Video HDTV Tuner Ant In Loop Out Network USB HDMI YPbPr Audio Digital Audio L R Composite Video Pb Pr Y 12V DC ON OFF 3 Cabling Audio For HDTVs without HD...

Page 12: ...ideo Antenna HDMI INPUTS HDMI HDMI HDMI HDMI YPbPr component Television AV Amp Receiver YPbPr component YPbPr component in YPbPr component out Audio Video Antenna HDMI INPUTS AV Amp Receiver Coax or O...

Page 13: ...a on the disk will be lost and that the file system will be EXT2 which may not be readable on a PC without third party software If you prefer to format your drive using Windows there are several third...

Page 14: ...29 28 4 1 Getting a Picture 30 4 2 Welcome to Magic TV Guided Setup 30 4 Guided Setup...

Page 15: ...e the Video Output Format using the front panel display 4 2 Welcome to Magic TV Guided Setup Do you want to continue Choose yes to be taken through Magic TV setup Step 1 Please select the best Video O...

Page 16: ...ided setup is now complete You can now view Live TV view the Electronic Programme Guide or take a look at some of the other setup options If you wish to return to Guided Setup at any time it can be fo...

Page 17: ...mme so that you can catch up later see section 6 10 Jumps to the Recorded Programmes List Cycles through the available Audio languages Cycles through the available Subtitle languages Magic TV Menu Pre...

Page 18: ...eview Guide Channel logo and date for the listings shown below Button hints Press these buttons for extra features Programme times and names Scroll through the programmes Synopsis for the currently hi...

Page 19: ...l shape Magic TV removes the sides and evenly stretches the image to fill the screen If a programme appears stretched in Full mode this mode could correct it by adding black bars to the sides or top a...

Page 20: ...eries option see section 6 3 These are shown on the EPG as an S instead of an R for single recordings Timer Recording Manually setting a time for Magic TV to record To Do List This is where you can vi...

Page 21: ...ight hand list All programmes Not yet viewed Trash 6 Recording and Playback 43 6 5 Viewing and Amending Scheduled Recordings Using the To Do List The To Do List can be found under Main Menu Recording...

Page 22: ...Main Folder View Repeat Recordings HDD Selection If there are multiple Hard Disk Drives attached to Magic TV you can browse Recorded Programmes on individual disks by pressing whilst in the left hand...

Page 23: ...ed Programme List there is a Filter called Trash When a programme is highlighted and is pressed you will have the following options Undelete this This will restore the programme and it will programme...

Page 24: ...ed Programmes Once a recording has been selected from the Recorded Programmes List playback will begin During playback you get all the features you would expect from a video recorder such as pause fas...

Page 25: ...ll Instant Rewind may not be available When Magic TV is recording two channels concurrently Instant Rewind is only available on the two channels being recorded The recording buffer is automatically re...

Page 26: ...make a note of your number as the only way to reset the PIN is to do a full factory reset of Magic TV which will lose your personal setup options 52 6 Recording and Playback 6 Recording and Playback...

Page 27: ...go to Settings Parental Control Level Setting and select the level you want blocked Levels above this will also be blocked The default PIN is 0000 and you can change this in Settings Parental Control...

Page 28: ...l more News and Weather information is obtained from the Internet Pixel Magic does not guarantee the accuracy or reliability of any information 7 3 HD Camcorder Movies Magic TV can browse copy and pla...

Page 29: ...59 58 8 1 Info Format 64 8 2 Video 65 8 3 Audio 66 8 4 Recording 67 8 5 Playback Setup 69 8 6 Channel Setup 69 8 7 Guided Setup 70 8 8 Parental Control 71 8 9 System 71 8 Magic TV Settings...

Page 30: ...ack of recorded programmes Magic TV will display a logo for 3 seconds at 10 second intervals This setting allows you to turn the logo off Timeshift OSD Logo Off On During Live Pause and Instant Rewind...

Page 31: ...Magic TV Settings 63 default setting 8 3 Audio HDMI Audio Out Off On Auto HDMI is unique in that it can transmit both video and audio along the same cable This menu allows you to select whether or not...

Page 32: ...ing is changed You can also set this time for individual recordings See section 6 8 for further information on Keeping Recordings Auto Standby Off On If Auto Standby is switched on Magic TV will autom...

Page 33: ...s 66 8 Magic TV Settings be stopped at any time and any found channels will be available to view When the scan has finished Magic TV will jump to Live TV Manual Channel Scan Magic TV can be made to sc...

Page 34: ...the Guided Setup process Firmware upgrade From time to time Magic TV will receive updates for the software that controls it It is important that your firmware is up to date as new features bug fixes...

Page 35: ...automatically download and install firmware updates You can turn this feature off here User Prompt to Upgrade Yes No If Auto Firmware Upgrade is On Magic TV will by default ask permission to start do...

Page 36: ...working firmware will only be overwritten if the upgrade firmware is successfully loaded This process safeguards against power cuts and similar interruptions Automatic Upgrade over the Internet If Mag...

Page 37: ...during the upgrade process Finish Once the firmware has been upgraded Magic TV will restart automatically If Magic TV finds new firmware online it will always upgrade to that instead of any USB firmw...

Page 38: ...m Possible causes Solution 76 Remote control is not working No batteries or batteries incorrectly inserted Batteries are flat Infrared receiver on Magic TV is obstructed Insert the supplied 4x AAA bat...

Page 39: ...the front panel display to change the format to one supported by your TV 1 Press 2 The front panel should read Live TV 3 Press until the display reads Settings Press 4 The front panel should now read...

Page 40: ...81 80 11 Support Warranty...

Page 41: ...e current market rate 11 Magic TV is not liable for any other loss other than the unit itself 12 Nothing contained in this warranty shall be read or applied so as to affect the right of the consumer i...

Reviews: