30
Exploring with TR7
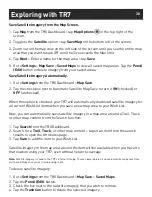
Save Satellite Imagery from the Map Screen.
1. Tap
Map
from the TRX Dashboard > tap
Map Options
in the top right of the
screen.
2. Toggle to the
Satellite
option > tap
Save Map
on the bottom left of the screen.
3. Zoom out on the map view on the left side of the screen until you see the entire map
area that you want to save OR until the Size exceeds the Max limit.
4. Tap
Next
> Enter a name for the map area > tap
Save
.
5. Go to
Settings
>
Map Save
>
Saved Maps
to view all saved map areas. Tap the
Pencil
(Edit)
button to delete imagery from your saved areas.
Save Satellite Imagery Automatically.
1. Go to
Settings
from the TRX Dashboard >
Map Save
.
2. Tap the check box next to Automatic Satellite Map Save to turn it
ON
(checked) or
OFF
(unchecked).
When this option is checked, your TR7 will automatically download satellite imagery for
all current Wish List items when you save a new map area to your Wish List.
Now, you can automatically save satellite imagery in a map area around a Trail, Track
or other map content from the Search function:
1. Tap
Search
from the TRX Dashboard.
2. Search for a
Trail
,
Track
, or other map content > tap on an item from the search
results to open the Attributes page .
3. Tap
Save
to add the item to your Wish List.
Satellite imagery in the map area around the item will be available when you travel to
that location using your TR7, even without network coverage.
Note:
Satellite imagery is saved to the TR7’s internal storage. To save space, delete all unused satellite map areas from
your Saved Maps once you’ve finished using them.
To delete satellite Imagery:
1. Go to
Settings
from the TRX Dashboard >
Map Save
>
Saved Maps
.
2. Tap the
Pencil (Edit)
button.
3. Check the box next to the satellite imagery that you wish to remove.
4. Tap the
Trash Can
button to delete the selected imagery.


