background image

Magellan eXplorist 110 User Manual 

1

Using the Magellan eXplorist

The Magellan eXplorist GPS receiver is designed to be easy enough for the casual explorer as well as having all 

of the advanced features the enthusiast requires.   This chapter provides information on the basics of using the 

Magellan eXplorist GPS receiver. 

Use of the Joystick to Select or ENTER.  Throughout this manual you will be asked to ‘select’ a button or icon.  

This is done by using the joystck (left, right, up, down) to highlight the item on the display.  Pressing down on the 

joystick provides the ENTER command to the receiver.

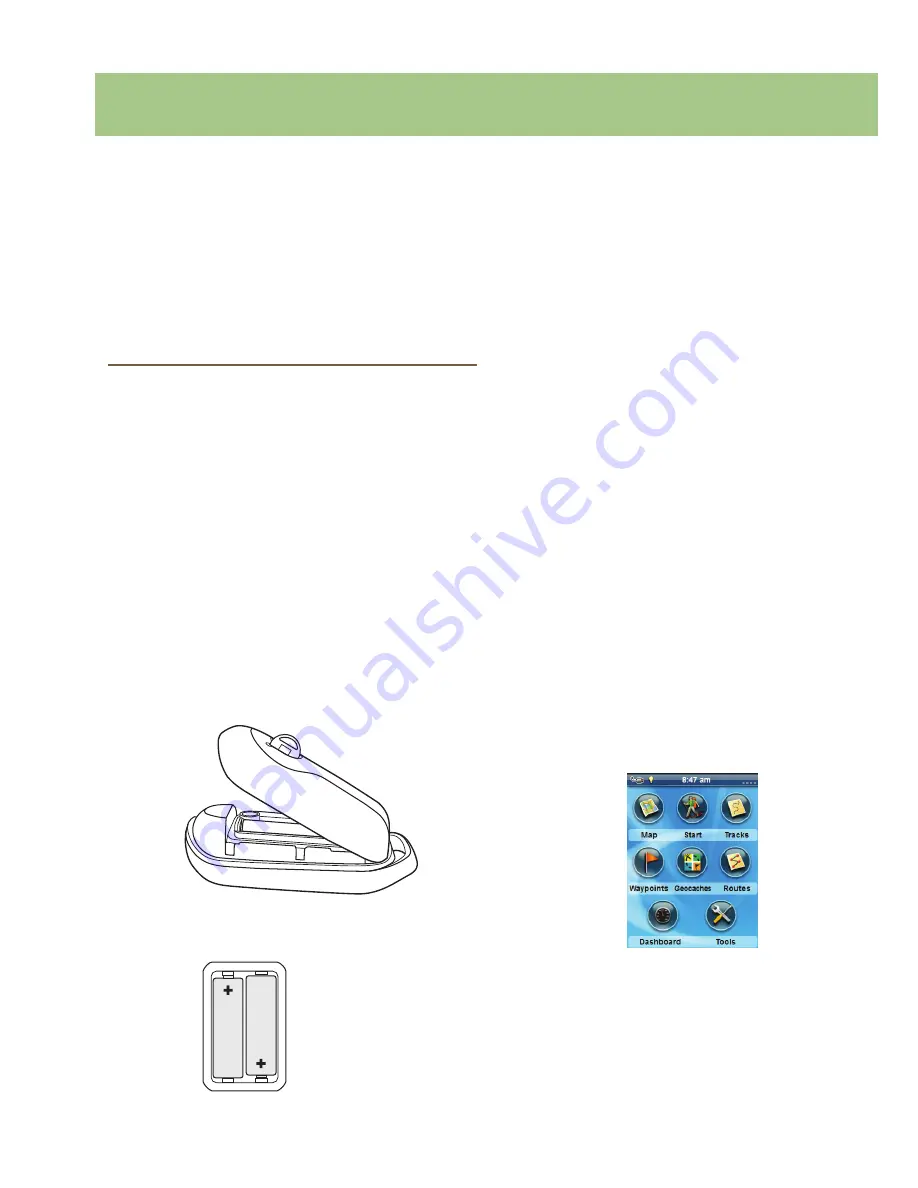
Installing the Batteries

The Magellan eXplorist GPS receiver uses two 

AA batteries that provides 18 hours of normal use.  

(See the section on Power Settings for details as to 

how to extend the battery life.)  Lithium, alkaline or 

rechargeable batteries can be used but both batteries 

need to be of the same type and should be defined 

in the Tools > Power function in the receiver (see 

Setting Battery Type).

Replacing the Batteries

1. 

Remove the battery door by raising the arm 

on the battery door lock and turning it counter 

clockwise for one-quarter of a turn.

2. 

Remove the battery door.  The battery 

door pivots from the bottom.  The 

pivot points will release when the top 

of the battery door is being raised.   

3. 

Install two AA batteries as shown.

4. 

Replace the battery door by first aligning the 

pivot tabs at the bottom of the door with the 

receiver.  

5. 

Lower the battery door until it seats firmly 

against the receiver.  (Note:  you may need to 

turn the battery door lock counter clockwise to 

allow the door to seat against the back of the 

receiver.)

6. 

Turn the battery door lock clockwise, locking 

the door in place.  

Setting the Battery Type

You should set the battery type whenever you put in 

batteries of a different type.  Battery life indicators 

may not be accurate when using batteries that have 

not set in Battery Type.

1. 

With the receiver on and the Map screen 

displayed, press the 

BACK

 button.

2. 

The Menu screen is displayed.  Use 

the joystick to highlight the Tools 

icon.  Press the joystick to Enter.  

3. 

Select Settings (use the joystick to highlight 

Settings and press the joystick for Enter.)

4. 

Select Power.

5. 

Select Battery Type.  A drop-down menu is 

displayed.

Summary of Contents for eXplorist 110

Page 1: ...User Manual MiTAC Digital Corporation 471 El Camino Real Santa Clara CA 95050 www magellanGPS com Magellan eXplorist 110...

Page 2: ...id the warranty No part of this guide may be reproduced or transmitted in any form or by any means electronic or mechanical including photocopying and recording for any purpose other than the purchase...

Page 3: ...ty to operate this equipment The Magellan eXplorist must be installed and operated at a distance no closer then 8 inches 20 cm from the user This Class B digital device meets all requirements of the C...

Page 4: ...Maximum normal use temperature is 66 C 2010 MiTAC International Corporation The Magellan logo Magellan and eXplorist are registered trademarks of MiTAC International Corporation 112 0025 001 A...

Page 5: ...iver On 2 Turning Receiver Off 2 Conserving Power 2 Setting Active Suspend Timer 2 Setting Power OFF Timer 2 Setting Backlight Brightness 2 Setting Backlight Timer 3 Dashboard 3 Accessing the Dashboar...

Page 6: ...ccessing Pan Mode 6 Creating a Waypoint in Pan Mode 6 Dashboard Screens 7 Displaying the Dashboard Screen 7 Changing the Dashboard Screen 7 Compass Screen 7 Satellite Status Screen 7 Altimeter Screen...

Page 7: ...with Send to GPS Detail Page 12 The Magellan Communicator 12 Direct installation of the Magellan Communicator from www magellangps com 12 Installing Geocaches Drag n Drop 12 Installing Geocaches with...

Page 8: ...g Hunting Times 15 Sun Moon Rising and Setting Times 16 Using Sun Moon Times 16 Help 16 Accessing Help Files 16 Play Product Demo 16 Accessing the Product Demo 16 Stopping the Product Demo 16 Screen C...

Page 9: ...ils 18 Toggling Position Destination Lines On Off 18 Toggling Origin Destination Lines On Off 18 Toggling Track Lines On Off 18 Setting Geocache Waypoints Display Criteria 18 Setting Waypoint Display...

Page 10: ...ordinate Type 20 Setting Coordinate Accuracy 20 Setting Coordinate Datum 20 Selecting North Reference 21 Setting Altimeter Source 21 Memory 21 Clear Memory from Device 21 Restoring Factory Defaults 21...

Page 11: ...Remove the battery door by raising the arm on the battery door lock and turning it counter clockwise for one quarter of a turn 2 Remove the battery door The battery door pivots from the bottom The pi...

Page 12: ...e display 3 Select Settings 4 Select Brightness Volume 5 Select the Brightness slider to set the desired backlight brightness 6 Select the type of battery installed Alkaline Rechargeables or Lithium 7...

Page 13: ...n and the Map screen displayed press the BACK button 2 Select the Tools icon at the bottom of the display 3 Select Settings 4 Select Brightness Volume 5 Select the Backlight Timer A drop down menu is...

Page 14: ...ed to access the Main Menu Keyboard Entering text and numbers is done by the use of a displayed keyboard Accessing the different keyboard layouts is done by Selecting the left or right arrows Uppercas...

Page 15: ...g Zoom Levels 1 Use the Zoom or the Zoom buttons to change the zoom level 2 The map scale will change and can be identified by the map scale in the lower right portion of the map NOTE If you are in a...

Page 16: ...3 Modify and save the waypoint as described in the chapter on Waypoints Navigation Lines Navigation lines are displayed on the map providing you with route destination indicators and active track Acti...

Page 17: ...the top of the display are customizable see Customizing the Data Fields The graphic displayed that is used for the compass is customizable as well Satellite Status Screen The Satellite Status screen...

Page 18: ...0 except for the Data Only screen which has a minimum of 1 Changing Displayed Data 1 Access the Dashboard screen you want to change the data displayed 2 Press MENU 3 Select Edit Nav Fields Not availa...

Page 19: ...to select All or just show Favorites 5 Select the Back button to return to the list of waypoints Searching for a Saved Waypoint 1 Access the Waypoint list 2 Press MENU 3 Select Sort Search 4 Select t...

Page 20: ...point Description page is displayed 7 Edit the waypoint as needed 8 Select the Disk icon 9 Select Save as Waypoint 10 Confirm the save Saving Your Current Location as a Waypoint 1 While viewing the Ma...

Page 21: ...r Pocket Queries Installing Geocaches Send to GPS Installing Geocaches with Send to GPS List Page 1 Go to www geocaching com on your browser 2 Use the search tools on geocaching com to view a list of...

Page 22: ...saving geocache files until you have all you want for this session 9 Open the MAGELLAN device that has been installed on your computer Installing Geocaches with Send to GPS Detail Page 1 Go to www ge...

Page 23: ...elect the name of the geocache to be routed to 3 Press MENU 4 Select Go The geocache is displayed with a projected route from your current position to the geocache 10 Open the Geocaches folder in the...

Page 24: ...increased accuracy 5 Select Done 6 Select the Geocache Name to edit the name with the keyboard 7 Select the Difficulty and Terrain stars to indicate the level of difficulty 5 stars is the most difficu...

Page 25: ...y 1 Access the Tools Menu 2 Select the Track Summary button Waypoint Projection A waypoint can also be created by entering the distance and heading for the waypoint from your current location Projecti...

Page 26: ...he Sun Moon button Select the calendar and the arrows to the left and right of the month to select a day to view Help Use this tool to access Help files stored in the receiver Accessing Help Files 1 A...

Page 27: ...main on without a screen touch Adjusting Volume 1 Access the Settings Menu 2 Select the Brightness Volume button 3 Highlight the Volume slider and use the joystick to increase or decrease the speaker...

Page 28: ...play Track Up Course Up or North Up Setting the Number of Map Fields 1 Access the Settings Menu 2 Select the Map Options button 3 Select the Map Fields drop down menu and select how many data fields w...

Page 29: ...on 3 Select the Arrival Distance drop down menu and select the distance from your destination that the arrival alarm will sound Setting Waypoint Display Style 1 Access the Settings Menu 2 Select the M...

Page 30: ...the Coordinate Accuracy drop down menu and select the desired accuracy Setting Coordinate Datum 1 Access the Settings Menu Setting the Waypoint Proximity Alarm 1 Access the Settings Menu 2 Select the...

Page 31: ...Copyright Info 2 Select the Navigation button 3 Select the Coordinate Datum drop down menu and select the desired datum Selecting North Reference 1 Access the Settings Menu 2 Select the Navigation bu...

Reviews: